6

After I level my Ender 3, the distance between the nozzle and the bed seems fine on both ends, but moving the bed on the Y axis shows that it's increasing and decreasing for three times, which I just cant fix.

This only occurs on the left side - the right side is constant from beginning to end. Also I've been using three different beds (the magnetic one and two glasses) to make sure it's really something else.

I created this video to demonstrate the problem.

I'm sure that this has something to do with the carriage wheel adjustment, but tightening those did not change anything.

How do I get rid of this problem?

0scar
  • 32,029
  • 10
  • 59
  • 135
1125
  • 83
  • 1
  • 5
  • I'm having the same problem on my Geeetech A10m (Ender 3 clone), but the distance changes on X and Y axis. Did you find a solution? I know the bed is not warped, so the answer bellow doesn't work for me. – Davide Feb 16 '19 at 13:19
  • I switched the carriage wheels and tried to tighten things differently, which really changed the position of the increases and decreases. Tightening them seemed to have the most positive effect. – 1125 Feb 16 '19 at 23:58
  • @Davide if your bed is not warped, then it should be just slanted in one direction or incorrectly leveled. – Trish Feb 17 '19 at 00:06
  • Messing with the eccentric nuts for the X axis seems to make a difference, but didn't really fix anything. I also noticed a change in the noise the printer makes when the head lifts, as if the vibration from the fans is transfered more to the frame. It almost seems as if the X axis is twisting or something. Or maybe the wheels are just bad... – Davide Feb 18 '19 at 11:58

3 Answers3

4

Your video shows that your bed seems warped somewhat.

Ammount of error

As I assume you did level the bed with a sheet of paper to be 0.1 mm thick, we can estimate the change of thickness. The thickest point seems to be 0.2 mm, the thinnest 0.05. that's in average an error of 0.075 mm for the first layer. If you can live with that, no need to touch it.

Fixing the issue

Basically, if the error is too large for your liking, you need to fix it. To fix it, there are pretty much 2 ways. Remember that the Ender-3 uses 24V when ordering parts!

Fix the part or install a replacement part

If you feel like you need to get it even flatter, you'll need to try to flatten the bed mechanically or replace it. You'll need to be comfortable to remove the BuildTak-clone surface, then remove the leveling screws, open the electronics enclosure, remove some hot glue, unhook the bed.

Then you will need to flatten the bed in some way (grinding the upper side perfectly flat or bending it, replacing it for an entirely flat one).

Then reinstall it, going through the uninstallation backward, and add a new build surface on it.

Switch to alternate leveling method: Mesh Bed Leveling

If you consider yourself to be able to do some intermediate to advanced modification of your printer, you can change the hotend carriage to one that allows mounting a distance sensor and changing the firmware to mesh-bed-leveling.

You'll need to get an induction or capacity sensor (common operation ranges for those are 6-36V, so perfectly fine with 24V) and some way to couple that to the board, most likely an optocoupler. Print a new mounting for sensor and fans.

To install you open the electronics compartment, hook up your chosen 24V-5V coupler as extra to the Z-switch, hook the power supply of the sensor up and run it up to the printhead. Replace the mounting for the hotend cooling fan and part cooling fan and change your firmware. Calibrate the height of the sensor to trigger correctly.

I did flash a bootloader via the ISP on my ender-3 since then, so I can just flash the new firmware via a direct connection.

Last words

In either way, after fixing, you should run a PID-tune on the machine.

Thermal Runaway might or might not be active, depending on your firmware iteration, so you should update it anyway, which might make Mesh Bed Leveling the slightly easier way to go.

This has nothing to do with the bed carriage wheels, as the bed hangs onto the carriage only via the screws in the corners.
Trish
  • 20,169
  • 10
  • 43
  • 92
  • 1
    With that average error being so small mounting a sensor seems to be the best/easiest/cheapest(?) option and there are several videos on YouTube on mounting such on an Ender 3. – Lux Claridge Feb 04 '19 at 15:39
  • @LuxClaridge True. Note though, that Mesh Bed Leveling isn't that simple to set up, it is what I would consider *intermediate* or *advanced* thing, as you need to flash firmware and substantially modify the machine. – Trish Feb 04 '19 at 15:51
  • Though it's getting easier. TH3D's Unified Firmware includes the Ender 3 and one only has to uncomment a few lines (as opposed to changing Marlin directly). Either way, modifying the machine has to be done, I think adding a mount is a lesser mod than potentially replacing the bed. – Lux Claridge Feb 04 '19 at 16:06
  • 1
    @LuxClaridge well, I think replacing is "simpler", but gave a rundown to both variants. – Trish Feb 04 '19 at 16:20
2

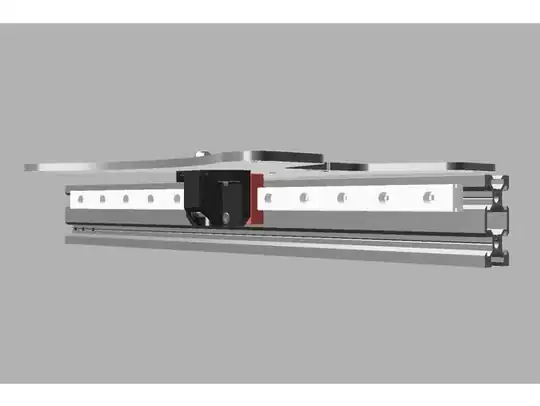
I managed to get rid of the problem by installing a linear rail for the y-axis! enter image description here

Used this mod from thingyverse: https://www.thingiverse.com/thing:3064275

There are also solutions out there which are placing a linear rail on the left AND right side, but since for me the problem was only on the left side, this seemed sufficient (and was).

1125
  • 83
  • 1
  • 5
0

Blue Painters tape on the left side starting at the center and leaving a band on the far left side and the rear Perfetto side. I checked the before and after and the thickness of the tape shimmed out the deflection on the plate. It sounds like whatever the use to stamp the steel out is creating the bend we are only talking several thousands of an inch but when I put a flat edge on the plate and shined a light from the rear I could see daylight. The blue tape was from Nearys video on creality cr-10 bed leveling.