13

I'm new to 3d printing, so I might be missing something obvious. If so, please let me know.

I printed my model successfully yesterday, but today I'm trying to print the same model and the first layer refuses to adhere, which means at best several layers after that are messed up if it manages to recover, but usually it just means I have to cancel and start again.

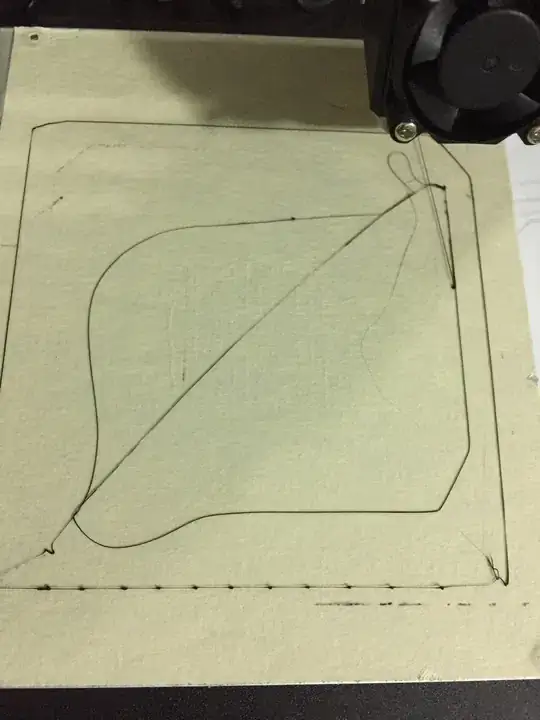
It will print one horizontal line (across the x axis), then when it tries to vertical line (across the y axis) the horizontal line doesn't adhere and gets dragged along with the print head and everything is screwed up.

I've tried leveling the bed over and over again. (I use a sheet of paper and try to slip it between the bed and printhead. I adjust the bed so that I feel a bit of resistance as I push and pull the paper under the printhead.)

I've tried increasing the preheat on the printhead and on the bed. I'm using black PLA 1.75mm that says it has a print temp of 205-225. I've tried printing at 205, 210, 215, 220, and 225. I've tried a bed temp of 50, 55, 60, 65, and 70.

I've tried setting the print speed multiplier to 0.5 to give it time to adhere, but no changes.

I'm trying to print something a wireframe cube that is at the extent of my printable size, so I don't know of a way to use a raft or a brim to help adhesion.

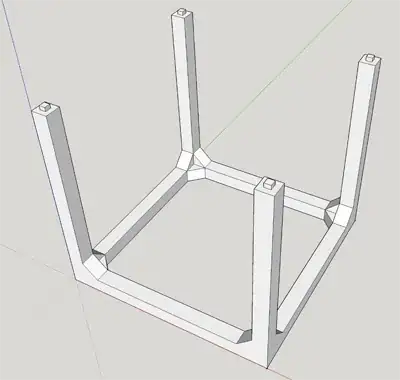
This is what my model looks like:

my wifeframe-ish partial cube model

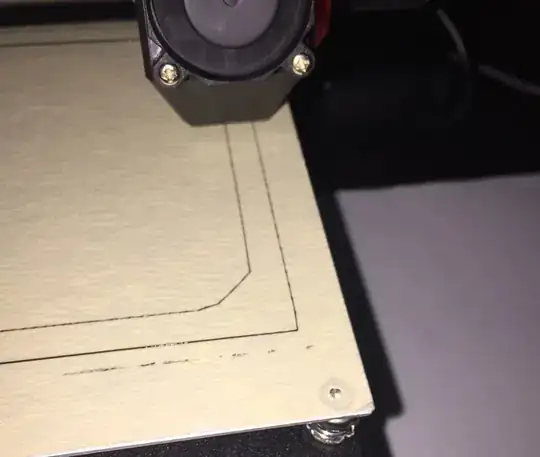
When I printed a good one yesterday, here is what the first two lines looked like:

good first layer

When I print today, even after multiple attempts to level the bed, this is what the first layer tends to look like:

enter image description here

I'm using a Monoprice 15365. I created my model in SketchUp, then exported as STL, which I imported into Cura 2.3.1. Then I used Cura to export a gcode file to an SD card. I put the SD card into my 3d printer and printed from there.

Any advice is welcome. I don't know if the problems I'm having are because the bed is too low or too high or too hot or too cold or if the printhead is too hot or too cold... nothing I've tried seems to change the results.
Kenny Wyland
  • 405
  • 4
  • 13
  • What are you printing on - white painter's tape / masking tape? – vwegert Jan 05 '17 at 07:47
  • Print a large skirt or brim around your object. Now you have time to adjust the bed level to the correct height. – Gunslinger Jan 05 '17 at 08:27
  • @vwegert It's whatever came with my 3d printer (as I said, I'm brand new). It appears to be one giant sheet of a material like masking tape. – Kenny Wyland Jan 05 '17 at 20:10
  • @Gunslinger The screws to adjust the height are on top of the bed, so I'd be really worried about the allen wrench getting in the way of the machine. :/ The model I'm trying to print is as big as my max print size, so I don't think I have any extra space for a brim or raft. – Kenny Wyland Jan 05 '17 at 20:16
  • 1
    I stopped using paper as a feeler gage to set the gap between the nozzle and bed and just bought a set of metal feeler gages for a few dollars. A small but noticeable improvement. – DLS3141 Jan 06 '17 at 03:11
  • I threw away the white cheap-o masking tape that came with my printer right at the start and bought a roll of blue tape. That helped a lot, but in my case, it clearly was some cut-off crap stuck into the packaging to make it look complete. – vwegert Jan 06 '17 at 07:50
  • I've been trying all of the suggestions below and not getting any improvements. I've been watching a bunch of YouTube videos and I've been inspecting the machine while it prints, etc.. and I'm starting to think my nozzle is clogged. I don't think enough material is coming out and THAT is why it is sticking. I'm getting these tiny, almost hairline, plastic lines, but when I watch videos of the same printer I see nice, thick lines being laid down. – Kenny Wyland Jan 15 '17 at 22:29

6 Answers6

14

Your nozzle is clearly too far from the bed. The plastic should be squashed down slightly. Some firmwares have an option where you can adjust the height of the nozzle "live" during the first layer, in Marlin this is called "babystepping". This can be very useful because you can get the height correct without having to mess with the physical leveling of the bed.

Tom van der Zanden
  • 14,588
  • 2
  • 33
  • 60
9

Eureka! All of the other answers and suggestions on this post were all very helpful, and would likely be the right answers 90+% of the time, but they didn't give me any relief. I spent a bunch of time watching YouTube videos about 3D printing and I started to notice a difference in size of the lines of plastic being laid down on the build plate.

In the videos, the lines of plastic looked bigger. Mine were very fine lines. That lead me down a series of different search terms until I found some other videos that talked about nozzle cleaning.

I noticed that one of the symptoms they mentioned was that when the plastic would come out of the nozzle that it would curve around. That's a sign that it's partially blocked and causing it to bend and curve. After the people in the YouTube videos cleaned their nozzle, the plastic would then extrude and drop straight down.

If my nozzle was partially blocked and only about half the right amount of plastic was coming out that would make sense since there wouldn't be enough surface area of the plastic to make a good connection to the build surface.

I acquired some 0.4mm drill bits from Amazon and followed the instructions on this YouTube video.

Sure enough, when using the 0.4mm drill bits, I could tell the nozzle was clogged. After clearing it out, the plastic started extruding in a straight line down, just like the video. I was stoked!

I tried another print and it was NIGHT AND DAY. I was finally getting nice plump lines that stuck to the build plate. I still had an issue or two on certain parts of my build plate, but I think that's because in all of my tries I had damaged the masking tape. I put down new blue tape and started up my print and it's BEAUTIFUL.

Thank you all very much for your help. Hopefully, this will be helpful to someone else as well.

Kenny Wyland
  • 405
  • 4
  • 13
6

Your photo has shadows which seem to suggest that your tape layer has some wrinkles. That won't help. Try removing that tape and laying down the fabulous blue painter's tape.

If you read any dedicated forum for plastic extruder printers, you'll find plenty of claims that X or Y is the best way to guarantee adhesion. Some folks swear by glass+gluestick, others by PEI sheet, and so on. The only general consensus is that use of a brim or a raft is highly recommended so as to increase the total contact area.

Carl Witthoft
  • 3,008
  • 1
  • 9
  • 15
5

I've been struggling to work out what is wrong with the process where you claim to be leveling the bed OK (and the print is starting in mid air). Now I remember I had exactly the same problem with my first prints.

I think you are leveling OK, but getting some binding in the Z-axis. As the head jumps to start printing, it goes up, then down (but not as far due to some mechanical problem). So although your Z-endstop is aligned with the bed, after finding the zero, the head is not reliably able to move and return to zero.

Check these questions for more detailed ideas about how to fix this:
Z-axis steppers and bed alignment problems
z-axis hard to move in some areas - what could be faults, how to improve?

You can try and confirm my diagnosis by zeroing, them moving Z-position up 2/3 of the full travel, and back down. See if it is still at the position where you leveled it to.

If it is not this, I suspect your Z-endstop may be giving unreliable results. Check the microswitch is securely mounted. I ended up replacing mine with an optical sensor, and have seen huge improvements in repetability (<0.1mm rather than around rms 0.3mm from zero to zero)

Sean Houlihane
  • 3,712
  • 2
  • 18
  • 39
2

I find 60-65 for bed. You are COOKING your pla. 175-200 unless you are a fast / expert. That said get rid of the tap. Use a Elmer's glue stick. Also set first layer speed to 30% and do like 130% material for layer 1. Let us know what happens!

Agree with Tom. Likely your too high up. I take a piece of paper and try to get the distance just so when moving the paper between the nozzles and the bed it has some resistance but not too much.

StarWind0
  • 3,023
  • 3
  • 12
  • 29
  • Some folks swear by gluestick; others by blue tape. I've found, as Tom's answer suggests, that getting the first layer squished is ideal. I agree his temps are high, but I've had great success at 205, and up to 230 when using wood-filled PLA. – Carl Witthoft Jan 05 '17 at 12:17
  • I used to do blues but its a lot better with glue sticks. Mine is the same but more subtle, hence the 130% flow on the first layer. Wood PLA would be different. Wood has less thermal conductivity thus higher temps – StarWind0 Jan 05 '17 at 17:33
  • @StarWind The reason I'm using the high temps is because the spool of PLA says that temp range on it. It's definitely higher than what I've seen for other PLAs when I search online, but it explicitly says on the spool that it has a 205-225 print temp. – Kenny Wyland Jan 05 '17 at 20:18
  • Re: 130% material flow on layer 1, is that a setting that I would need to configure on software like Cura and then do I have to print FROM Cura or is that 130% material setting something that can be represented inside the gcode file so I'm still able to print from an SD card inserted directly into the printer? – Kenny Wyland Jan 05 '17 at 20:19
  • I use simplify 3d. Its under settings, layer, first layer height % for S3d. So yes it is a setting in your slic3r. You do not need to do more then generate the GCODE with this setting. – StarWind0 Jan 05 '17 at 20:21
  • Thanks, I'll look for that type of setting in Cura, or I'll find another app to generate my gcode. – Kenny Wyland Jan 05 '17 at 21:04
1

You can use the masking tape as base, however the height of nozzle is higher than required. Check that your fist layer height is 70% lower than your nozzle size. In my opinion this can be the step layer minus 0.05, for example layer height is 0.2, then my first layer is 0.15, this makes that the material squizes a little more.

If this is not possible you might change the offset of printing level until you reach the height required.

Manually you can add some layers of masking tape to minimize the overgap within the nozzle and bed. (some times I do this, due mi home 3D printer gets out of calibration on changing nozzles)

For PLA i´m using 210°C because using 190 and 200 makes some balls like your photo. also try to use a lower speed like 90 or 80 % to allow a good melting inside the heater.

Fernando Baltazar
  • 1,420
  • 3
  • 13
  • 21