8

I've actually solved this, but I think its still a useful question which I don't think is easy to answer with existing questions.

As soon as I'd built my ANET-A8 (Prusa i3 DIY kit), I found I was having problems with the extruder crashing into the bed. Although I thought I'd adjusted the bed leveling OK, the calibration seemed to keep getting messed up.

I tracked this down to two factors. First, I was winding the extruder head up some distance before loading the filament and starting a print. Second, at roughly half-way up the axis, the right-hand thread seemed to be getting stuck (more often when moving up than down).

What wasn't clear (and not mentioned in the building instructions) was what might cause this problem.
Sean Houlihane
  • 3,712
  • 2
  • 18
  • 39

3 Answers3

6

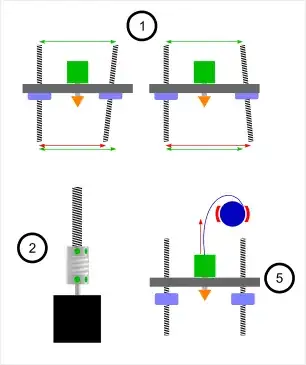
I assume you did everything according to the instructions but here is a checklist of what could be possibly wrong:

  1. Friction - check if you can rotate/move parts without lot of resistance
  2. Screws - check if screws on couplings are tight and they don't slide over a shaft or thread
  3. Stepsticks - check if they are cooled properly and similar (as there are two of them)
  4. Carriage nuts on threads - check if they do not slide out of their nests while [the x-axis] carriage goes up
  5. Filament - check if filament unrolls without resistance which can eventually cause [the x-axis] carriage to hang.

IMO #2 and #3 are the most possible cause

Diagram of issues 1, 2 and 5

Greenonline
  • 5,831
  • 7
  • 30
  • 60
darth pixel
  • 3,438
  • 1
  • 11
  • 20
3

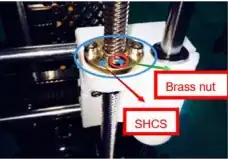
So after reading the instructions more carefully, ANET do cover this in their operating instructions under troubleshooting. On closer inspection, I realised that the brass nut following the right hand thread seemed to be out of alignment with the stepper at the bottom. Fiddling with the flexible coupling helped a bit, but what I needed to do was place the assembly at the tight point, slacken the 3 bolts marked SHCS in the diagram, then tighten them again. I was expecting I might need to open out the holes, or re-make the white (factory printed) part, but this wasn't necessary.

From ANET manual

Sean Houlihane
  • 3,712
  • 2
  • 18
  • 39
  • 1
    ha! so there is caret nut :) it's good to hear you've solved it (btw: my suspicion about 1. assembling according to instruction was priviledged) ;) and 2. that there is a problem was priviledged too) – darth pixel Nov 21 '16 at 11:42
  • 1
    I don't think `caret nut` is a real word. It is probably a mistranslation. – Tom van der Zanden Nov 21 '16 at 12:53
  • 1
    @darthpixel - I would wager that `caret` actually means `carriage`, as in _the x-axis carriage_. Mostly because of the phrase in Tom's answer, _which can eventually hang caret_, which probably should be _which can eventually hang [the x-axis] carriage_ – Greenonline Nov 21 '16 at 16:57
  • where did you find this under troubleshooting, I think Im having the same issue. Can't find what you are refereing to. – user6668 Apr 04 '17 at 21:38
  • 1
    Found it in the A8 Operation instruction-1.1.pdf file provided on the SD card, page 66 – Cactusbone Jan 20 '19 at 12:50
0

From http://3daddict.com/anet-3d-printer-common-mistakes-fix/

The motor shaft and the threading rod must have space between them in the flexible coupler.

That means unlocking the coupler from the motor shaft and moving it up a bit, in the end the threaded rod nearly touches the printer top hole instead of having like a 1cm gap. This will allow the coupler to flex, and thus should handle small misalignments of the brass nut.

That's about point 2 of @darth-pixel answer, but before locking the screws, make sure to have empty space between rod and motor shaft

Cactusbone
  • 101
  • 2