TL;DR
The settings that you seem to need can be found here: Print One At a time settings? CURA:
You actually can!
Providing that none of your object is too tall (taller than the Gantry
clearance). Also the objects cannot be too close from each other (when
you activate the option and move objects on the bed, you see a gray
box around them showing this limit).
The reason you cannot use it at the moment is probably because you
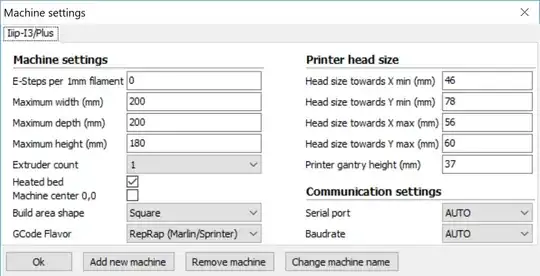
didn't filled the printer head size parameters (Menu "Machine ->
Machine Settings..."). You will have to measure them, but on mine
(Australian clone of the i3) I use those values and it works fine:
- Head size toward X min: 30
- Head size toward Y min: 70
- Head size toward X max: 60
- Head size toward Y max: 50
- Printer gantry height: 35
Those are "conservative" values (a little bigger than the actual
values). It means I'm losing a little bed space, but I prefer that to
the risk of having the print head knocking out previous prints if one
of the measurements is too low :o).
PS: The option will automatically disable itself if some object
dimension are too big to avoid collisions
To be fair, the rest of the thread is people debating whether you can successfully achieve sequential printing, or not, with the Wanhao Duplicator I3.
However, the setting above seem to be the settings that you are looking for. Apart from Head size toward X max, they also correlate, pretty much, to the settings that you have already determined. As the poster notes, their settings are, somewhat, on the conservative side, which would explain the difference.
Extra detail
If this is so that you can achieve sequential printing1, then this may not be suitable for your printer, unfortunately. Sequential printing works best for printers with a long nozzle with nothing (fans, X-axis gantry, etc.) around it, for example a delta printer with a low hanging nozzle would be ideal. Your printer type has a wide head with attachments, as well as an X-axis gantry, and so the clearance is less than that of an (ideal) delta.
See WanHao Duplicator i3 Printer Head Size Settings for Cura for more details.
If you wish to go ahead and still try it, then from the same link:
The way to measure is lower the nozzle to the bed.
Then measure the space taken up around the nozzle by the heater block, fans, mounting, the motor, and finally, the distance between the X axis rods and the bed "WHEN the nozzle is touching the bed".
That gives you some idea of the clearance you have where an ALREADY printed object can exist on the bed and NOT get slammed into the gantry or moving head when printing a second sequential part.
Just a visual with a moving bed printer and it's not promising.
Not impossible, but in a 200mm square build area, you might really only get 4 objects at a time in the 4 quadrants.
Even that is height limited because the gantry will slam into it at a certain height.
Maybe some weird staggering pattern.
Also, of use, for obtaining your own measurements, from Ultimaker - Cura 14.07 Printer Head Size:
If I'm not mistaken all measurements are taken from the nozzle tip. So, for the first one, measure the size of your head from the nozzle tip towards the direction in X to where your machine homes.
and
There's a tooltip when you mouse over these settings which describes what they mean.
Gantry height is the vertical clearance between the build plate and your x-y gantry (on the Ultimaker, these are the 6mm shafts which hold the head).
If you print two objects - one after another - then the first object must be shorter in height than the gantry height. Otherwise, the gantry would crash into the first part while printing the second part.
In more detail, paying attention to the placing of the objects can aid with any issues that you have with a low gantry:
If you place multiple parts in a diagonal line across the build-plate so the gantry and head never intersects earlier parts after printing them, you can set the gantry height to an artificially high value, to ignore it, without problems.
I place pieces along a diagonal from right-front to left-rear, to avoid conflict when the head homes after finishing the print. I can fit 3 to 4 small but tall pieces on the build plate that way for sequential printing.
The purpose of these Printer head size settings is to enable Cura to determine the order in which the objects are printed:
... none of those settings are important as long as you only print one STL file at a time. It's when you want to print multiple objects "one at a time" that these numbers have a purpose - it allows Cura to figure out which order to print them in and if it can do them one at a time or if it has to print them all at once.
Footnote
1 Sequential Printing is where one object is completely printed, before moving on to the next object, instead of the usual method of printing all objects simultaneously one layer at a time. This method can give superior quality prints, but not always. The main advantage appears to be reduced "stringing" of filament between objects, and a cleaner surface finish, due to reduced print head movement between objects. The process is detailed in Multi-part printing.
