5

I received a Monoprice Maker Select v2 (I3 V2 clone) from my wife for Christmas. The sample .gcode files that came with the printer generally print great with no noticeable defects.

However, when I try to print miniatures for use with table-top gaming (D&D, primarily), I tend to get a lot of oozing and stringing. On top of that, bridge supports don't cool in time and tend to get fudged by the print nozzle, which results in oddities like arms being only half printed, sticking to the nozzle, and getting relocated to some other part of the print. If I use full grid supports with the most modest fill settings (8%) they end up being stronger than the miniature and are a real pain to remove.

My printer is calibrated, as level as can be (the desk it's on is slightly warped but I've got the printer in the center of the warp; there is no wobble or lean) and squared. The build plate is calibrated and set to the right height.

I'm using the version of Cura that came on the SD card with the printer (honestly not sure which one and I'm not at home to check). I've fiddled with print speed, extruder temp (ranging from 185 to 210), layer cooling, retraction settings, and tried switching to Slic3r (didn't go over well -- couldn't even get past the first layer).

I'm using Hatchbox silver PLA filament (1.75mm +/- 0.05mm). I don't have another filament I can test with to compare performance.

Even when I import the profile settings from one of the sample .gcode files I tend to end up with blobbing, pulling, and stringing all over the miniatures, in addition to missing or deformed parts. Notably, arms and hands -- most often overhangs -- tend to stick to the hotend and get repositioned, sending the whole thing out of whack.

I end up with similar problems when I use the Novice mode settings in Cura (Normal Quality, High Quality, etc).

Is there something I'm missing that I can do to improve the quality of small, detailed prints, or is the I3, as an entry-level printer, simply not up to the task? I'm especially interested in answers from users who have experience printing miniatures and their experiences in tuning for that type of print job.

A few things I've tried test printing:

Printer calibration test model v1

Printer calibration test model v3

Both of these came out very stringy, with lots of blobbing and layer pulling, especially towards the upper portions of the taller elements.

I have also tried printing these two models:

Knight with sword - high detail

Elf monk - high detail

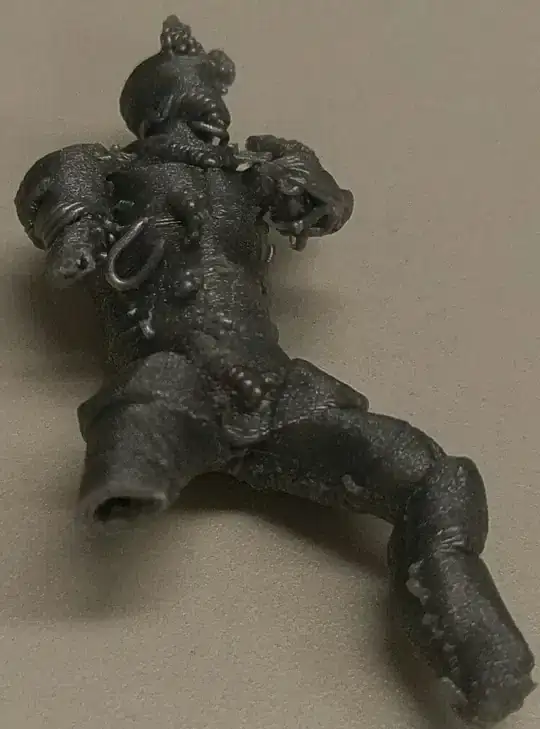
All test prints of these two models had at least one missing hand due to it getting stuck to the hotend and pulling off the part, and both demonstrated lots of minor blobbing and pulling on otherwise smooth surfaces, with loss of detail in the more finely detailed areas. Here's a sample of the output for the knight model. Please ignore the fact that he has been dismembered, that was mostly my fiddling with it post-printing (I guess I don't know my own strength), though the left hand was not well-attached and fell off rather easily. He was printed with both hands and feet/base intact, but you can see the blobbing and pulling pretty well.
enter image description here

LegendaryDude
  • 213
  • 2
  • 8
  • Wow, that isn't how you imagine a thing to come out of a 3D printer... What layer height are you using? I would try it with layer height 0.1 mm (because strong overhangs getting better printed). Did you figure out the 'min time per layer' setting? I'd try to set this to about 15 seconds to try, if it works better than. Don't put the extruder temp to high, about 195 ºC. – MrOnkelChiller Jan 27 '17 at 09:19
  • Yeah you need to get the Slic3r / Ultimaker Cura profile from the manufacturer. Calibration print worked. We know the firmware works. We know the hardware works. That leaves your Slic3r settings. Post your Slic3r settings please. But I doubt we can do more than point out the way off settings. Google calibration guides and you should be all set. – StarWind0 Jan 26 '17 at 22:53

2 Answers2

6

I've not done much miniatures printing, but I have the same printer and I happen to have the exact same filament loaded. Also, I've been doing a lot of tuning lately, including this z-brace mod which has improved my overall print quality, so I thought I'd take a pass at printing the Knight from your photos and sharing my findings.

First, I've posted a series of pictures to show my findings. Overall, I'd say my print quality was better than what you showed in your photos, but still isn't good enough. I sliced with Cura 15.04.6, and printed from SD card. Here are my (Full) settings:

Layer height (mm)         : 0.1
Shell thickness (mm)      : 0.5
Enable retraction         : Yes
Bottom/Top thickness (mm) : 0.3
Fill Density (%)          : 20
Print Speed (mm/s)        : 20
Printing Temperature (C)  : 210
Bed Temperature (C)       : 67
Support Type              : Everywhere
Platform Adhesion         : None
Skirts                    : 3
Filament Diameter (mm)    : 1.75
Filament Flow (%)         : 100.0
Nozzle size (mm)          : 0.5

Retract Speed (mm/s)      : 40.0
Retract Distance (mm)     : 7
Initial Layer Thick (mm)  : 0.2
Initial Later width (%)   : 100
Cut off object bottom (mm): 0.0
Travel Speed (mm/s)       : 100
Bottom Layer Speed (mm/s) : 20
Infill speed (mm/s)       : 50
Top/bottom speed (mm/s)   : 20
Outer Shell speed (mm/s)  : 20
Inner Shell speed (mm/s)  : 20
Min. Layer Time (sec)     : 10
Enable cooling fan        : Yes

I do most of my printing with a later height of 0.2mm, but for a detailed mini, 0.1mm is probably the largest that will look good (and probably the smallest possible on this printer. I normally set most of my speeds to 50 mm/s, with first layer at 20 mm/s; for this I slowed it all to 20 mm/s due to the fine details, and I think it helped.

Temps of 67˚C bed and 210˚C extruder are what I've found to work best on my machine for PLA, after much experimentation, but your machine may vary; I'm not sure how accurate the temperature measurements are on these machines. 67˚C gives me an observed bed temp of 60˚C, but that's at the top surface - I have PEI atop Borosilicate glass, adhered to the bare aluminum bed with silicone-based heat transfer pad.

I think I miscalculated the top/bottom heights and infill. I'm not used to printing at 0.1mm layer height, but 3 top layers over 20% infill is clearly not enough - see the closeup of the mini's base in my linked gallery. Next print, I'll either try 0.6mm top/bottom, or much higher infill.

The supports came off easily; I used a pair of sidecutters from my electronics bench. A little more cleanup with a sharp hobby knife, combined with a better base top layer would probably produce an acceptable result.

There were two major flaws. The first are the little blobs on many layers; see for example the inseam area on the picture of the knight's back. Ed Nisley at Softsolder.com calls these "Reveral Zits", and I think the name is apt. These happen when the print head needs to quickly reverse direction or stop-move-print, but filament continues to extrude. I use fairly aggressive retraction settings, and I think my print shows smaller zits than yours, but still far too many. Ed has explored this topic in some depth; it's possible my extruder stepper isn't keeping up with my settings due to mechanical limits. This is an area I want to pursue, but I don't have time at the moment. I plan to read Ed's work and try some experiments on my machine to see if I can get better results; I will update this answer if/when I do. As it stands, most of them are quite small, and could probably be cleaned up with a knife; the worst are those around unsupported areas, such as the back of the shoulder guard.

The second major flaw is the helmet. It's just... bad. I'm not sure the printer has much hope of nailing those horns, but overall the head is just bad. I'm not sure what can be done there.

To summarize: @disc0ninja's advice on Bed Level and Print speed are certainly the right place to start; You might want to try my Cura settings to see if you get similar results. Also, the Z-brace mod I linked to above has made a big difference for me; I rarely have to adjust my leveling anymore. I also plan to try slicing with Slic3r, which I haven't used previously, but have been looking into. You mentioned you couldn't print with Slic3r, was that USB or SD Card? I'd suggest trying via SD if it failed during USB printing.

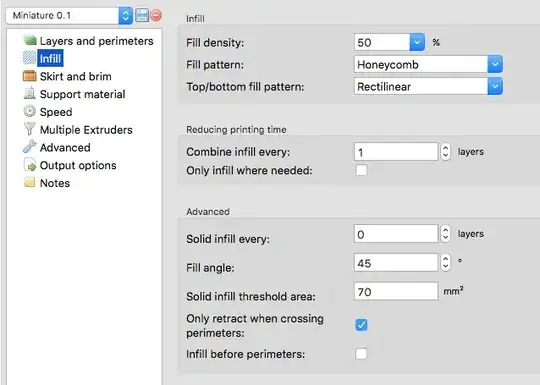
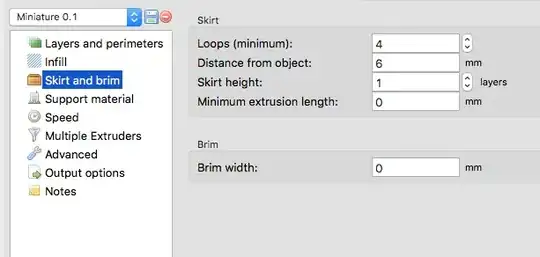
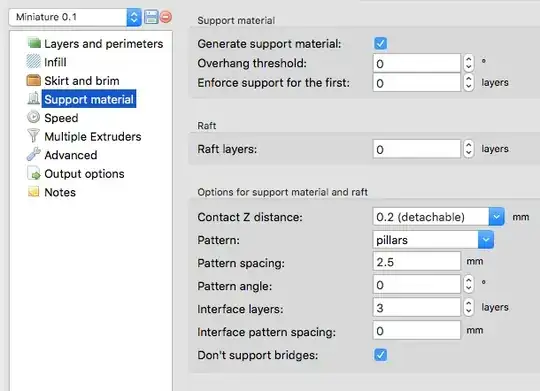
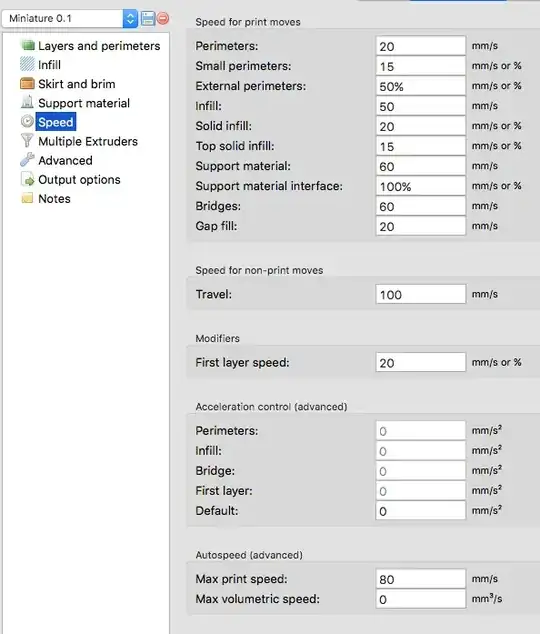
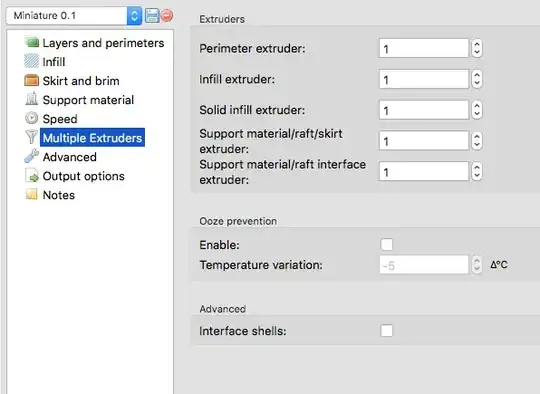
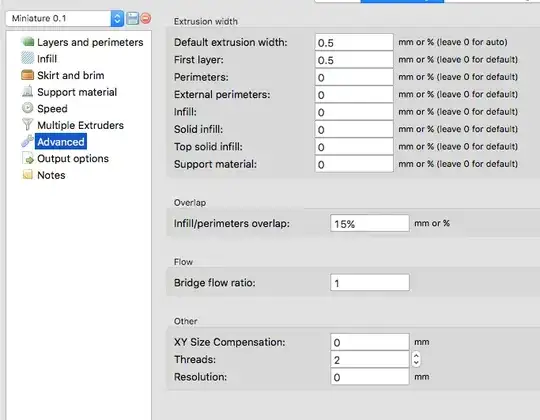
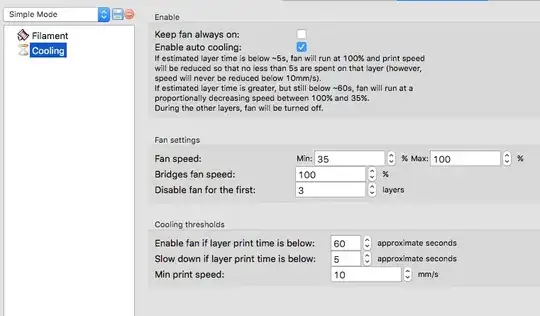
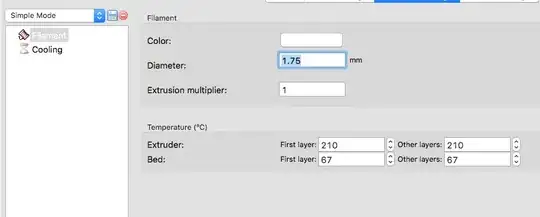
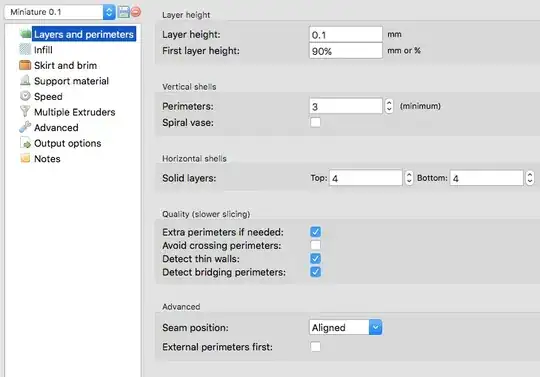
Update 30 Jan 2017: It took a little doing, but I managed to slice and print this model via slic3r. I had some issues with the original STL in slic3er, which I ended up fixing with a free trial at makeprintable.com. I spent a lot of time fiddling with slic3r; it has a lot more knobs to turn than Cura, and I make no claims of having the best settings for this print. There are so many settings that rather than transcribe them here, I've captured them in my pictures of the slic3er print.

Layers and perimeters

Infill

Skirt and Brim

Support material

Speed

Multiple extruders

Advanced

Cooling

Filament

Overall, I feel like the quality is higher. The "reversal zits" are hardly noticeable; but the big remaining problem is one I didn't fully diagnose in the original Cura print - lack of support for areas such as the shoulders. Slic3r added more support than Cura, but it's also harder to separate from the base. The head isn't great, but much better than the Cura print; I don't think my photos show it as well as it looks. This print has convinced me that there's plenty of quality still to be wrung from this printer; I hope to make time to do some more slic3r prints of this model while tweaking the params to see what's possible. If I make any big leaps in quality I will update this answer.

Greenonline
  • 5,831
  • 7
  • 30
  • 60
Jason Clark
  • 253
  • 2
  • 8
  • 2
    This is an excellent answer. I've taken the liberty of adding the images to the SE imgur, just in case the external link died in the future. I've inlined the images, although it might be better just to have links to them. Some inlined images of the model and supports would be good too but I got tired of adding images :-) – Greenonline Nov 15 '22 at 00:21
  • 1
    @Greenonline brilliant, thanks for the improvements! I really need to get that printer up and running again. I never quite finished a mod to replace the Z-axis limit switch with a proximity sensor. Re-reading this old thread is a great motivation. – Jason Clark Nov 15 '22 at 18:41
3

I have an Alunar(Anet) Prusa i3 printer I bought from amazon 7 months ago. I have not done much for ultra high detail prints, but it does seem to print everything I've thrown at it quite well. It took sometime for me to get it dialed in. I've found that Bed Level, Z-axis height, and Print Speed are usually what makes the most difference.

I have only used Inland PLA (Microcenter brand) and can get good quality prints.

I would recommend double checking bed level, z-axis, and going through print quality trouble shooting. Re-measure your PLA thickness and make sure your print multiplier is adjusted appropriately, and try to slow down your print speed.

If you could post a link to a sample file that you're trying to print It may be helpful?

Simplify 3D has a wonderful trouble shooting guide you can check out here

disc0ninja
  • 31
  • 4
  • I posted a few links to files that I've failed to print well, as well as an image of one of my failed miniature prints. – LegendaryDude Jan 26 '17 at 20:38
  • I downloaded the knight and elf models and will try and get them to print nicely and take note of the adjustments I have to make, so I can suggest them. Have you tried adjusting _Extra Restart Distance_ ? I have read that a negative value can help reduce blobbing, by not pushing as much filament immediately after retractions. – disc0ninja Jan 26 '17 at 21:31
  • I'm not even sure that's an option in the version of Cura that I'm using. I'll have to check when I get home. – LegendaryDude Jan 26 '17 at 21:36
  • I downloaded Cura 2.3.1 and (at least in this version) The setting I mentioned earlier is called _Retraction Extra Prime Amount_ and I had to enable its visibility in _Preferences => Settings => Material_ It also only accepts positive values in cura, but I think it works the same. Eg. _Retraction Extra Prime Amount = 0.2mm_ Will push .8mm of filament after a retraction (if the retraction distance was 1mm) which counteracts filament oozing. I could be wrong, but that's my understanding of how it works – disc0ninja Jan 26 '17 at 21:54