3

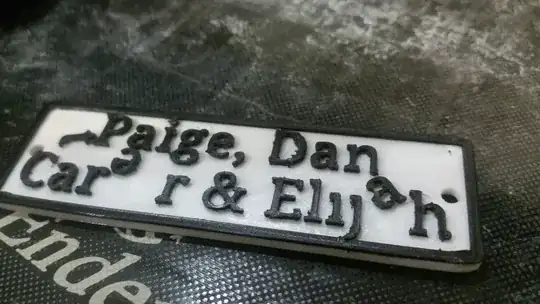
I have been trying to make some small signs, and to highlight the text by changing between black and white filament at a layer just above where the text comes out of the back plate.

I've used Cura 4.12 and the "change filament" script to make the printer pause at the right layer. The change and purge process works fine, no issue there.

However the second colour adheres poorly to the first. Doesn't matter if I print Black then White, or White then Black. Both filaments are the same brand.

  • Should I dab gluestick into the print at the same time as changing colour? (read on)
  • Is there some way to re-preheat the object and get a better adhesion?

To save the print I've used superglue to stick the letters back on that have fallen off, but is definitely not ideal.


Here's an example:

enter image description here

The loose letters are held on well enough for printing, but only barely. They can knock loose at a touch of a finger afterward.

I have tried changing filament on the first layer that is not the back board, and one or two layers up the letters. One print I even changed filament a layer too low, and surprisingly that did not have adhesion problems. Perhaps it is merely a function of surface contact area ?

Gluestick on the exposed surface while changing filament was useless - the whole thing simply didn't stick and the second colour never got any adhesion at all, merely wiping off.

As for timing, it seems to make little difference if I'm there waiting for the last layer to print, or if I let the printer sit for half an hour before noticing and changing colour. The bed stays hot at 50 degrees, and the hot end is permitted to cool off.

There is a heating cycle, and then a purge/discharge-into-air that shows the transition between colours, so its not that the filament has lost a prime.

At the moment, a much more effective solution is to use a paint marker and colour-in the top layer with a contrasting colour.
Criggie
  • 902
  • 4
  • 15
  • 1
    This is very similar to an idea for a project I wanted to do. How long is the time from when the first color is finished to the time the next color starts printing? It sounds like the time in between is allowing the first color to cool down so as not to allow the second color to adhere. – agarza Dec 09 '21 at 04:49
  • 1
    @agarza: New extrusion should adhere just fine on already-fully-cooled previous layer. I think a more likely explanation is that there's initially underextrusion due to not priming the new material sufficiently, or oozing after it's primed but before resume. – R.. GitHub STOP HELPING ICE Dec 09 '21 at 14:11
  • 2
    Do not dab gluestick. This will create a water-soluble layer between the first color and the second that will *ensure* they don't adhere properly. – R.. GitHub STOP HELPING ICE Dec 09 '21 at 14:12
  • 1
    Can you show some pictures of the part that failed, that would give us some idea about the size, geometry, etc.? – R.. GitHub STOP HELPING ICE Dec 09 '21 at 14:13
  • 1
    One other thing to watch out for: if your pause-and-resume lifts the Z axis and lowers it back down, you might have Z reproducibility issues, due to undriven side of gantry poorly following the driven side, where the nozzle is too high after resume. – R.. GitHub STOP HELPING ICE Dec 10 '21 at 01:30
  • 1
    This is a material specific problem. If it was a slicing problem the layers of the same material wouldn’t adhere to each other. What two filaments are you using? Brand, type, your print temperature? – ChinchillaWafers Feb 17 '22 at 16:38
  • @ChinchillaWafers It was ESUN brand PLA+, one in black and one in white. They were identical other than colour. – Criggie Feb 17 '22 at 18:31
  • I'm having the exact problem. Did you finally find a solution? I tried everything and the only thing left is maybe the two filaments might have a different flow rate so the new layer came out too thin. I need to buy a more precise caliper before it can calibrate the flow rate of the two filaments. – Edward Yen May 06 '22 at 08:16
  • @EdwardYen in the end, the single biggest help was making sure there were wider areas. I was printing signs, and the text was just too fiddly. Another sign with fewer letters printed much better, but each letter was thicker so it could stick better. If a letter fell off, then a dab of superglue/CA glue worked fine to hold it on - nothing here was structural. For one print where almost all the letters fell off, I just coloured in the raised letters with a paint marker, which worked out nicely. – Criggie May 06 '22 at 10:49

4 Answers4

3

I never had layer separation when changing filament to a different color. Even with three different colors within the same print. Or five layers of two different layers.

Both filaments should be made of the same material, for instance PLA. The filaments should be printable with the same settings. A test print should work well with both filaments.

Try a print with a pause and a simulated filament change. Printing with the same filament before and after the pause. You may try different durations of the pause. Is there layer separation even with a very short pause?

Uwe
  • 151
  • 4
  • I'm actually having this problem -- one of the times I wasn't able to change filament due to using the wrong command and not being able to pull out the old stuff, so the filament didn't change. The behavior of the material was the same. – Raye Keslensky Jan 31 '22 at 00:04
2

It might be worth a try to manually kick the flow rate setting up 5-10 % and temperature about 5 °C for the first layer after the filament change, then returning to the original settings. Consider too killing or reducing the cooling fan speed for the first layer only. The benefit of a skirt to get things flowing is not available when starting on the second color.

Another approach would be to make the letter-layer a negative image so it would be more of a flat, contiguous piece with letter shaped holes in it. Printing time and filament usage would both be somewhat higher, however, unless the thickness of the letter-layer was reduced. It would only need to be a few layers thick.

Color order could be changed with this method too if black letters on a white field is the desired scheme.

allardjd
  • 310
  • 1
  • 1
  • 10
  • I did some with white on black and some black on white. The order seemed to make no difference. but the thickness of the letter did. – Criggie Feb 17 '22 at 18:36
  • I meant swapping colors if you went to a full-size second color with letter shaped holes. That would preserve your original design of black letters on a white field. – allardjd Feb 17 '22 at 21:54
1

Most of your settings will not change with changing filament, if the new filament is the same material and OEM as the old. The main settings to check after changing the filament are the initial z-height and planarization of the bed. If the z-height is too high the first few layers may not stick together well.

If you change filament materials or OEM, change the settings to match the new material. The layers may have trouble sticking together if the extrusion temperature is too low.

Perry Webb
  • 2,158
  • 1
  • 8
  • 18
0

After much fiddling about, the only positive conclusion I could come up with was to not make the letters too thin. A chunky thick letter has more surface area to adhere, whereas a thin spidery letter is too fragile.

So print fewer words on each label, make the words more-bold, and if they still fall off after printing then CA glue/superglue is good enough to hold them together.

Criggie
  • 902
  • 4
  • 15