2

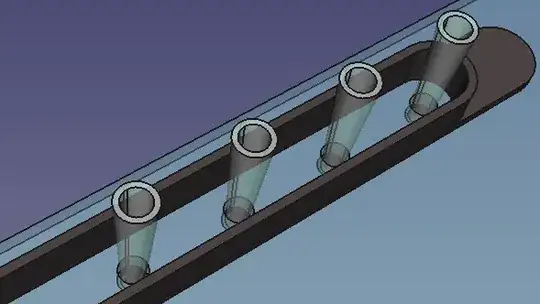
I would like to 3D print a small thin tub/mold for an epoxy resin. I have tubings inserted into holes, and I need to fix these tubings securely with epoxy (see picture below). The space is very limited, and the whole assembly must have a smallest possible footprint, so I have to confine the epoxy from spreading to the sides - that's why I need a tub. The tub itself must have as thin walls as possibly for the same reason.

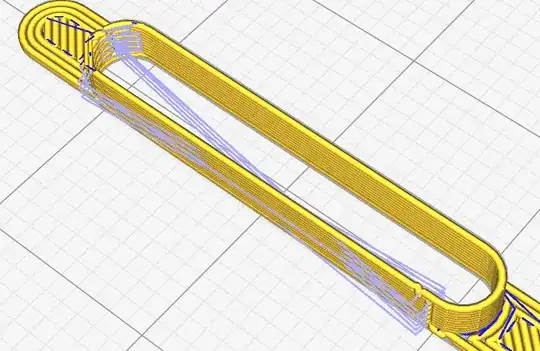
CAD model

The wall thickness is constant, so theoretically the nozzle could just make one single loop to print a layer, and then move to the next one. Kinda a spiral motion. It seems to be so simple! How do I get the slicer (I use Ultimaker 2 with 0.4 mm nozzle, CoPA material, and slice in Cura 4.6.1) to produce single outline walls?

I tried so many things, but I couldn't get this.

With the default settings for 0.2 mm layer a 0.4 mm wall (or thinner) will not be printed at all (left - 0.35 mm wall, middle - 0.4 mm, right - 0.45 mm): Default settings

Occasionally even the 0.45 mm-thick wall gets excluded from the print, which is really bizarre: absent walls
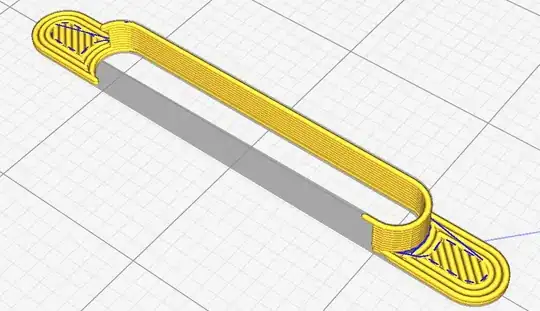
If I make the wall thicker, then the slicer tries to pack two discontinued lines next to each other, which is even worse. Cura has an option 'print thin walls', but this results in jerky, discontinued tracks. discontinued tracks
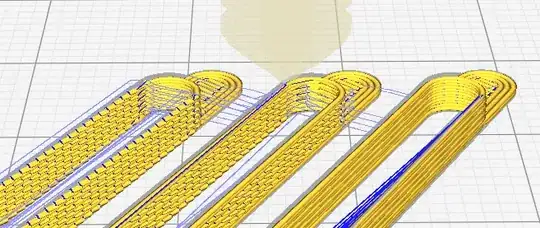
At the moment I print 0.45 mm walls with the 'print thin walls' option turned on, this is the closest to what I need that I could find so far.

additional nozzle movements

This may look fine in Cura, but the result is pretty ugly due to the additional nozzle movements... I really don't understand why the printer has to do them. It prints the outline, then jumps to the 'corner' and deposits a blob there. I can carefully remove these blobs with a scalpel, but come on, this is a disposable part and I need a ton of these!!!

printing results with blobs

If that helps, here is a link to a sample STL file with 450 μm walls.
R Kiselev
  • 121
  • 1
  • 5
  • I noticed after answering that you're using an exotic material. Switching to PLA might make things easier. But that's unrelated to your slicing problem. – R.. GitHub STOP HELPING ICE Jun 17 '20 at 05:16
  • If you try Prusa slicer you will see that it provides information about thickness of walls to be used in the model for optimal printing. It should be in the page about the number of perimeters. – FarO Jun 17 '20 at 14:53
  • @R..GitHubSTOPHELPINGICE I have to print from an acetone-resistant material. I tried PLA, and it indeed looks better, but it's not chemically resistant. – R Kiselev Jun 17 '20 at 16:06
  • @RKiselev: If only PLA were affected by acetone, 3d printing folks would be very happy, but alas PLA is not soluble in acetone or any other easy-to-handle solvent and shouldn't be chemically affected by it either. Have you tried unpigmented "natural" PLA? It's probably just messing with the pigments or additives the manufacturer added for strength/printability-improvement/whatever. Another great option if you need something that won't react, that's easy to print, and that's easy to remove if you need to remove it, would be TPU. – R.. GitHub STOP HELPING ICE Jun 17 '20 at 17:11
  • @R..GitHubSTOPHELPINGICE I decided to do a quick check with the PLA that I have (Ultimaker material, PLA black). As you can see in [the picture](https://trello-attachments.s3.amazonaws.com/5b6b2534b398ed67842b5cf7/5edeb664103bb57c7dd030fc/bf1a0d0a10214722710d4e488b1b6e67/20200617_161016.jpg), after just 5 min in acetone the part became gummy and very deformed. Additionally, the acetone itself darkened and became turbid. I don't have a natural PLA to try it, but I expect a similar behavior. [This chart](https://bit.ly/2UUbOqM) also says its not compatible. – R Kiselev Jun 17 '20 at 21:20
  • @RKiselev: Thanks for that paper link! It's very useful and answers an open question I've had for a long time. I'm trying to reproduce your result, and indeed I got almost exactly the result you did for blue Hatchbox PLA, but little or no damage so far to unpigmented/clear 3D Solutech PLA (not particularly marked as natural/no-additives afaict). – R.. GitHub STOP HELPING ICE Jun 17 '20 at 22:39
  • And after much longer (not timed but about 20-30 min) the clear PLA softened and deformed somewhat, but not as bad as the blue. It'd be interesting to study this further but I think your choice to use a different material here is sound. – R.. GitHub STOP HELPING ICE Jun 17 '20 at 23:10
  • Did you ever report this issue on the Cura bug tracker? It's very odd that this happens when the wall that should be there is significantly wider than the wall line width, and it'd be nice to get them to track down the root cause and fix it. – R.. GitHub STOP HELPING ICE Feb 20 '21 at 04:52

4 Answers4

3

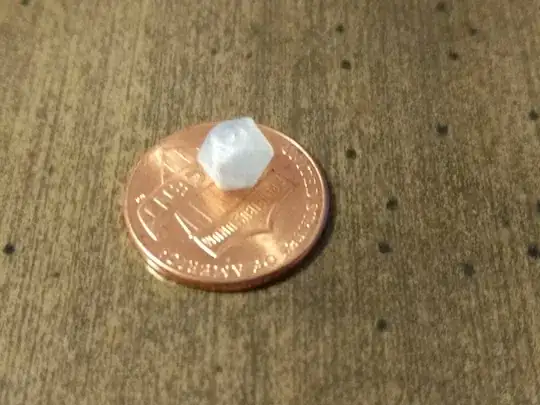
Cura is exceptionally bad at printing details comparable in size to the configured line width. Lower your wall line width to something like half the wall thickness (i.e. 0.225 mm) and see if that works. With a standard 0.4 mm nozzle I've had success printing tiny details with 0.2 mm line width or smaller. For example:

tiny printed icosahedron bead with thread hole on penny

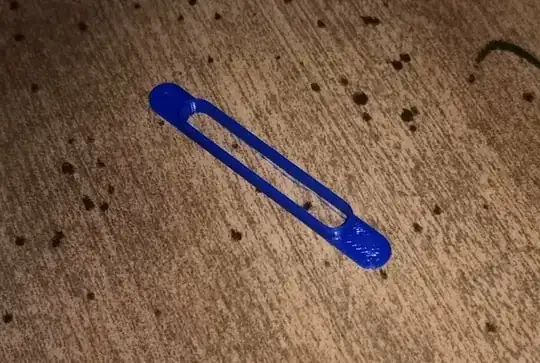
And here's your model printed at 0.225 mm line width:

print of OP's model

I also had to slow down the print speed considerably to get first layer adhesion with such thin lines. I did 40% via the printer UI, relative to 30 mm/s base rate, so effectively 12 mm/s. After first layer increasing speed was no problem.

Important: You also need to set the "Outer Wall Inset" (wall_0_inset) setting to 0. This is a broken Cura feature that's supposed to compensate for wall line widths less than the nozzle width, but the math is incorrect and not actually needed, and if it's left at the default it will reproduce exactly the same "missing wall" issue you got with full wall line width.

  • small note: printing such slim lines Works considerably better with flat-nosed "e3D-style" nozzles, as they have a considerable edge to smooch the plastic into position. – Trish Jun 18 '20 at 09:44
  • @r-github-stop-helping-ice I tried this, but I've got a meshed discontinued structure, that is the printed was depositing way too little material. I solved this issue by printing in the 'vase mode'. – R Kiselev Jul 14 '20 at 04:26
1

You don't need to use vase mode. But vase mode will work.

I'm not familiar with Cura, I use PrusaSlicer, but I'm sure there are equivalent settings.

What you want to do is model the part in two pieces. The first piece will be the same height as the base. The second piece will be the top half. It can all be one model, but it helps to think of it as two.

In the bottom part, add your hole, and print it with however many solid layers as is required to make the base thickness.

For the top part, make it solid, and print it with 1 perimeter and 0 % infill and 0 top and bottom layers. You can decide the wall thickness by tweaking the extrusion width.

If you want to make the part perfect, you can size the bottom hole by taking the dimensions of the upper portion and subtracting whatever extrusion width you will use from the surfaces.

You can print as many of these as you want as close together as you can because it isn't using vase mode.

0scar
  • 32,029
  • 10
  • 59
  • 135
TheRooster
  • 43
  • 6
0

After a lot of experimenting and trying several different things I finally discovered the 'vase mode'. In this mode the 3D printer makes a hollow object with a single-layer outer shell.

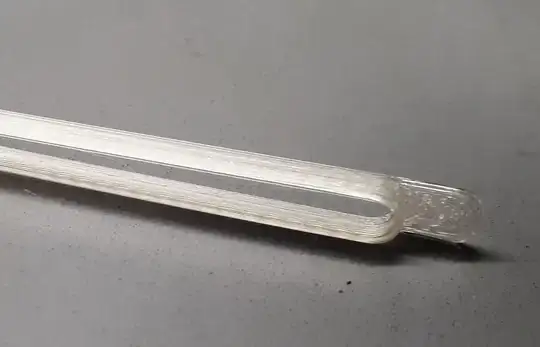
The corresponding setting is called 'spiralize outer contour' in Cura 4.6.1. In this mode the printer does not make distinct layers and prints the whole shell in one continuous motion (video), exactly as I need it. The print is done faster, and the quality is dramatically better!

improved print

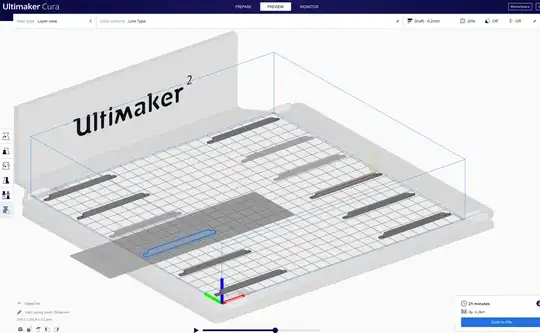
The downside is that only one model can be built in this mode. If you place several models on the build plate, they will get connected by a wall. However, there is a workaround in Cura: under 'Special modes' set 'Print sequence' to 'One at a time'. Ultimaker will print several model one after another provided they are not tall and you leave enough space between them (dark area in the picture below). I could print up to 12 models at once, which is enough for me.

enter image description here

R Kiselev
  • 121
  • 1
  • 5
  • 2
    Vase mode was what I was going to say, however it has limitations. You can't print any other geometry with it, and the shape will be limited. That said the better solution I would say is to use a SLA printer, or something like it that can print higher quality. Actually you really don't need vase mode for this, as your issue would be retraction settings, and large nozzle. – StarWind0 Jul 14 '20 at 06:05
  • @StarWind0 thanks for the great suggestions. Unfortunately, that's not my printer, so I'm not going to mess around with the nozzle. I used to work with SLA before and it is indeed awesome, but we don't have this technology now. – R Kiselev Jul 15 '20 at 18:17
  • You can create your own slicer profiles and not change the machine you are borrowing or the owners settings. – StarWind0 Jul 15 '20 at 20:51
0

I recently wanted to print something with small walls as well and this site helped me out. Basically just set horizontal expansion to 0.04 and Cura does a better job.

  • 3
    Thanks for your answer but we are looking for comprehensive answers that provide some explanation and context. Very short answers cannot do this, so please [edit] your answer to explain why it is right. Additionally, we prefer answers to be self contained where possible. [*link only*](https://meta.stackexchange.com/questions/8231/) answers are frowned upon (as links [tend to rot](https://en.wikipedia.org/wiki/Link_rot)) & will be rendered useless if the linked-to content disappears. If you add more context and detail from the link, it is more likely that people will find your answer useful. – 0scar Feb 20 '21 at 11:09