1

I tried printing a "improved" calibration cube and noticed that the printer was laying down dots instead of a solid line. This was right after switching out my extruder motor and tweaking retraction settings. I believe my first setting was 0.3 mm, then I tried 0.1 mm. I didn't get a picture of the first setting, but shown below is when retraction was set to 0.1 mm. I think the print was at layer 3 roughly. The difference is 0.1 mm had a higher frequency of dotting, ie more dots that were closer together.

This was only present in the first couple of layers. The dots weren't occurring in the same spot so the picture shows dots overlapping each other making a sort of "twisted" or braided look. This also happened on both the x-axis movements and the right side of the y-axis movements. The rest of the cube came out relatively well.

Settings

  • Printer: Creality CR-10S
  • Temp: 205 °C at nozzle; 60 °C on bed
  • Retraction: 0.3 mm initially, 0.1 mm (pictured)
  • Bed Distance: ~0.1 mm
  • Nozzle Diameter: 0.4 mm
  • Layer Height: 0.2 mm. I usually do 0.4, but I was lazy with slicer presets (AstroPrint)
  • Hotend: e3D Hemera direct, e3D v6 heater and nozzle
  • Filament: Hatchbox PLA white

I never saw this issue before on my printer nor have I seen it mentioned in various articles/videos online.
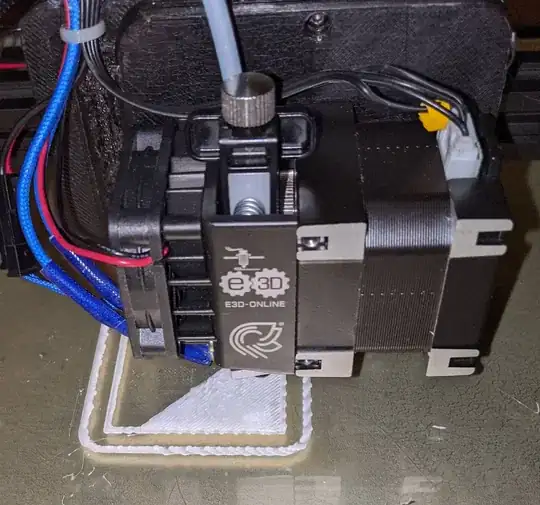
Dotting when laying down initial layers

Lux Claridge
  • 829
  • 2
  • 10
  • 28
  • 1
    Never do 0.4 mm layers with a 0.4 mm nozzle, don't exceed the layer height more than 75% of the nozzle diameter. – 0scar Jan 22 '20 at 18:47
  • Have you increased the bed to nozzle distance, it looks as if the nozzle is too close for a 0.2 mm first layer. Note that some slicers offer an option to add an additional gap, alternatively you can change the G-code and redefine the level by moving to the gap/Z-height you want an redefining that level with `G92 Z0`. – 0scar Jan 22 '20 at 21:40

2 Answers2

1

I have seen this a lot of times on my tronXY-X1 with an e3d-v6 via Bowden tube. It is not related to retraction but a different settin: Your first layer is set too thin or not leveled to the right height.

Having the first layer too thin, means that with a tiny error, the calculated correct extrusion becomes either a massive overextrusion or a barely sticking underextrusion. For example, the repeatability of the probing is the biggest error source. A well calibrated probing might varry about 0.05 mm between extremes, so would be written as (layer thickness)+-0.025 mm. On a 0.1 mm layer, that is a 25 % over- or underextrusion; overextrusion of that degree is well known to create such ripples.

Setting it to 0.2 mm for the first layer in Cura, Slic3r and PrusaSlic3r (look in your advanced settings!) did eliminate such rippling for me. My understanding is, that the extra distance gives the filament better ability to flow and stick on this first layer. Also, remember to set your line width to ca. 10 % wider than the nozzle - 0.45 mm is my typical setting.

Trish
  • 20,169
  • 10
  • 43
  • 92
  • Is this something that's just common to e3d's v6? I find it odd to never heard of this issue given the popularity. But come to think of it, I guess I haven't watched too many videos about the v6... Nonetheless I will try your settings when I get home from work. – Lux Claridge Jan 22 '20 at 15:30
  • No, it is independant of the e3d hotends but merely a proplem with **printing too close**, probably slightly increased by the use of the larger flat from an e3d-nozzle. A tiny variance in distance is a huge percentage error then, resulting in the bulging. – Trish Jan 22 '20 at 15:47
  • The wording "first layer is set too thin" may confuse people: it's not a setting in the software, but an adjustment ("setting") of the printer bed. – FarO Jan 22 '20 at 16:35
  • 2
    You can set First layer thickness in any good slicer. – Trish Jan 22 '20 at 16:57
  • The photo looks like overextrusion. A thinner layer will extrude less material, but since the nozzle is closer, the overextrusion will still be there. – FarO Jan 22 '20 at 17:36
  • 2
    @FarO If the layer is 0.1 mm with an error of +-0.025mm, then that is 25% error. If it is 0.2 with the same error, then the error is only 12.5%. THAT is what creates the overexstrusion in the first place: the tiny error in getting first layer thickness. – Trish Jan 22 '20 at 18:34
  • This fixed the rippling seen in the skirt and perimeters, but not so much the floor layer. Thanks! – Lux Claridge Jan 23 '20 at 14:09
  • @LuxClaridge what is the line width and extrusion multiplier? you might get slightly better results by settign the EM to 100% and the line width a little higher, and reduce the temperature by some degrees. Also, make sure your Steps/mm are calibrated right. – Trish Jan 23 '20 at 14:28
  • @Trish The new line width is 0.45 mm and multiplier of 1. I did a rough calibration of steps/mm to get it in the right ball park, I guess it's time to tune that in more. – Lux Claridge Jan 23 '20 at 14:35
0

It's not about printing settings but only about the bed: the bed is too close to the nozzle.

Maybe you adjusted it when it was cold, instead of doing it when it's already heated to the desired temperature and the nozzle is heated at about 180°C to get close to operating temperature without oozing.

Or maybe you used a too thin paper sheet.

FarO
  • 3,906
  • 13
  • 31
  • I leveled the bed when it was up to temp (didn't level with hot nozzle though). I use a feeler gauge of 0.1 mm, the recommended distance on several other answers here on this SE and on so many tutorials. – Lux Claridge Jan 22 '20 at 16:59
  • Is the firmware aware that the "zero" position means 0.1 mm? I'm using Klipper and the default profile for my printer expects a gap at "zero" height of 0.2 mm. Since I use paper to judge the distance, with the default setting I was getting overextrusion. Maybe the same happens with your printer? – FarO Jan 22 '20 at 17:35
  • I don't think that the firmware is aware of that (at least I didn't set it to be). I'll have to look into that. – Lux Claridge Jan 22 '20 at 18:06