7

I'm new to 3D printing, but have been having relative success with the Ender 5 Pro and Cura.

I'm making some coasters and using the ironing feature to smooth out the top layer. This is mostly working great, but there are lines left on the surface, consistent between identical prints. They appear to be seams between different ironed areas. They form when one continuously ironed area finishes, the nozzle leaves that area, then an adjacent area is ironed later, forming a seam between them.

I'm using the default ironing settings, on only the top layer. I have no clue what settings might be causing this, or if this is an avoidable issue.

Any ideas from more experienced printers?
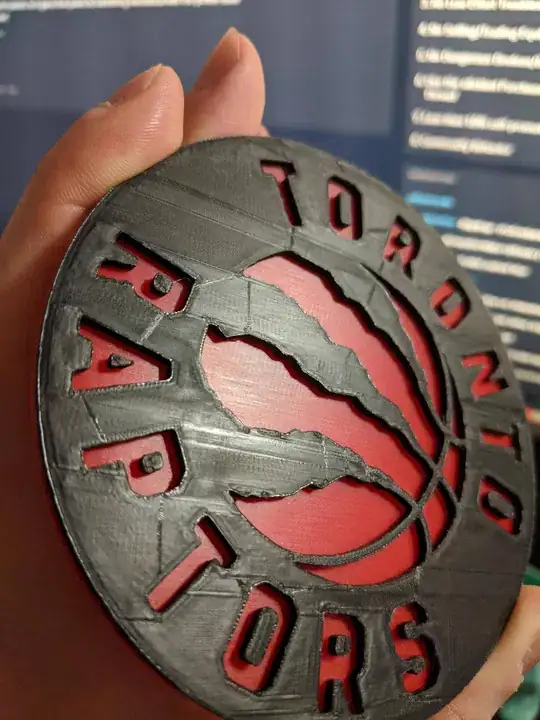
enter image description here

Trish
  • 20,169
  • 10
  • 43
  • 92
Josh D
  • 71
  • 1
  • 2

1 Answers1

2

There's a couple of Cura settings that can help, that I know of:

  • In the 'Travel' section, change "Combing Mode" to "not in skin". Combing means it tries to move the head over areas that have already been printed. This is a good thing most of the time, but if it does it while it's ironing, it will make an annoying line. (I am not sure why this isn't automatically turned off for the ironing pass, but it seems it isn't.)

  • After enabling ironing, an option "Ironing Pattern" appears. Try changing this to "concentric." This produces a different pattern, which you may or may not like, but it seems less susceptible to those kinds of lines appearing.

Here are some other settings that might help. I'm suggesting these on the assumption that some of the lines are caused by the print head travelling over the ironed surface, which is what it looks like to me from your photo. I got them from this Cura documentation page, but it doesn't mention ironing, so I can't be completely sure whether they will affect the ironing step.

  • "Avoid printed parts when travelling" - this might help a bit more than just turning off combing, since it will try to go around the printed areas instead of just cutting across them. Apparently you have to enable combing for this to work.

  • "Z hop when retracted" and "Z hop only over printed parts." This should make it lift the print head up when it can't avoid crossing the printed part. It may be that you have to enable retraction, combing, and/or "Avoid printed parts when travelling" for these to appear.

N. Virgo
  • 1,489
  • 1
  • 14
  • 25
  • I did try the combing setting earlier, and it didn't seem to change the effect. I'll try concentric on the next print. – Josh D Jan 03 '20 at 00:58
  • I added some additional options that might help. (But I haven't tried them myself.) – N. Virgo Jan 03 '20 at 10:41
  • The main assumption of this answer, that the lines are caused by the head traveling over printed portions, only addresses part of the problem. The raised portions are seams that happen when the head irons from one position in the middle of a face, then needs to return and iron the rest of it. The seam happens where the ironed portions meet. – Steve Hanov Feb 23 '21 at 22:29
  • @SteveHanov both of those things happen of course. I could be wrong, but at the time it seemed to me like the most visible lines in the photo are due to the head moving, because they cut diagonally across the "grain" of the ironed surface. There are some horizontal lines also, which I guess are 'seams' of the kind you mention. You're quite right that nothing I say here will get rid of those. (Although in my opinion the 'concentric' ironing pattern makes them aesthetically less displeasing, since they become part of the pattern.) – N. Virgo Feb 24 '21 at 03:55