The most safe way to move the printer up to the maximum print height is to use a concept known as "keywords" (sort of constants that are filled by the correct value when slicing) in Ultimaker Cura, certainly if you have multiple printers with different print area sizes.
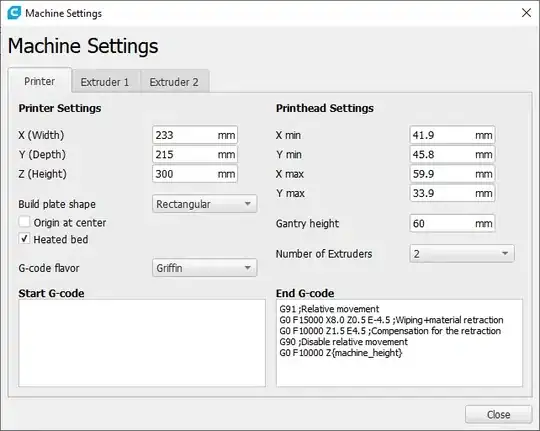
To use these keywords, just add these in between curly braces and insert them into your slicer "End G-code" script. These keywords will be substituted with actual numbers from the printer settings or slicing configuration parameters. In this case we need to use the maximum print height which is specified by the keyword machine_height. This keyword takes its value from the printer settings, set for the printer in the graphical user interface of the printer settings, see image below (this is a configuration of an Ultimaker 3 Extended, it also shows the Start G-code and End G-code which you can tweak yourself, as seen by the additional G-code line G0 F10000 Z{machine_height} that has been added for this demonstration).

E.g. similar to this answer, you could solve this with a keyword. Now when you slice for a certain printer (e.g. with the printer settings of the image above), the correct value will be filled in automatically when slicing the print object as can be seen from this snippet of G-code:
...
G91 ;Relative movement
G0 F15000 X8.0 Z0.5 E-4.5 ;Wiping+material retraction
G0 F10000 Z1.5 E4.5 ;Compensation for the retraction
G90 ;Disable relative movement
G0 F10000 Z300 ; <------------ note to see {machine_height} be resolved to 300 mm
...
This is specifically for Ultimaker Cura. Do note that e.g. Slic3r even takes the keyword concept further by allowing arithmetic and logic, similar as you could do in programming languages!
