2

I recently installed an original BLTouch V3 on my Ender 3 pro and ever since I can’t seem to get a decent print. My first layers are horrible.

The install wasn’t so bad, I really thought it would be plug and play thereafter.

I currently have:

  • Version 1.1.4 board with non silent steppers
  • Marlin 1.1.9 with bug fix as per the teaching tech video
  • Printing on glass, bed @ 60 °C, extruder @ 200 °C

I have checked

  • Bed is level.
  • X gantry is squared/straight.
  • Belts seem tight.
  • Tried my best at getting the Z offset right.
  • Checked E steps are correct.
  • BLTouch seems to be working - not 100 % sure as it’s my first time using an auto level sensor.

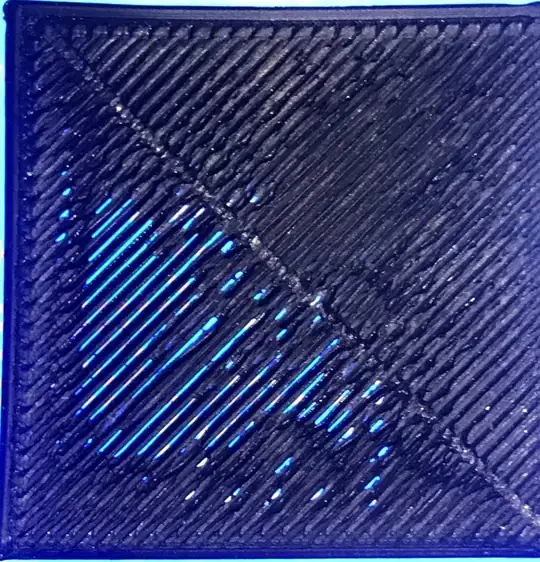
First layer view of print with BLTouch V3


More pictures here for those who can help.


I have reset the offset and still having difficulty I’m hoping the following pics would help. They bed level squares that prints squares on all four corners and the centre of the bed plate. If I raise the offset any higher I have difficulty with prints sticking. See here.
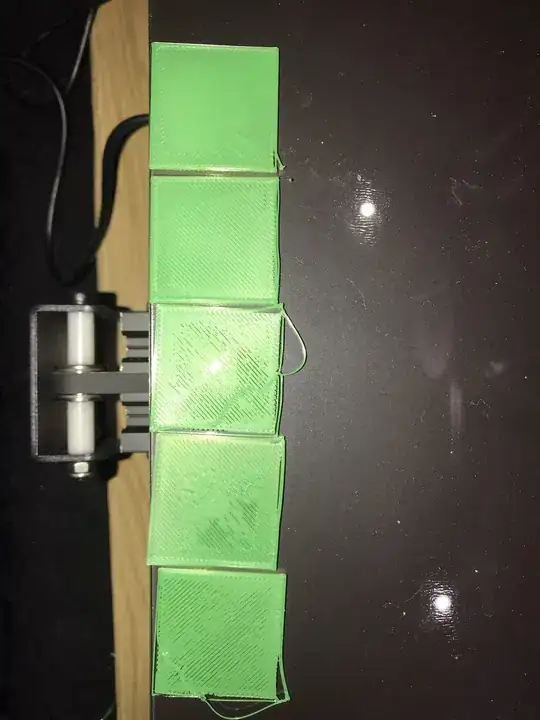
enter image description here

Greenonline
  • 5,831
  • 7
  • 30
  • 60
Raph
  • 61
  • 1
  • 1
  • 7
  • 1
    Please do not roll back constructive edits, thanks. Informational updates should be edited into the question and not left as comments, as comments are ephemeral in nature and are generally deleted over time. I've updated your post for you. – Greenonline Aug 11 '19 at 21:27

3 Answers3

4

I manage to get the printer working, it was an hotend issue. Was clogged, replaced nozzle and working as expected.

Thank you all for the guidance!

Raph
  • 61
  • 1
  • 1
  • 7
  • 2
    Glad you got it working, please don't forget to mark the answer and the accepted answer using the tick icon in order to remove the question from the unanswered question list. You may have to wait 24 hours or so, in order to be able to mark it as the accepted answer. Maybe also expand upon the answer, if at all possible, in order to provide guidance to other users who may experience the same issue in the future. Thanks in advance. – Greenonline Aug 11 '19 at 20:40
0

So the weird ridges around each line look like a form of over-extrusion that happens when your nozzle is too close to the bed. The gaps on the other side may be areas that were so thin that they didn't survive removal from the bed, or just areas that the plastic couldn't reach because the nozzle was basically dragging. I don't personally have any experiences with touch sensors (yet! got an inductive probe I'll be installing soon) but I can only assume that you have the ability to set the probe's Z offset from the nozzle. If that is the case, try setting your Z offset such that the nozzle is further away from the bed after probing.

I'd suggest starting by raising the nozzle about 0.2 mm, and fine-tuning from there. If you continue to get the raised ridges adjacent to each printed line, keep raising the nozzle until you don't get them anymore. At some point you should actually get to a point where there's gaps between the lines because the nozzle is too far, and at that point you can start bumping the offset back down again to try and perfect that Z offset.

Alternately you could do what I do and print on a raft with a 50% density first layer, but I get the feeling if you're printing on glass you probably want to be able to just print on the glass.

Nach0z
  • 876
  • 5
  • 11
0

If the image is showing a view of the bottom layer of the print, the most probable issue is that the nozzle is too far away from the bed when printing the first layer. This manifests itself as almost not flattening out the deposited filament lines, hence you can see through them. Also it might be a good idea to check if the extrusion process is giving you enough filament (it could be that you are under-extruding); a calibration of the extruder might help in this respect.

To lower the nozzle/decrease the nozzle to bed distance you can use the menu of the printer to set a smaller value. Also, G-code M851 may be used to set a new (smaller) value (e.g. M851 Z-1.23 when the sensor trigger point to the bed is 1.23 mm); don't forget to store the value to memory with M500 (if enabled in firmware). Sending of G-codes to the machine can be done by "printing" the commands stored in a .g text file directly from the SD card, or using a so-called terminal interface that many 3D Printer software applications offer (e.g. OctoPrint, Pronterface as part of Printrun software suite, Repetier-Host, etc.).

0scar
  • 32,029
  • 10
  • 59
  • 135
  • Thank you, it is the top layer. The bottom layer is pretty smooth as in glass and using alcohol.. the prints do stick surprisingly. I have calibrated the extruded I’m 2mm off .. would that cause major issues? I measured from the extruder end unscrewed ptfe and used octoprint to extrude 10cm of filament and the printer returned 9.8cm – Raph Jul 09 '19 at 19:09
  • So slight under extrusion, not much. Use [this reference](https://3dprint.wiki/reprap/anet/a8/improvement/autobedleveling#is_your_z-offset_correct) to determine the Z offset. Do you hear skipping clicking when printing? – 0scar Jul 09 '19 at 20:54