9

I just installed my (v3) BLTouch with a vanilla version of Marlin (1.1.9) on my Ender 3 and everything seems to work fine (including auto home) except the probing. It repeatedly does the first three probes (successfully) but then tries the fourth and fails. Even when disabling the axis movement (X/Y stepper motors) the issue persists, which would indicate that it is not a bad connection or physical location dependent. Any ideas on how to troubleshoot?

On second thoughts, it seems that it now fails inconsistently, so it is probably a wiring issue, although there is still the issue of it not retracting before printing and not leveling well when it does (although those issues would be more appropriate for a separate question), among other things.

<Edit: Resolved, I both replaced the BLTouch and updated my firmware, but I believe it was the latter that fixed it.>

0scar
  • 32,029
  • 10
  • 59
  • 135
Blubberguy22
  • 293
  • 1
  • 3
  • 9
  • Welcome to 3dPrinting.SE! – Pᴀᴜʟsᴛᴇʀ2 Jun 22 '19 at 16:13
  • This is a loose wire, may be some strength is pulling the wire while moving from XX,XY,YY then you get the failure. Also happens with the temperature sensor or even the heat resistor. Keep your wires tightened to connectors. – Fernando Baltazar Jun 24 '19 at 06:11
  • It also fails when disabling the X and Y motors, so I'm not sure if it's a pulling as much as a poor connection. – Blubberguy22 Jun 25 '19 at 11:26
  • Thanks for posting your solution, I have a brand new V3, and when through all of the cable testing, etc. I turned my grub screw 1/4 turn into the housing, and its working consistently now. I thought I was going to have to return for refund/exchange. I think I will order a backup just in case. – dminkler Dec 16 '20 at 00:13

6 Answers6

4

Is your BL Touch a v3 (likely if you've only just purchased it)? If so, make sure you're using the bugfix version of Marlin 1.1.9, which supposedly fixes the compatibility issues. I say supposedly because there's also a capacitor on the mainboard that can be removed to fix the issue, and once I removed it (and commented out the specific v3 bits in the firmware) the BLTouch performed noticeably better than when relying on the bugfix firmware alone.

Teaching Tech on YouTube has a few BLtouch Ender 3 videos, covering the changes for configuring the bugfix firmware and the removal of the capacitor.

  • Oh yeah, I forgot about that. Yes, it is a v3, so the updated firmware should help with the other issues but I still think it also may be a wiring issue because of the inconsistency of failure. I just ordered a replacement so I'll update accordingly once I get the new one set up with the bugfix firmware. Thanks. – Blubberguy22 Jun 25 '19 at 11:24
  • I'd recommend getting ready with the bugfix firmware and the v3 settings it comes with ahead of time so that you can try it with the existing probe and wiring and be 100% sure that this wasn't the cause. – StringsOnFire Jun 25 '19 at 14:41
  • Good to see you solved the problem and took the time to share it with us! Please post your last edit as a separate answer posting to stick to the Q and A format of SE sites. Please accept your answer (after 48 hours) so that it does not pop up to the top of the queue once in a while. This also will help us in reducing the [unanswered questions list](https://3dprinting.stackexchange.com/unanswered). – 0scar Jul 31 '19 at 21:51
  • I followed the same guides and everything works now. I believe the bugfix firmware is what resolved the issue. Unfortunately I had returned the old probe so I wasn't able to test that but I did try different wires on it and it still failed, so that leads me to believe it was a software issue. – Blubberguy22 Aug 01 '19 at 15:21
1

Just leaving this note here as I have had my own BLTouch issues, maybe it will help someone else...

V4.2.2 board on an Ender 3. BLTouch V3

I was getting inconsistent failures on both home and bed level, also would drive into the bed on occasions.

I would first recommend keeping your Z stop switch connected (the BLTouch uses the five pin header on the V4 boards, not the Z stop.

I tried with extension cable and connectors, then hard wired the extension cable, also removed the pin header plastic body on the connector going into the board (as it's not the right type, and sits a bit too high) to make the cable ensure good connection to V4 board.

Correctly levelled bed, Z stop, was getting awesome prints with stock Creality firmware for Ender 3 Pro and BLTouch on v4.2.2 board (without adaptor board version).

Still random crashes into the bed and random bed level fails.

I'm racking my brains, replaced nearly all wiring, made sure good connections, changed to Marlin 2.X.X bugfix (which you load onto SD and turn the machine on).

Still random crashes into the bed and bed level fails.

So I'm now getting close to, this has to be a faulty touch surely, I've done my fair share of electronics repair being an electronics engineer by trade.

I'm looking at the touch, I see a solonoid, I checked how it works, the ferrite core looks flush with the top of the touch housing. I turn it a full turn into the touch. I'm getting less errors.

I think I finally ended up turning it about 0.5 mm to a 1 mm into the housing. All seems much better. No fails or crashes since the last tweak of the ferrite grub screw.

If the sensor is a little off on the Ender, and I hear they are, then maybe the position of the ferrite is more sensitive on these machines. That will affect the magnetic flux of the sensor.

I also found a link brief on the V3 probes and there is a section that points out a 0.3 mm gap from top of ferrite to top of probe stated, mine was flush.

I have ordered another just to be on the safe side but I think this may have helped stop my random fails.


After moving house, pulling printer down and rebuilding, I had this issue again... groan....

This time I found the issue, its firmware.

After going through 2 touch probes, rewired (again), screening touch to ground and more, still doing it.

So I got the latest marlin 2.0.9, compiled it, boom, not a single failure......

lesson learnt
0scar
  • 32,029
  • 10
  • 59
  • 135
Paul Smith
  • 11
  • 2
  • I have the same setup as you and I'm encountering the exact same problems. Leaving the z-stop switch plugged in didn't stop it from driving the nozzle into the print bed. I'm trying out your suggestion of screwing in the core a bit more, and I also zip-tied the wires to the bltouch in case they were too loose. – Taegost Apr 12 '21 at 14:01
1

I had the same problem. It seems it was definitely a loose connection on the BLTouch. I put a wire tie around the neck of the BLTouch, just underneath the mounting feet, to secure the wire and ensure a good connection regardless of position. It has worked great so far.

w1r3d
  • 11
  • 1
1

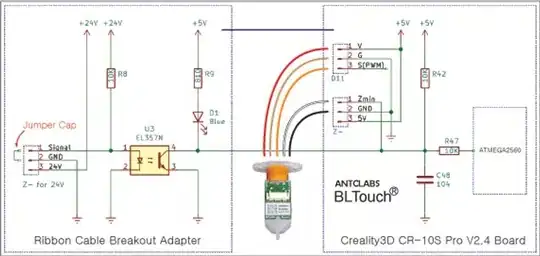
I found this and remember doing something similar on my TAZ 5 when I installed a proximity sensor on it. See BLTouch V3 on the Creality3D CR-10S Pro:

Creativity recommends connecting white and black lines to Z+ and downloading the Creativity firmware.

The BLTouch V3.x is enough just to install the jumper cap on the CR-10S Pro and it works well in Default(OD) and 5V Logic Mode. (including Smart V3.0 produced by April 4th, 2019)

This solution is complete and safe. You do not need to remove the capacity or add a pull-up resistor for the BLTouch installation in the CR-10S Pro.

Cause of problem: When the inductive proximity sensor is removed from the Ribbon cable breakout adapter, 24V is kept at EL357N pin1

(Anode) through R8, so EL357N pin 4(Collector) is fixed LOW.

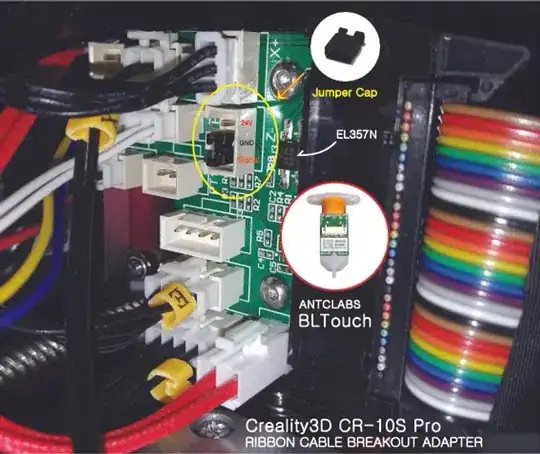
Solution: Install the Jumper cap between the Z-connector signal and GND pin on the Ribbon cable breakout adapter.. It prevent the

EL357N pin4(Collector) to fix LOW.

How to install the jumper cap: Remove the inductive proximity sensor from the Ribbon cable breakout adapter for CR-10S PRO and

install the jumper cap as like the picture. This operation requires caution.

Board

※ Never install the Jumper cap between the Z-connector 24V pin and the GND pin on the Ribbon cable breakout adapter.

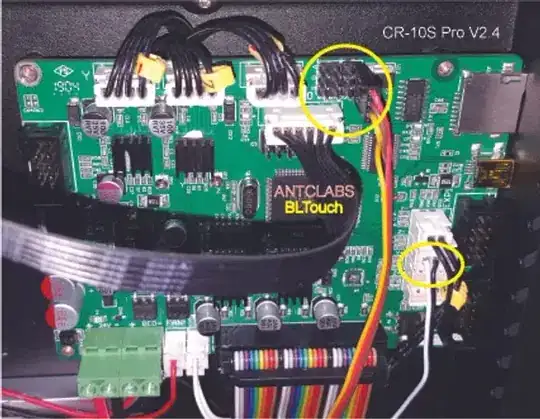
CR-10S Pro Wiring:

Schematic

See Schematic. Using the 5V Logic Mode without the jumper cap installation may break BLTouch or EL357N.

Wiring

Greenonline
  • 5,831
  • 7
  • 30
  • 60
RoRo
  • 11
  • 1
  • Hi RoRo and welcome to SE.3DP..! Please include the info from the page in future, otherwise your answer is a link only answer, and these tend to get flagged for deletion. If (or rather, when) the link dies, then your answer won't be as much as as it could have been had the info been included within the answer. I had added the info for you this time. Many thanks. – Greenonline May 15 '21 at 14:46
0

I've been through the same sort of issues and eventually found that it was attributed by the cable and connector. Re-check or re-wire the sensor, this helped me out.

0scar
  • 32,029
  • 10
  • 59
  • 135
0

Is it something like in this video? Extending/retracting when NOT probing works fine, but probing fails with the pin not correctly retracting?

Then the BLtouch is defective and it should be replaced. It is not a firmware issue.

FarO
  • 3,906
  • 13
  • 31