and welcome to 3D Printing Stack Exchange.
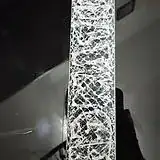
From the picture and the video, it appears that you have significant under extrusion. It is impossible to determine from this information what is causing this. It could be temperature, such as a nozzle that is too cold, slicing configuration being wrong, such as by slicing for 3mm filament but using 1.75mm filament, electronics, such as the extruder stepper not generating enough torque, or a jam where the filament simply can't be pressed into the hot zone.
I listened to your video but didn't hear anything that might help straighten this out. But, what I didn't hear was a "clicking" extruder. The extruder "clicks" if it is trying really hard to push the filament but it is not able to come out of the nozzle. It might be worth checking the toothed roller that drives the filament to be sure the teeth are clean. If the teeth are full, the drive roller can't get a grip on the filament to push it forward.
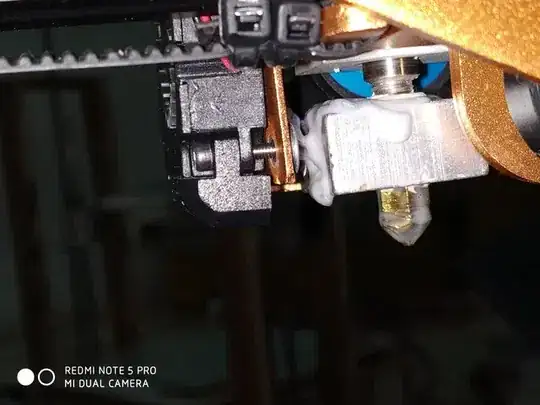
Also, I am concerned that plastic is may be coming out somewhere other than the top of the nozzle. That shouldn't happen. Could you attach a photo of plastic coming out of the wrong place?
--- Added after comments, and this photo os the nozzle leak was attached.
3D printing needs a long chain of conditions to be right. Any problem in that chain can cause unacceptable results. When trying to get good results, it is always best to fix any problem you find, and the plastic leak is a big problem. Other problems may exist, but this must be fixed for a print to succeed.
The plastic leak is a big problem for a few reasons:
- It allows plastic to leave the melt zone other than through the nozzle. Since 3D printing depends on controlling the plastic leaving the nozzle for the print, this extra escape path is plastic which should have been neatly deposited on your print. The control system has no way to know that the plastic it fed through the extruder is not on the print, so you get under extrusion.
- There is an extra chamber inside the hot end which must be melted. In the ideal case, the filament directly enters the nozzle, in which it melts. Pressure from the cold filament at one end pushes the molten filament toward and through the nozzle. The filament doesn't not need to change directions or flow particularly easily because it always moves linearly through the hot end. It necks-down to the output hole size, but that is assisted by an entry cone to the nozzle aperature.
- In a working hot end, there is not hot filament inside the hot end that is not extruded. There are no eddy currents. There are no places where filament can rest. PLA is prone to degradation when kept at printing temperatures. This isn't a problem in an ideal hot end because no filament sits idle. Where there is an opening, or any extra gap, even if filament weren't leaking past the threads, there would be a pool of filament that was not in the extrusion path which would be hot for tool long, and would degrade into a hard, burned mess.
Disassembling the hot end can be tricky. The cold plastic is a great glue which has filled and sealed the threads. Do not use the internal heater to heat it. The wires will get in the way when you are taking it apart. There can (will) be broken connections, and possibly uncontrolled heating. Use a hot air gun or hair dryer to soften the plastic.
If you can not remove the heater and thermistor before taking it apart, find where they are connected to the electronics and disconnect them there. Do not leave the wires connected. The heater and thermistor are fragile, and too much bending or force on the wires will destroy them. You might purchase spares because you are likely to damage one or both.
PLA softens at a relatively low temperature. When you have a plastic encased mess, disconnected from the rest of the printer, you can soften the plastic either with hot air or hot water.
A "relatively low tenperature" can still give you serious burns. Use gloves, pliers, toothpicks, and any other tools you need.
When you reassemble the hot end, the nozzle should screw tightly against the upper tube that delivers the plastic.
Inspect the top of the nozzle and the bottom of the tube, and be sure they are flat, smooth, and are cut at a 90 degree angle to their axis. They must fit together tightly, leaving no gap.
One assembly order is recommended by E3D. I mention them because they deserve credit, although I am embellishing with details they are unaware of, have not suggested, and are not responsible for.
- Start with all parts removed from the heater block (the rectangle of aluminum).
- Screw the nozzle into the heater block, and then back it off 1/4 to 1/2 a turn.
- Screw the top tube into the heater block until it is tight against the nozzle.
- Assemble eerything else -- heater, thermister, wiring, attach to extruder, ...
- With no plastic, heat the hot end from the control panel to be hotter than the hottest you will need when printing, maybe 250C if you are only printing PLA and ABS, and assure that it is heating normally.
- WITH THE HOT END HOT, tighten the nozzle with a wrench so that it is tight against the upper tube.
Of the three objects in the hot end, the aluminum heater block has the highest coefficient of thermal expansion. It is higher than both the steel upper tube and the brass nozzle. The tendency as the hot end heats is to open a gap between the nozzle and the tube. By making them tight at the highest temperature, they will also be tight at lower temperatures.
When the leak is fixed, you may be done, or there may be other problems to solve.
Welcome to 3D Printing!