7

I have been having an issue with certain portions of the walls of certain prints becoming separated from the rest of the model. It happens with smooth vertical edges.

Specifically, this model, ID Badge Holder, on the edges where the lanyard would be attached. And on several places on this model, Cat Necklace.

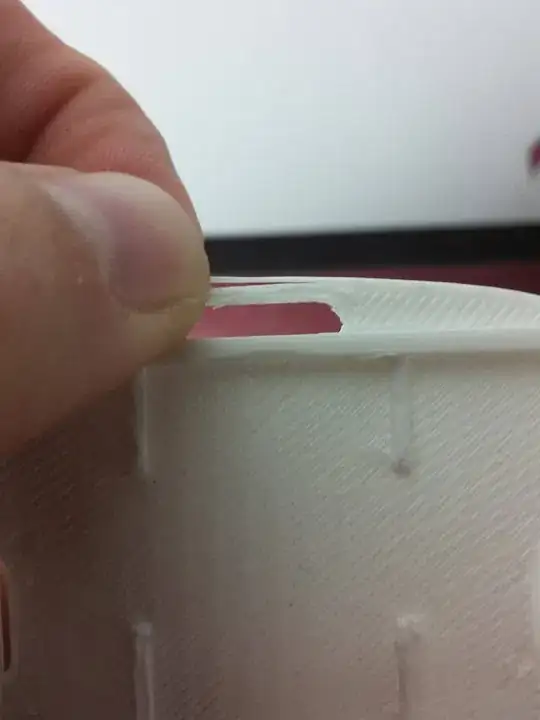
Here is the resulting issue:

Detached print wall

I am quite new to 3D printing, so I'm sure this is an easy fix, I just don't know about it yet.

I am printing with a Monoprice Select Mini V2, using Hatchbox PLA, and the default slicing settings inside Cura. I don't have problems with any of the D&D figures I've printed, or some of the other thicker square pieces I've printed. I know I've got kind of a bargain printer; if it's just a quality issue I have to learn to live with, no problem. But if an expert knows of some slicer settings to tweak for these kinds of prints with flat vertical walls, I'd love to give it a try.
0scar
  • 32,029
  • 10
  • 59
  • 135
CatsAndCode
  • 175
  • 1
  • 1
  • 8
  • 1
    Can you post the default settings in use for extrusion speed, wall thicknesses, layer height, at the least. "Default" varies by defined printer and by Cura version. – Carl Witthoft May 30 '18 at 14:53
  • Please include the photos. Also please include photos of the model as links do not last the test of time. – StarWind0 May 30 '18 at 19:31
  • @StarWind0, I've attached an image of the issue I'm experiencing. – CatsAndCode May 31 '18 at 12:05
  • @CatsAndCode Looks like your lines of the faces and not touching; under-extrusion? Or are you printing with no top and bottom faces and high infill? Have you checked filament diameter, filament settings in slicer and checked the length your extruder prints (when you ask for 50 mm, does actually push 50 mm forward)? – 0scar May 31 '18 at 13:47
  • @0scar The more I'm reading everyone's responses, the more I think it IS an underextrusion issue. I am not sure how to create the "top and bottom faces" you mentioned in Cura. I'm printing at 10% infill. Filament diameter is set correctly in Cura, but I haven't done any calibration/verification on my printer. It was allegedly set up at the monoprice factory, so that's been working for me thus far. – CatsAndCode May 31 '18 at 14:40
  • @CatsAndCode I updated my answer. If you select 0 mm layer thickness and 95% infill you get the exact same faces as your print. I print stuff for a colleague who uses the products in a vacuum chamber as molds, without skins you cannot trap air :) – 0scar May 31 '18 at 17:15
  • does it work better if you slow down the print speed? – dandavis Jun 04 '18 at 21:46

4 Answers4

7

I have faced the same issue if it concerns just gaps between the walls (to the point you could put a nail in between the outer and inner perimeters, so clearly the perimeters were not bonding), for me this was fixed with proper tension of the belts of my Prusa i3 clone, and for my other (CoreXY) printer reducing the friction of the X-Y system. Both help position the head better for proper wall adhesion.

Now that you have posted a picture of your product I do not think the above is applicable to you. Your print looks as if it has an under-extrusion problem as the lines on the faces are clearly not touching, you see the diagonals of the layers beneath. This under-extrusion also may contribute to the vertical wall bonding problems you mention. To fight under-extrusion you need to check a few things:

  1. Be sure the slicer has the actual filament diameter as mentioned on the box, or measured at various points (if it varies, take the mean value).
  2. Check your extruder setup to see whether you have play or friction preventing filament to extrude freely.
  3. Also check whether your extruder gear is not loose, re-tighten the grub screw.
  4. Final step is calibration. You want to be certain that when you demand 100 mm of filament to extrude, you actually extrude 100 mm. Put a mark on the filament and extrude 100 mm using a tool like Pronterface or Repetier-host. If this is off you should readjust the steps per mm in the firmware (if you are able to do so), or increase the extrusion multiplier or flow in your slicer.

Please look here or here for more information.

0scar
  • 32,029
  • 10
  • 59
  • 135
  • "You want to be certain that when you demand 100 mm of filament to extrude, you actually extrude 100 mm" This. On my MP Mini I've noticed that the default extruder steps per mm is wrong. I think the default is something like 97, and every time I calibrate it, it's more like 105. This was leading to constant underextrusion for me until I did an extruder calibration. – CodingWithSpike Jan 20 '20 at 13:16
  • As I saw this efect come in gradually over time, I knew it had to be something with the printer itself. And indeed, tensioning all belts resolved it. – Cees Meijer Jun 02 '21 at 20:52
2

I dont know if I understand you correctly, but let me try...

It could be that the wall-thickness of the part you try to print is to thin or is not "compatible" with your nozzle size. Lets say your nozzle and output size is 0.4mm. You now try to print a wall with a thickness of 1mm. So the printer will print 2 wall-perimeters (left and right) with a 0.4mm thickness. Between these walls there is now a 0.2mm gap. The slicer cannot fill this gap as its to small for the nozzle, so it is left empty.

I run into this problem multiple times already with different models using Cura.

But, atleast in older versions of Cura, if you go to the layer-view you can kind of preview/see the problem. (Iam still using an older Version.)

This problem can also effect the overall print quality of the part. (For example I had a part with very big stringing problems but only on the inside of a specific wall. The wall wasnt even thin, it was a couple of mm, but the overall thickness of the wall was not a multiple of my nozzle-size so it created problems.)

Some say you should design a model with a nozzle size already in mind, however this is not really practical, as everybody uses different settings/printers and not everybody creates his own models.

Here are some more infos regarding this issue: (and more "walls-not-touching" issues) https://support.3dverkstan.se/article/23-a-visual-ultimaker-troubleshooting-guide#wallspace

So maybe try varying your nozzle size and wall thicknesses and see if this changes something in the cura preview already.

This problem can also happen if you have some very tight corners, which are to small for the nozzle.

LWS-Mo
  • 131
  • 3
1

When printing someone else's model, your print is at the mercy of their design. Designing for multiple printers is hard work, and even if something is printable on 90% of printers, you may be in the 10%. Sometimes designs use walls too thin for other printers. On this design, the lanyard wall looks a bit thin but workable. My own card holder has a thicker wall at that junction: https://github.com/firepick1/taz-shield/blob/master/STL/Cardholder.stl

Vertical walls are the weakest part of 3D printing. Walls are made up of overlapping filament strands. They'll come apart if your printer belts are loose and the strands don't align (tighten belt if there is play). They'll come apart if you print too fast and the contact area is too thin (slow down for better contact and more accurate motion). They'll come apart if filament head temp is too low and the strands don't fuse (bump it up by 5C and try again).

Slicing software normally takes are of all this for you, but it's good to understand what happens on the print bed because your slicing software will often have options that you will need to tweak for your specific printer.

OyaMist
  • 459
  • 2
  • 5
  • 2
    I respectfully disagree -- wall thickness is generally well-controlled by the slicing software, and a quick check by looking at "layer view" or similar should show if there are any unprintable sections. – Carl Witthoft May 30 '18 at 19:10
  • 1
    Yes. Wall thickness is indeed well-controlled by slicing software. However, I think it's important to have a conceptual model of the printing process to understand how to use the slicing software. For example, Cura has three speed settings for non-expert mode. I use slow for accurate/strong prints and super-fast for prints with massive walls. – OyaMist May 30 '18 at 19:38
  • @CatsAndCode, I've updated my answer with my own lanyard cardholder I've used for years. If you have time, I would be most curious if you could print out this: https://github.com/firepick1/taz-shield/blob/master/STL/Cardholder.stl – OyaMist May 31 '18 at 18:03
1

Yup I can tell at a glance it is under extrusion. I bet the issue is temp.

Test your steps per MM for E. See https://reprap.org/wiki/Triffid_Hunter%27s_Calibration_Guide

Measure Required tools: vernier caliper with depth gauge, or similar tool that can precisely measure 100mm. Your hob effective diameter is unlikely to be exactly 7mm.

Remove the hot-end from extruder so you don't waste filament. Feed in some filament. Using the extruder body as a reference point, mark the filament at 120mm. Tell the printer to feed 100mm of filament. Measure the distance from the extruder body to the mark you made. It will be over 20mm if it moved too little, under if it moved too far. new_e_steps = old_e_steps * (100 / distance_actually_moved) … or, old_e_steps * (100 / (120 - distance_to_mark)) Set this value in your firmware. You may need to re-flash your board. Sprinter/Marlin supports M92 Ennn to set this value temporarily. Repeat from Step 3 until you get between 96-104mm. Then continue with this guide. You'll dial it in perfectly later on. Don't flash firmware yet. There's a further refinement to this value below. Why? The back-pressure from the hot-end alters how much plastic each hob revolution pushes, and you'll probably end up tightening your idler more which reduces the hob effective diameter. Re-attach hot end.

If that comes out correct, your Temps are too low.

To fix this, you will need to play around and increase your temps by 2-3 degrees until the infill comes out correctly. Do not go over the minimum needed else you will have other issues.

Also check for obstructions such as carbon buildup in the nozzle. In addition to the tightness of your filament tensioner on your extruder drive if you have one.

I will say, I had this issue on my Ultimaker 2. An apparent design flaw caused the filament drive to lose power over time or possibly wear on the tube causing extra drag (bowden tube only issues). I corrected it by increasing the extrusion multiplier in simplify3d. However that is a bandaid and the real issue should be addressed. In my case in the end I replaced the drive with a bondtech.

StarWind0
  • 3,023
  • 3
  • 12
  • 29