9

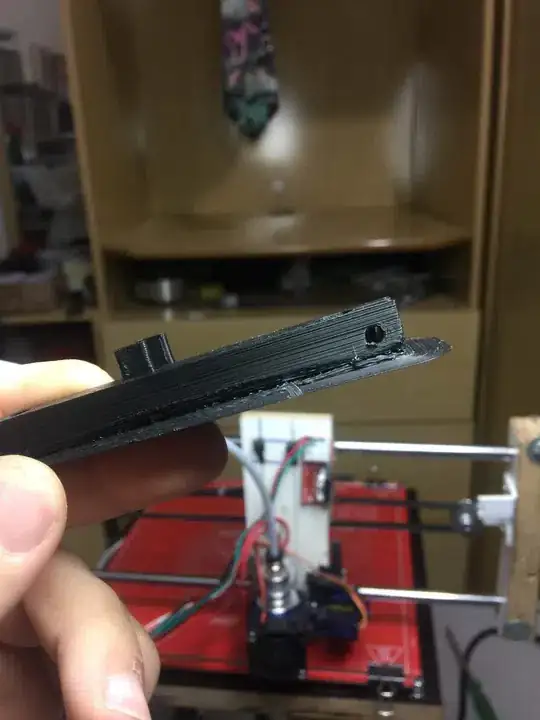
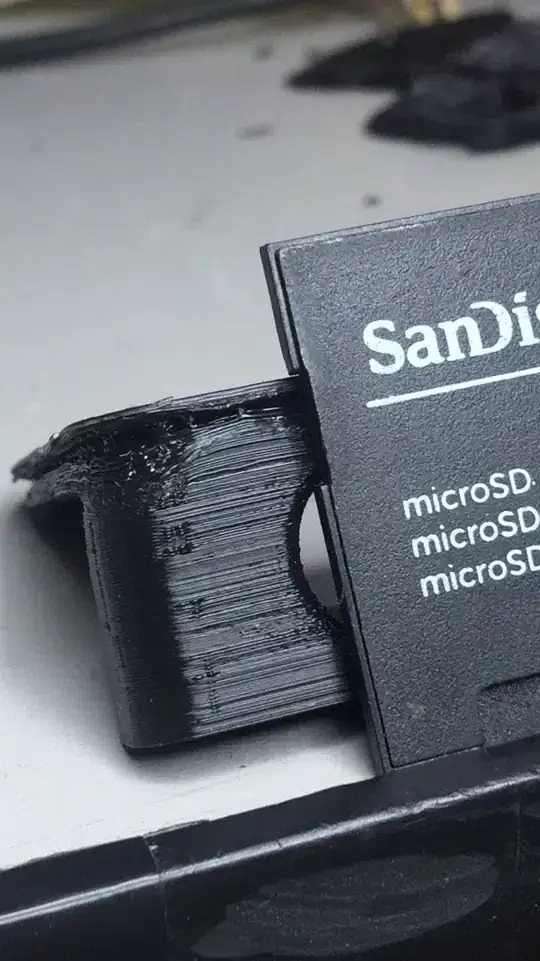
I'm having a frustrating problem with my recent built custom 3D printer so every single print I made, from the third layer, the nozzle is "rubbing" on the already placed filament. This results in a complete mess, melting the previous layers with the nozzle / new extrusions coming, getting malformed and out of precision forms, if I leave this happening, my Y-axis motor (bed) start to jump steps (by the force of nozzle friction to cold material). To stop that symptom, at the beginning of this, I have to raise the Z-axis by hand turning about 1/8 rotation of T8 fuse. By doing this, every rest of my printing runs peaceful, nicely, and beautiful.

I'm using Marlin firmware, the most recent version, and Ultimaker Cura. My nozzle size is 0.5 and I'm using Ultimaker Cura's Fine Preset (0.1 mm height)

My stepper motors axis are very well calibrated (X, Y, Z and Extruder). I tried:

  • lowering and raising the print bed to get spaced or shrunken first layers to see if something helps,
  • tried to change Z home offset on display,
  • tried the M206 command to change the print zone of the Z-axis,
  • tried to change the first layer height on Ultimaker Cura,

but nothing seems to solve my problems.

Due to my lack of experience, I don't know what I could try to solve this frustrating issue. I already check and rechecked my mechanical structure and everything was fine solid and very well balanced and square.

Photo of failed print - side

Photo of failed print - front

From comment:

  • Printing speed are 40 mm/s,
  • Temps:
  • Hotend: 220 °C;
  • Hot Bed: 120 °C;
  • I have also tried 110 °C,
  • My Z-axis uses 800 steps per mm (1/32 micro stepping on DRV8825 at RAMPS).

I'm thinking about over extrusion but I have fine tuned my stepper, checked and rechecked for it and seems normal
Greenonline
  • 5,831
  • 7
  • 30
  • 60
eduardogarcia234
  • 139
  • 1
  • 1
  • 8
  • 3
    Going by what you think is happening, the Z is skipping steps.... or your over extruding. Bump the stepper current. if that's not it, change back to 1/16 or try other drivers and see. if it's either then those rods aren't 8mm per rev. – Eric Kelly Oct 03 '17 at 13:06
  • 2
    "most recent version" changes: since this question has been asked, Marlin released 1.8, 1.9. 2.0 and possibly more. – Trish Oct 08 '18 at 10:55
  • 1
    As @Trish states, saying that it was the *most recent version* isn't particularly useful. Even looking at the date of your date and correlating that with the release dates of Marlin may not give an accurate estimation as to the version that you were using. Could you edit your question and state the actual version that you were using, if you can remember? Thanks. – Greenonline Oct 10 '18 at 08:56

7 Answers7

4

I have made some learning on mechanical setup and discovered some issues on my printer, there are few:

  1. Bed warped, even with glass (thin thickness), making BAL confused with Z-movement over the bed.
  2. Overextrusion making layer oversized in terms of thickness.
  3. Some of missing mechanical fine adjustments.

The main reason for this symptom was the overextrusion (that made my X and Y axis jump some steps when hotend collapses in the already-printed materials on their movements).

I hope this helps some of those who have this similar problem!

Greenonline
  • 5,831
  • 7
  • 30
  • 60
eduardogarcia234
  • 139
  • 1
  • 1
  • 8
3

Your Z axis movement is somehow wrong. You should check steps/mm, z acceleration and speed. Try moving your z 10cm up and use caliper to check if it is correct.

3

I'm not a 3d printing expert by any means, but I had some funky layer stuff going on before "wrinkled" first layer & gross edges w/overlap. For my printer, the problem was I was over-extruding.

I followed this video by Tom's 3D: 3D printing guides - Calibrating your extruder

For some reason, I had to do it twice before it actually worked. Once I got that calibrated (and fixed an uneven print bed), I was good to go.

IanCaz
  • 104
  • 3
  • Also keep in mind that extrusion calibration depends to some % on extrusion speed. Be sure to calibrate at a speed which sits in the middle of your usual extrusion speeds: you'll get overextrusion when going slower and underextrusion when going faster, but by a smaller margin – FarO Mar 01 '21 at 13:00
1

I just flashed my new Ender 5 with Marlin and I had the same issue. The 2nd and 3rd layers were digging into the previous layers.

I manually lowered the bed by 10 mm via the machine knob and the bed only moved 5.207 mm (I used a dial caliper). I went into the EEPROM and adjusted the steps/mm for the Z from 400 to 769:

  • 10 mm /5.207 mm is 1.921
  • 400x1.921 is 768.4
  • I rounded up to 769

The next test print was a success.

This was an odd thing for me since the test print I did before flashing the firmware was just fine. It only started after I flashed Marlin. This is how I knew that it wasn't the stepper itself, but just a setting.

Greenonline
  • 5,831
  • 7
  • 30
  • 60
  • Hi welcome to 3DPrinting.SE! Sorry, but this does not answer the question, this is an answer to a different question, but when stumbled upon may be useful for others that mistakenly gotten here. It may therefore don't receive much upvotes. Please note that this is not a regular forum, SE sites are driven by questions and answers. Your answer is perfectly valid for a different question where the Z movement does not correspond to the commanded input value. We encourage you to read [help] and do the [tour]. – 0scar Mar 01 '21 at 12:06
1

Taken from a rejected suggested edit. If the author (Gareth) posts their own answer, this can be deleted, or flagged for deletion


My Ender 3 is not warped in any way but there are several issues I needed to address:

  1. Extrusion:

    Check your extruder and Z eSteps for accuracy, as detailed in numerous places. Test layer width: print a cube in vase mode (1 shell thick) and measure wall thickness. Adjust extrusion multiplier accordingly.

  2. Bed Level:

    I was leveling with the '1 sheet of paper' method. I started using two sheets of paper. To compensate for reduced bed adhesion I use hairspray.

  3. Mechanical 1:

    I found my X carriage was slightly loose: the hotend was pulled upwards or rode upwards during some moves then grinding on subsequent layers.

    Test: Grab the rail with your left hand then push with your thumb against the top left roller. If the roller rides up the groove then the carriage is loose.

    Fix: The carriage is held firm by an eccentric on the bottom roller. Loosen the bottom wheel bolt, adjust the eccentric nut until the carriage is firm on the rail. Then back off slightly until motion is free. This is best done with the belt loose or disconnected.

  4. Mechanical 2: X rail sags on the right.

    I found the X rail assembly was not even height across the width. Again, the eccentric roller was loose. Test: Measure rail height on both sides.

    Fix: Adjust inside eccentric roller as above.

  5. Mechanical 3: Tighten belts.

Obviously, this is brief. Check your manual or YouTube for anything you're unsure of.

Greenonline
  • 5,831
  • 7
  • 30
  • 60
1

The first picture seems to show layer shift. Usual causes include:

  1. Missed Z movement, so the nozzle hits the build and the layer is offset.
  2. Bad acceleration in X/Y, so there is missed X/Y movement, and the layer is offset.

Adjustment: reduce Z G0 speed, and reduce X/Y speeds (G0 and G1) and acceleration, and then repeat.

Hopefully, correcting this will make the issue in the second picture easier to diagnose.

Davo
  • 2,362
  • 1
  • 12
  • 26
1

Does Cura have options for avoiding perimeters during moves? And does it have an option to step up the z axis during non print moves? These were the two issues I was having with the nozzle dragging through the previous layers on my prints. I set the z axis to move up 0.2 mm during non print moves and to avoid Perimeters during non print moves (using Slic3r) which eliminated this issue for me almost entirely.

Greenonline
  • 5,831
  • 7
  • 30
  • 60