9

When printing the first layer, the infill overlaps on just one side of my print. Thereupon there's a rough, and a lot higher, surface on the first few millimeters after the wall.

  • Printer: Arduino Materia 101
  • Filament: Rec Pla
  • Temp: 210 degrees

I have tried to troubleshoot it, but I just found information about a problem when the infill isn't close enough to the wall everywhere.

However, for me, the problem is the contrary and just on one side.

Photo of overlap

Greenonline
  • 5,831
  • 7
  • 30
  • 60

2 Answers2

2

This may be a result of an unlevel build plate (OP did not specify if calibration was done at time of writing).

If the area that is overlapping is higher (closer to the nozzle), the filament will be pushed down and around the nozzle as it extrudes in that area. This will result in excess filament overlapping unto other strands on the layer.

Please excuse my lack of artistic skills in paint, but the image below should illustrate what can happen when your build plate is unlevel:

enter image description here

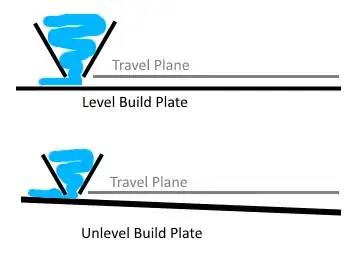
Basically what it's trying to illustrate is that if the nozzle is closer than the expected layer height, the machine will continue to flow as if the nozzle is layer height away. This typically results in a larger layer width because the nozzle is essentially pushing material out of the way.

You will notice that as you go further to the right in the drawing, that your layer may begin to "thin out" because if the nozzle more than a layer height away, the filament "stretches" until it settles on the build plate, resulting in a thinner layer width.

Ideally, your nozzle will be parallel to your build plate at all points along the build space and the "Standoff Distance" will be equal to your layer height. So, you should see the top of your bead of filament at the same height as the bottom of your nozzle.

tbm0115
  • 6,234
  • 2
  • 18
  • 40
  • Sorry for the long delay... I'm not really good at calibrating yet, but i calibrated the build plate. I took a paper and put it on the build plate, then i liftet Z to 0. Afterwards i told the printer to move X and Y and leveled the build plate so, that the power i needed to pull the paper under the nozzle was the same in every place... So that should have done the trick, shouldn't it? Sorry for bad english. :/ – MrOnkelChiller Dec 27 '16 at 08:31
  • 1
    Yes, it sounds like you did the right procedure. Your English looks fine :) You might do a little digging to see if there is a GCode program to help you calibrate faster if your machine does not have a procedure all ready. – tbm0115 Dec 27 '16 at 16:21
1

Yes. That happens. I personally prefer this to the alternative which is it does not go far enough and curls back. That said depending on your slicer you will have a line overlap tolerance. But what's really happening is you are smooching your first layer. Aka your hot end is too high in relation to your first layer multiplier.

Failing that and if you see it later in the print. Again I don't think you really can fix it but you should recalibrate your printers firmware, steps per mm and your slicers filament size.

Looking at it I again it is a bit much. Maybe the plate is not flat. Does it happen on any other sides? After that we have the unlikely case your hotend is too hot. Which the slow down of the printer could cause too much material to ooze out. But I'm going to say plate level as number one suspicion.

3D printing is a lot like trying to spin 3-4 plates at once.. if you still have issues I can expand more on calibration steps you need to do.

StarWind0
  • 3,023
  • 3
  • 12
  • 29
  • Yes, you're right, it's better like that, than other way round... Maybe the Printer just don't fits the requirements i have. but the steps per mm calibration would be interesting... – MrOnkelChiller Dec 27 '16 at 08:33