6

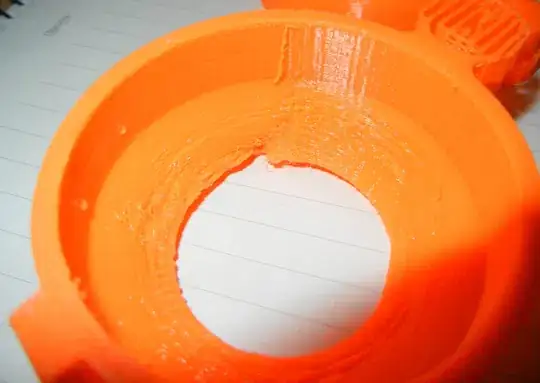
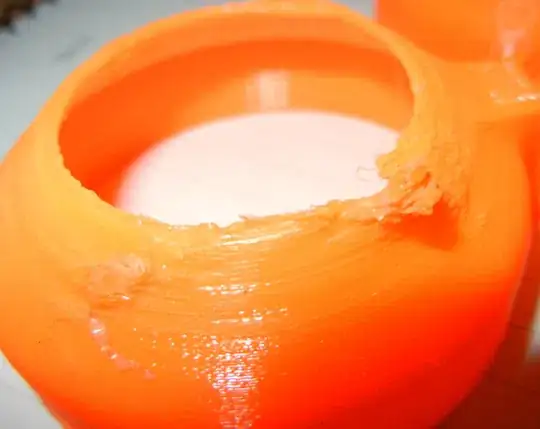
What would cause this effect, and how can it be avoided?

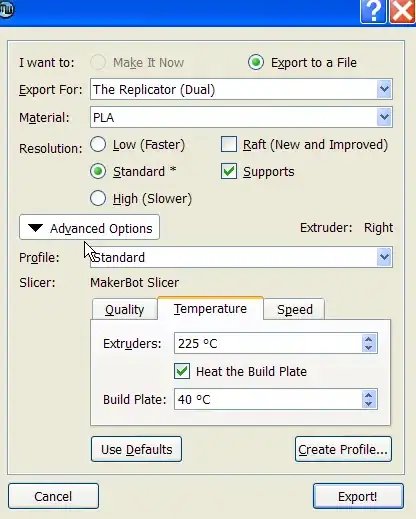
This is a PLA print, and it should look like this. I tried 215 and 225°C and both had the same effect. An earlier similar print at 220°C was not as bad but it still had some catching- it seems hit and miss and not strongly related to extrusion temperature.

Outside:

enter image description here

Inside:

enter image description here

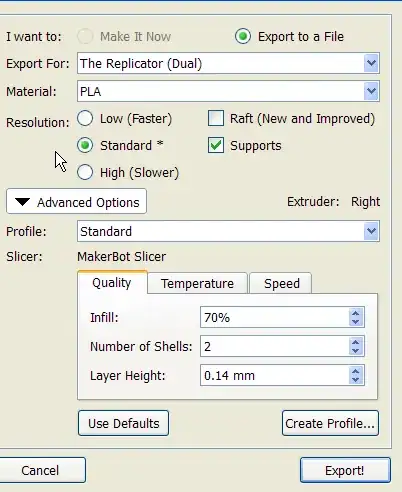
I'm using a QIDI dual extruder printer with Makerware 2.2.2.89 software and these parameters:

enter image description here

enter image description here

Speed is 60/80mm/s.

Spehro Pefhany
  • 303
  • 1
  • 8
  • 1
    Cooling fan? It seems that this is a bridging failure (or at least that initiates the problem). Cooler temp, or supports maybe? – Sean Houlihane Nov 24 '16 at 10:30
  • @SeanHoulihane Thanks for your comments. Bridging? You mean the fact it's curved inwards toward the top? There is a cooling fan, but I thought it was more important for ABS. Have to figure out how to control it. There did not seem to be any improvement with lower extrusion temp- it was actually worse (probably a coincidence). – Spehro Pefhany Nov 24 '16 at 14:52
  • Bridging meaning drawing an un-supported overhang. I think the way it's supposed to work is the extrudate freezes in mid-air, and clings on at the supporting ends. Hard to tell if its cause or effect, but it seems to be falling away. Also, the thingiverse listing says to use supports (which would be printed under the overhang, with a small gap. Check how this looks in the slicer. – Sean Houlihane Nov 24 '16 at 14:58
  • Is the failure mode location something that can be associated with a specific point on the bed? To have the head catch on the print, the print has to be higher at a specific point, or the head has to be lower. The mechanical integrity of the head transport must be solid and the bed has to be level and not warped. How does your situation fit in this description? – fred_dot_u Nov 24 '16 at 14:59
  • The supports printed nicely under the hinge overhang. I assume the software didn't think they were required under the conical top. – Spehro Pefhany Nov 24 '16 at 15:06
  • @fred_dot_u That's a **very** good tip. I'll check the bed leveling tonight. It does seem to occur near one corner. – Spehro Pefhany Nov 24 '16 at 15:07
  • @SpehroPefhany, I believe you might have mixed the cooling strategies of ABS and PLA: use as much cooling as possible with PLA, and as little as possible with ABS. :) – Tormod Haugene Nov 29 '16 at 16:58

2 Answers2

3

I think that you should first verify that you have the latest firmware and a newer version of MakerWare. I experienced similar issues around that version of MakerWare and remember a lot of print errors came with it.

I believe the MakerBot Dual firmware is somewhere around 7.? and is no longer in development.

MakerWare is also no longer in development as a standalone application and seems to have been ported over to the MakerBot Desktop. However I've personally found v2.4.1 to be substantially more stable than v2.2.

I have not tested it, but supposedly the new MakerBot Desktop (v3.10) is compatible with the Replicator Dual "Original". I had tried an earlier version of MakerBot Desktop and reverted back to MakerWare 2.4 because I ran into issues with connectivity. However, I'm not certain it was an issue with software so much as the exploding voltage regulator...

It might be best to give the new software a shot and/or try v2.4 of MakerWare, if you can find it.

Here's the link to the latest MakerBot Desktop

Here's the release notes for MakerWare/MakerBot Desktop v1.0-latest (v3.10+)

tbm0115
  • 6,234
  • 2
  • 18
  • 40
  • Well, I downloaded it, got it work, leveled the bed and got exactly the same results from the new file. – Spehro Pefhany Dec 05 '16 at 03:06
  • Did you try Tormod's suggestion of reducing speeds? Check out my answer [here](http://3dprinting.stackexchange.com/questions/540/mushy-small-top-layers/541#541) on how reducing your print speeds may help. As well as adding additional "columns" in a different area of the build plate may help cooling of your actual part. Please let me know if you'd like me to elaborate. – tbm0115 Dec 05 '16 at 03:30
  • I was just going to run another test, and cancelled it - changed minimum time per layer to 30s from 5s. Will let you know. – Spehro Pefhany Dec 05 '16 at 04:05
  • Reducing the minimum time per layer might make it worse. I would suggest making a dummy part, like a cylinder in the corner of your build plate and make it the same height as your part. Also, increasing the time value for the parameter mentioned should help. – tbm0115 Dec 05 '16 at 04:07
2

As pointed out in the comments, what you are seeing could very well be related to lack of cooling:

You may notice that the irregularity in the print become more and more pronounced the further up you see. I believe this happens because the area that is printed is reduced gradually closer to the top, which in turn will give each printed layer less time to cool. (The frequent revisits of the hot nozzle will not allow the top layer to cool naturally.)

This problem is very common when printing models with small cross-sections, and are typically solved by:

  • Installing additional print cooling fans (cooling the actual print, not the hotend/heat sink)
  • Printing several items at the same time (to increase the cross-section)
  • Reducing print speed (gives more time to cool, but might not work for very small models)
  • Reduce printing temperature

If you can, installing additional fans and/or printing multiple objects at the same time are probably the most efficient solutions - in my opinion. However, either method would be worth exploring.

PS: When printing PLA, set your fans to full. ABS, on the other hand, does not like cooling.
Tormod Haugene
  • 3,947
  • 2
  • 20
  • 40
  • 1
    Thanks. The fans were at 50%- "turn them off for PLA" is printed right onto the PC cover of heated bed of the machine, but that's not what the program does/did. I'll try 100% and see if it makes any difference, thanks. – Spehro Pefhany Dec 05 '16 at 03:08
  • @SpehroPefhany. It is very strange that the manufacturer suggests turning off fans for PLA. I know it is quite common to turn them off for the first couple of layers for better bed adhesion (also with PLA), but the rest of the model will look significantly better the more print cooling you have. (I did a test once with three print cooling fans for PLA and printed a full layer of 10 cm bridges flawlessly!) – Tormod Haugene Dec 05 '16 at 07:11
  • I wonder if it was a mistake in translation. 'Open cooling fan' could mean either to me, but the clarification "Set Cooling Fan OFF" is unambiguous. [Here](https://ae01.alicdn.com/kf/HTB1tWjLMVXXXXauXpXXq6xXFXXXW/QIDI-3D-printer-PC-building-plate-surface-tape-QIDI-TECHNOLOGY-PC-Gule-sticker-bule-print-bed.jpg_640x640.jpg) is what it looks like. – Spehro Pefhany Dec 05 '16 at 07:18
  • Hmm, yeah. That could really mean anything. :) Anyway, if you struggle with adhesion, turning it off for the first few layers will help with warping. Most slicers offer this option. :-) Found [this example](http://www.thingiverse.com/thing:202798) – Tormod Haugene Dec 05 '16 at 07:28
  • 1
    My struggles with adhesion are mostly in wrenching the $*&$#*$ part off the polycarbonate without breaking anything, though I did see some poor adhesion in supports when I cranked up the fan to 100%. – Spehro Pefhany Dec 05 '16 at 07:48