2

I have a Bowden extrusion printer in my garage. (Printing PLA is smelly and is nothing I want to be exposed to for an extended period of time!)

I enclosed the printer within a plastic sheet housing to reduce the energy consumption of keeping the hot bed tempered. I noticed that a strong temperature fluctuation influence how the PLA part turns out.

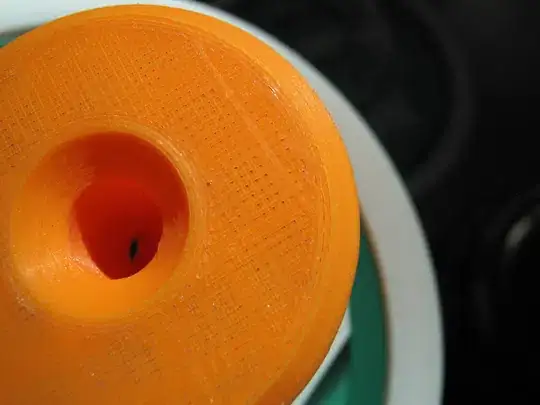
If I start printing in the morning a print that takes 2 hours to print -- in a cold garage, cold filament, cold tube, I end up with a solid first 4 layers and lacy last 4 layers. The last 4 layer are so thin that they end up to be almost see through.

last layer last layer

first layer first layer

I am assuming that the PLA and tubing heat expansion difference is the reasoning for that undesired under extrusion phenomenon.

The cold Bowden tube is perhaps expanding more then the PLA filament and the tubing is warming up more quickly being directly exposed to the heat during the heating up of the unit; obviously, the PLA filament is inside the tube and is kept colder for much longer.

How can I solve this -- keeping the printer in the garage? And, would a direct extrusion mod remedy this under extrusion?

Most likely preheating the printer would help, but that would call for an insulation upgrade from plastic sheet to Styrofoam. Insulating the Bowden tube may also be worth trying. (Happy printing.)
0scar
  • 32,029
  • 10
  • 59
  • 135
MeSo2
  • 131
  • 4
  • have you tried putting a thermometer inside the enclosure to know how hot it gets? expansion matters very little, if you reach 30+ °C and PLA gets soft and more difficult to feed. Besides that, try to keep the spool outside the enclosure, there is no need to warm up PLA – FarO Feb 19 '21 at 18:05
  • @FarO I will add a thermometer to see hat kind of temperature read I get. Currently I have the spool on the bottom where the plastic hub is not quite reaching. I forgot to mention: I am printing at 0.1mm Z with a 0.4 nozzle. – MeSo2 Feb 19 '21 at 20:18
  • Maybe you could also stay there and observe the print. Are the first layers ALL really properly laid out, or is the printer squeezing the first layer down too much, resulting in excess of plastic which gets "absorbed" by the first few following layers, while the rest of the print appears underextruded overall? In other words: you may have two issues, the first one being wrong first layer height, the second one underextrusion, which gets "hidden" by the first issue at the beginning of the print. – FarO Feb 19 '21 at 21:34
  • 1
    Also, try without enclosure! the bed won't have any problem staying warm and the power consumption for few test prints won't matter. – FarO Feb 19 '21 at 21:35
  • 1
    If it is too warm in the enclosure, you might run into problems with under-extrusion caused by heat creep. – 0scar Feb 19 '21 at 22:55
  • @FarO I forgot to mention that my filament is 1.75 mm in diameter (apparently +/- 0.03 mm.) I set my diameter in Cura to 1.90 mm thinking it would help me better control another problem I am having. It has to do with printed incline and decline angles not matching the design. I think it may be best for me to start another question for that particular issue. It is clear to me that having the filament set to 1.90 mm would reduce the pressure and make thinner lines, but did not think that it would make that much of a difference. (Now I know -- thank you!) – MeSo2 Feb 20 '21 at 03:16
  • this my related question https://3dprinting.stackexchange.com/questions/15702/how-to-control-fine-details-from-overhanging-part-to-not-build-upwards – MeSo2 Feb 20 '21 at 04:19

1 Answers1

2

I don't think your temperature based explanation makes sense. This looks to me just like a first layer smashed against the bed, possibly too much due to nozzle being too low, followed by underextrusion when there's actually the right amount of space to extrude into. If you have fewer than 3 top layers or less than 0.6 mm of top layer thickness, you will almost certainly have an underextruded top like this just from the first top layer sagging into the space between the infill lines. Since the walls look okay, this is my best guess; if the walls looked bad too I would suspect poorly tuned filament diameter/E-steps-per-mm. Also check that your infill is not too sparse; more than 4 mm or so between infill lines gives a lot of room for top layers to sag into and may increase the number of top layers you need.

I see you added in the comments that your layer height is 0.1 mm. At such thin layers, you probably need at least 5 or 6 top layers; the first 2-3 are expected to sag and not fill the space.

  • My infill was set to 12%, about 8 mm apart. The top layer was set to 4 layers. Your answer points to under-extrusion -- which is clearly what I had do to having set the 1.75 mm diameter filament to a diameter of 1.90 mm in Cura. So I guess it is not a heating issues after all. That is very helpful! – MeSo2 Feb 20 '21 at 04:35
  • 3
    I'd try setting infill line distance to at most 5 or 6 mm, possibly using Cura's gradual infill feature if you want to save material on lower layers, and increasing the top layers to 6. I suspect that will get you acceptable results. – R.. GitHub STOP HELPING ICE Feb 20 '21 at 05:15
  • 3
    And also fix your incorrect filament diameter. I just read your comment where you mentioned it (1.90 - that's a HUGE factor off because it scales quadratically) and that alone could explain the problem; you might even be able to stick with sparse infill and only 4 top layers. – R.. GitHub STOP HELPING ICE Feb 20 '21 at 05:17
  • To elaborate: I had filament with a few 1.9 to 2.1 mm blobs on it - those did not even pass the extruder and got stuck there! – Trish Feb 20 '21 at 09:25