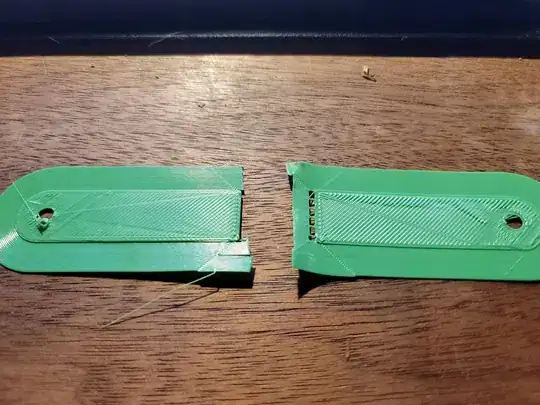
I am having an issue with prints set on the right side of my printer bed. I have leveled the bed, have a BLTouch and used a bed visualizer just to try and get it manually as level as possible. You can see the problem on the right piece side of this print where the filament was not laid flat and has many "humps" unlike the left piece side of the print that printed smoothly. Any idea what could cause this on an Ender 3 Pro and how to go about fixing it?
-
If you hold the (cold) bed at the sides and try to wobble it, does it move? – Andrew Morton Jan 21 '21 at 13:43
-
no, there was a very slight wobble when i got it but i tightened up the rollers on the bottom just to the point i did not feel the wobble again – John Ford Jan 21 '21 at 21:40
-
Are you sure it is not adhesion issue - like the spot on the right is just dirty (greasy)? The brim around it seems sticking well, as far as I could see. You could try to [ensure the bed is clean](https://3dprinting.stackexchange.com/questions/15327/how-to-get-sunlu-pla-to-adhere-to-the-printing-bed) or move items to the different Y position on the bed to confirm it. – octopus8 Jan 24 '21 at 18:16
1 Answers
Your bed level according to the sensor and reality is changing between the time of probing and the time of printing. There is not enough info to determine exactly where the problem is, but the possible causes and solutions are most likely:
Bed or X-carriage is mechanically loose: ensure all axis and parts of the printer are tight, including the hot-end mount
Bed temperature changes have affected the bed level: ensure the bed is at operating temperature during all manual and automated leveling
Sensor is not reading correctly across the entire bed due to the magnetic sensitivity of the bed or hot-end heating elements: either enable the
PROBING_HEATERS_OFFcompile-time feature in Marlin or disable the bed and hot-end heaters immediately prior to the automated bed leveling procedure using the code:M140 S0; set bed temperature target to zero M104 S0; set hot-end temperature target to zero
then turn them both back on to your desired temperature immediately afterward probing using the same M104 and M140 command syntax to their respective desired temperatures
- 31
- 5
