I am printing using an Ender3 Pro with eSUN PLA+ 215/45 and I am getting this issue on two corners, the other two corners look fine.
Any idea on what can be causing this?
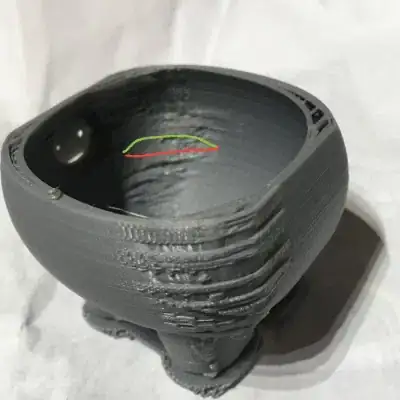
The bad corners

The good corners

I am printing using an Ender3 Pro with eSUN PLA+ 215/45 and I am getting this issue on two corners, the other two corners look fine.
Any idea on what can be causing this?
The bad corners
The good corners
This has nothing to do with speed, temperature, adhesion, and whatever you do, DO NOT extrude more material per line (increase flow rate), as this will make the problem that much worse.
This is a fairly simple problem with an even simpler fix: you're over extruding. Reduce your flow rate by 5%, and see if that fixes the issue. It will definitely improve it, but you might need to lower your flow rate a little bit more.
What can often happen when your flow rate is set too high is the extra plastic will concentrate at areas of relatively high acceleration (corners and the start/stop spot for a perimeter of a given layer), but depending on the size of the thing being printed and the degree of overextrusion, it won't concentrate at every spot like this on a perimeter.
Usually, I see this happen where the perimeter moves start and stop each time, which (again, depends on the slicer and settings) tend to be the same spot for certain models, often a corner. I couldn't say for certain the exact mechanism, except that it seems like the plastic, given the right conditions, prefers to lay down evenly while the excess over extruded plastic builds up (probably carried by the nozzle, since it is hot and the plastic will want to stick to it) until too much has built up for the nozzle adhesion to keep it from sticking to the print, or the nozzle begins to decelerate (late at a corner or the end of a print move), causing the extra plastic to 'scrunch' up, like something that shoved in a distance too short for it. Knowing this, if you examine the corners, it should be quite obvious that this is what is happening. The perimeter is being extruded with more plastic than it should be, and the extra has a tendency to collect all in one spot each time.
Sometimes it is one corner, sometimes it is every corner, sometimes it is corners that are maximally distant from each other (since it takes some time for enough excess plastic to build up to over power whatever effects are preventing it from adhering immediately. So in this case, the two good corners were just where not enough excess plastic had built up yet at the nozzle to cause problems). Another possible explanation is that those two corners are simply where the perimeters were started and stopped, but some layers it was one corner, and other layers the other corner. But you can see over extrusion artifacts lower down on the feet (or whatever they are), and your first layer as well.
Do not increase flow rate.
Do not increase infill.
Do not lower your speed.
Do not increase your temperature.
None of those will help, and increasing flow rate further could cause the nozzle to catch on the print, potentially damaging your hotend.
Just reduce your flow rate by 5%. You should see an immediate improvement, or even elimination of the issue. If it is still there, then reduce your flow rate a percent or two until it does go away. And remember this number, because you'll probably want to use that flow rate in general for your printer.
Looks like it treated those corners a bit differently in the slice routine. Normally something like this different treatment would be too slight to matter, but (probably due to the slight overhang?) it appears to have caused some layers to not adhere to the bottom ones and get pulled along to a different shape (red line in image). (Be sure to check some general layer adhesion/overhang topics too.)
I'd try increasing the infill there (and using honeycomb style infill) or even using a cad software to hollow the interior to essentially a desired infill before slicing if the current infill is important elsewhere.
Moving slower, Increasing the temperature a bit, and/or extruding more material per line and layer if the layer adhesion is due to the slight overhang (although it looks pretty small).