Introduction

Use this guide to replace the SIM card reader in an iPhone 12 Pro Max.

  1. 2gkTcTh5XYtxpIND
    2gkTcTh5XYtxpIND
    JEC1UAHnQtcSilFS
    • Insert a SIM card eject tool or a paperclip into the small hole in the SIM card tray, located on the volume button edge of the iPhone.

    • Press firmly to eject the tray.

  2. lXm5yZRlUcGkLQcj
    lXm5yZRlUcGkLQcj
    ftlXq3ppeClAQiBH
    xESNctaJyIncYROu
    • Remove the SIM card tray from the iPhone.

    • The SIM card will fall out of the tray easily.

    • When reinserting the SIM card, make sure it's in the proper orientation inside the tray.

    • A thin rubber gasket around the SIM tray provides water and dust protection. If this gasket is damaged or missing, replace the gasket or the entire SIM tray to protect your iPhone's internal components.

  3. RRIWGZ5FSXAZ4nY5
    • Caution: Before you begin, discharge your iPhone battery below 25%. A charged lithium-ion battery can catch fire and/or explode if accidentally punctured.

    • Power off your iPhone before beginning disassembly.

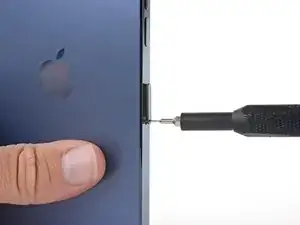
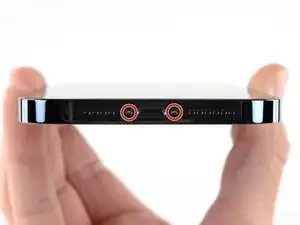
    • Remove the two 6.7 mm-long pentalobe P2 screws at the bottom edge of the iPhone.

    • Opening the iPhone's display will compromise its waterproof seals. Have replacement seals ready before you proceed past this step, or take care to avoid liquid exposure if you reassemble your iPhone without replacing the seals.

  4. GWPpkrUUtMwPoMCa
    • Prepare an iOpener and apply it to the lower edge of the iPhone for about a minute in order to soften up the adhesive underneath.

    • A hair dryer, heat gun, or hot plate may also be used, but be careful not to overheat the phone—the display and internal battery are both susceptible to heat damage.

  5. DaVwcZRqSNcFaiuH
    DaVwcZRqSNcFaiuH
    JwvGBOLZopChQxkf
    • The next two steps demonstrate the iSclack, a handy tool that we recommend for anyone doing frequent repairs. If you aren't using the iSclack, skip down two steps for an alternate method.

    • If the plastic depth gauge is attached at the center of the iSclack, remove it now—it's not needed for larger iPhones like the iPhone 12 Pro Max.

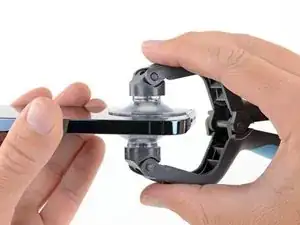
    • Position the suction cups near the bottom edge of the iPhone—one on the front, and one on the back.

    • Press both suction cups firmly into place.

    • If your display or back glass is badly cracked, covering it with a layer of clear packing tape may help the suction cups adhere. The iSclack also includes two pieces of tape for this purpose.

  6. KMmPE1RJJjEZIJCc
    KMmPE1RJJjEZIJCc
    sWdxktENOO2uTCpl
    wBCYOSJJGAMyO25X
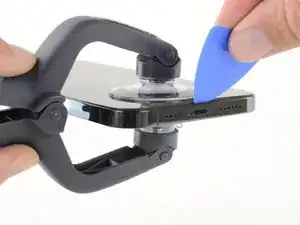
    • Hold onto your iPhone securely and close the handle of the iSclack to slightly separate the display from the rear case of the phone.

    • Don't try to completely separate the display; a small opening along the bottom edge is all you need.

    • Insert an opening pick into the gap under the display on the lower edge of the iPhone.

    • Skip the next two steps.

  7. IVnCerPqepugKsWo
    IVnCerPqepugKsWo
    HpkuSSsZsjRYBLlA
    • If you're using a single suction handle, apply it to the bottom edge of the phone, while avoiding the very edge of the glass.

    • If your display is badly cracked, covering it with a layer of clear packing tape may allow the suction cup to adhere. Alternatively, very strong tape may be used instead of the suction cup. If all else fails, you can superglue the suction cup to the broken display.

  8. okm4XxVvlropeCW3
    okm4XxVvlropeCW3
    j4NRadxUTnlrb12H
    UPjfVZJyETXVsOTW
    • Pull up on the suction cup with firm, constant pressure to create a slight gap between the front panel and rear case.

    • Insert an opening pick into the gap.

    • The watertight adhesive holding the display in place is very strong; creating this initial gap takes a significant amount of force. If you're having a hard time opening a gap, apply more heat, and gently rock the display up and down to weaken the adhesive until you create enough of a gap to insert your tool.

    Be very careful on this step to insert the pick as vertically as possible!!! I ended up separating the glass from the outer frame on this step and destroying the screen. Not a cheap mistake to make!

    L E -

  9. 3j5wcW42pWcqb4iB
    3j5wcW42pWcqb4iB
    FiusKEvSlvDNfA5X
    MKLnwmuIAxEfgw2Q
    • Slide the opening pick around the lower left corner and up the left edge of the iPhone, slicing through the adhesive holding the display in place.

    • Only insert the pick a few millimeters (about the width of the display bezel.) Otherwise, you may damage the display cables along this side of the iPhone.

  10. KIDlFJekEKhTPWbB
    KIDlFJekEKhTPWbB
    1xbHSGiYti6rS1t3
    v2huARdUJOTROElE
    • Re-insert your pick at the bottom edge of the iPhone, and slide it up the right side to continue separating the adhesive.

    • Don't insert the opening pick too far into the iPhone, or you may damage internal components.

  11. eboZajldSQjkaaSF
    eboZajldSQjkaaSF
    NmCMH6QOy2AHCZOD
    tDsVKMshO2SC4ohs
    • The top edge of the display is secured with both glue and clips.

    • Insert your pick into the right edge of the phone. Slide it around the top-right corner and across the top edge.

    • Don't insert the pick more than a few millimeters—about the width of the display bezel—or you may damage the front panel sensor array.

  12. OvnhYdTPLpxPjlbB
    OvnhYdTPLpxPjlbB
    gpBdotQ2NHtILfOE
    P4hyesRIpH5NFB6q
    • If you haven't removed your suction handle or iSclack, remove it now.

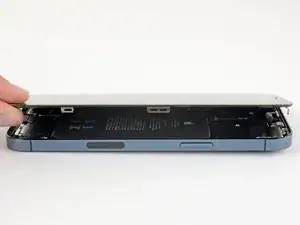
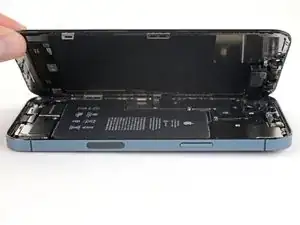
    • Open the iPhone by swinging the display up from the right side, like the front cover of a book.

    • Don't try to fully separate the display yet, as several fragile ribbon cables still connect it to the iPhone's logic board.

    • Lean the display against something to keep it propped up while you're working on the phone.

    • During reassembly, lay the display in position, align the clips along the top edge, and carefully press the top edge into place before snapping the rest of the display down. If it doesn't click easily into place, check the condition of the clips around the perimeter of the display and make sure they aren't bent.

  13. JPLGNbP3WdNvbGTI
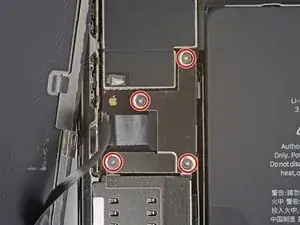
    • Remove four 1.1 mm-long Y000 screws securing the battery and display connector cover.

    • Throughout this repair, keep track of each screw and make sure it goes back exactly where it came from to avoid damaging your iPhone.

    • During reassembly, this is a good point to power on your iPhone and test all functions before you seal the display in place. Be sure to power your iPhone back down completely before you continue working.

  14. ZGmHGT6H3VJBSceO
    • Remove the battery and display connector cover.

  15. pEVHjPJqwQhOEjCa
    pEVHjPJqwQhOEjCa
    glJmaGNiiPJGiFRE
    • Use a spudger or a clean fingernail to pry the battery connector up from its socket on the logic board.

    • Try not to damage the black silicone seal surrounding this and other board connections. These seals provide extra protection against water and dust intrusion.

    • Bend the connector slightly away from the logic board to prevent it from accidentally making contact with the socket and providing power to the phone during your repair.

  16. H2jSZxvbTZkNIyMa
    H2jSZxvbTZkNIyMa
    d4xG6CpWGJfYKBBa
    • Use a spudger or a fingernail to disconnect the display cable connector.

    • To re-attach press connectors like this one, carefully align and press down on one side until it clicks into place, then repeat on the other side. Do not press down on the middle. If the connector is misaligned, the pins can bend, causing permanent damage.

  17. woSwIQYro42iHyZ1
    • Use a Y000 driver to remove the four 1.1 mm-long screws securing the front sensor connector cover.

  18. 4qeCDn1t6j6ZlwFN
    4qeCDn1t6j6ZlwFN
    Db3cSmZJVS3XjYBN
    4NKnqO4UAABsyEHc
    • Swing the cover up from the left until the small clip on the right unhooks.

    • Remove the cover.

    • During reassembly, insert the clip on the right edge into its slot first, then hinge the rest of the cover into place.

  19. BnkTNuHTeERcb24v
    BnkTNuHTeERcb24v
    MJZmAHG6UW3hqJAR
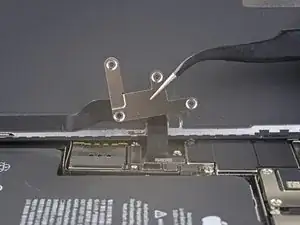
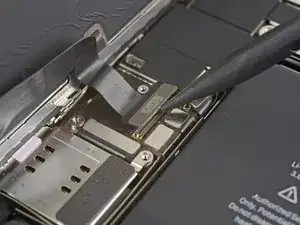
    • Use a spudger or a fingernail to disconnect the front sensor assembly cable connector.

    when lifting up the front sensor assembly cable connector, you should use the flat end of the spudger. Using the pointed end as shown in the picture runs the risk of damaging components on the board and/or the cable connector itself.

    Carter Taylor -

  20. A6bqsvj4qrkEiEwC
  21. cjpncEMTOEUhG53J
    cjpncEMTOEUhG53J
    XwkRfulQF5YaWgPL
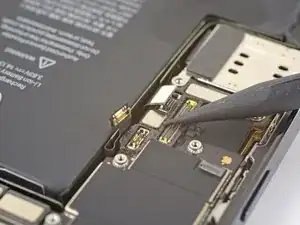
    • Use the point of a spudger to pry the charging port connector straight up and out of its socket on the logic board.

  22. 3ce6LFsSMI6tFe2v
    3ce6LFsSMI6tFe2v
    GuVLSG5sHnSD5vS1
    • Use the point of a spudger to pry the SIM card reader cable connector straight up and out of its socket on the logic board.

  23. DbLYNYW4v1BgDWLR
    • Remove the two screws securing the SIM card reader.

    • One 3.8 mm standoff screw

    • Standoff screws are best removed using a standoff screwdriver or bit.

    • In a pinch, a small flathead screwdriver will do the job—but use extra caution to ensure it doesn't slip and damage surrounding components.

    • One 1.3 mm Phillips screw

  24. fVqNLkfHPQW6TMcI
    fVqNLkfHPQW6TMcI
    MN2S6cNUT1ZBonpr
    TFPjyD5Q4NQ51I6w
    • Carefully lift the SIM card reader out of its recess. Avoid snagging the SIM card reader cable on any other cables.

    • Before reinstallation, make sure to push the SIM eject plunger into the edge of the phone.

Conclusion

Compare your new replacement part to the original part—you may need to transfer remaining components or remove adhesive backings from the new part before installing.

To reassemble your device, follow the above steps in reverse order.

Take your e-waste to an R2 or e-Stewards certified recycler.

Repair didn’t go as planned? Try some basic troubleshooting, or ask our iPhone 12 Pro Max Answers community for help.

Adam O'Camb

Member since: 11/04/15

172888 Reputation

One comment

Is it similar for iPhone 13 Pro max?

Matthew Au -