Introduction

If your Galaxy Note9 battery drains quickly, won’t charge, or won’t power on it may be time for a replacement. Follow this guide to install a fresh battery.

For your safety, discharge your battery below 25% before disassembling your phone. This reduces the risk of a dangerous thermal event if the battery is accidentally damaged during the repair. If your battery is swollen, take appropriate precautions.

For optimal performance, after completing this guide, calibrate your newly installed battery: Charge it to 100% and keep charging it for at least two more hours. Then use your phone until it shuts off due to low battery. Finally, charge it uninterrupted to 100%.

  1. imr3TvrFDDQ2Smgb
    • Power off your phone before beginning disassembly.

    • Use a hairdryer, a heatgun, or prepare an iOpener and apply it to the right edge of the back of the phone for about a minute to soften the adhesive underneath.

    If using an iOpener it will need to be fully heated and set on for at least 5 minutes. You’ll know the phone is hot enough when its almost too hot to touch.

    Spencer Barron -

  2. wK5AZqwWYVFHhdpM
    wK5AZqwWYVFHhdpM
    AiS2h1pqRmiTyrnX
    ijSfEkEAirfgkjyB
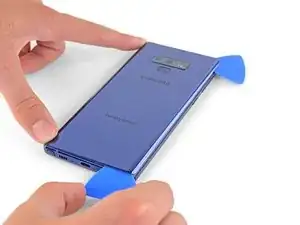
    • Apply a suction handle to the back cover.

    • Lift with a suction handle to create a gap between the back cover and the frame of the phone.

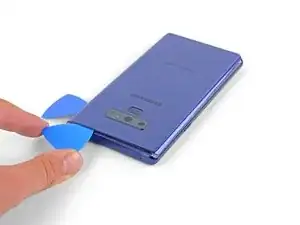
    • Insert an opening pick into the gap.

    • If the glass is badly cracked, cover it in packing tape to create a surface for the suction cup to adhere to.

    • If the adhesive won't budge, apply more heat, not excessive force. Too much force could break the glass.

  3. phWdatcXskIOnRO3
    • Note that there is more adhesive along the top edge and around the camera bezel than around the rest of the phone.

    • Cut carefully around the left edge near the fingerprint sensor or you risk damaging the ribbon cable inside.

    It's extremely easy to crack the back glass when nearing and rounding the corners. It's probably a good idea to soften the adhesive with heat as you go.

    Aaron Peterson -

    Step 5 is NOT "cut through the adhesive", that's steps 5-10. Step 5 is "Begin the careful process of cutting through the adhesive, starting at the right side where you already softened it. Proceed carefully, slowly, and warmly through the following steps."

    Aaron Peterson -

  4. YpkbXvVWUIR4Afeb
    YpkbXvVWUIR4Afeb
    FaUbUKoZe6HurIby
    5vZLASPFVpEgMyLC
    • Starting from the center, cut the adhesive up and down the right side with an opening pick.

    • Do not insert the pick more than halfway into the phone when cutting near the fingerprint sensor or cameras, or you risk damaging internal components.

  5. OFSZgLGgXARkwaWJ
    OFSZgLGgXARkwaWJ
    E6TEFVlXsPNDGGHi
    FFeOmLNySIi2VTct
    • Leave an opening pick in the upper-right corner.

    • Use another opening pick to cut the adhesive around the bottom-right corner.

    • Leave that opening pick in the phone.

    • Use an iOpener, hair dryer, or heat gun to apply more heat as needed where you are cutting the adhesive.

  6. 2jDIRHRfM2FgHNFR
    • Use a heat gun or hair dryer or apply a heated iOpener to the left side of the rear panel for about a minute to soften the adhesive underneath.

    If using an iOpener it will need to be fully heated and set on for at least 5 minutes. You’ll know the phone is hot enough when its almost too hot to touch.

    Spencer Barron -

  7. 1mtB1lSGkZWyMSrM
    1mtB1lSGkZWyMSrM
    4K246ldIYZVMViQv
    FFMXuXrVm2DpNhZ6
    • Insert an opening pick into the lower-left corner of the rear panel.

    • Using another opening pick, cut the adhesive along the left edge of the rear panel.

    • Do not insert an opening pick in more than half way on the left edge near the fingerprint sensor or you may damage the ribbon cable inside.

    • It is fine if opening picks fall out as the back cover becomes separated.

  8. nNSpwZdhgreWl3rh
    nNSpwZdhgreWl3rh
    DrwI6NpI44hU5bGQ
    6tniPN2RFyvbFgLv
    • Using the inserted opening pick, carefully cut the adhesive around the upper-left corner of the rear panel.

    • Finally, cut the last of the adhesive along the top of the phone.

    • Use an iOpener, hair dryer, or heat gun to apply more heat as needed where you are cutting the adhesive.

  9. CFGPd5CUmuDGj14k
    CFGPd5CUmuDGj14k
    XadxJ3X5cMDYZdsS
    • Separate the right side of the rear cover first.

    • Tilt the cover up along the left edge to expose the fingerprint sensor ribbon cable.

    • Do not pull out the fingerprint sensor ribbon cable yet.

  10. EOB5BnuPwLiWhRJy
    EOB5BnuPwLiWhRJy
    pvUG6RHyuIevnBsT
    • Use the tip of a spudger to pry the fingerprint sensor ribbon cable up and out of its socket.

  11. fxtTpIwKVs1XBASZ
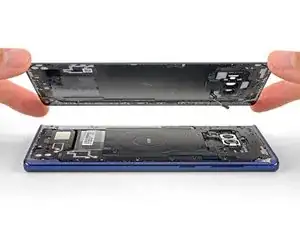
    • Remove the back cover.

    • To install a back cover:

    • Use tweezers to peel away any remaining adhesive from the phone's chassis. Then clean the adhesion areas with high concentration isopropyl alcohol (at least 90%) and a lint-free cloth to prep the surface for the new adhesive.

    • Turn on your phone and test your repair before installing new adhesive and resealing the phone.

    • Carefully apply the new adhesive to the back cover, then line up one edge of the glass against the phone chassis and firmly press the glass into the phone.

    • Alternatively, you may reinstall the back cover without replacing the adhesive. Remove any large chunks of adhesive that might prevent the back cover from sitting down flush. After installation, heat the back cover and apply pressure to secure it. It won't be waterproof, but the glue is usually more than strong enough to hold.

    I am installing a new backplate (this is my first repair; I was CERTAIN that I would crack the back glass, and I was NOT wrong) but I’m not sure how tweezers are meant to remove gooey adhesive! I simply used the blue plastic pry tool as a scraper and gently rolled up the goo. Maybe the glue is different because I have a refurbished phone? That may also explain why I had so much trouble with Step 1. Hope that this helps!

    Christopher Yarlott -

  12. NpvMRUlwISOMrGih
    NpvMRUlwISOMrGih
    xEFdupFYZIyOQham
    • Use a Phillips screwdriver to remove the nine 4 mm screws securing the upper midframe.

  13. TtRQbpjOgwgKyCeU
    TtRQbpjOgwgKyCeU
    qnfyfoRPVUgOHdxi
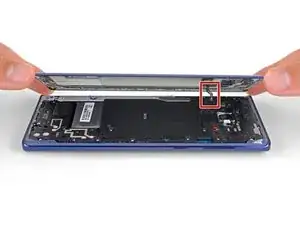
    • Insert the tip of a spudger into the upper-left corner of the upper midframe.

    • Pry the upper midframe out of the phone.

    • The upper midframe snaps into and out of place.

  14. WPl3OTEYUWaQk4lw
    WPl3OTEYUWaQk4lw
    OtIWY55KKKuAKdUL
    pRScXCbeMtNfmfgF
    • Peel the wireless charging coil off the battery starting with the left side.

    • The adhesive is weak but you can use an opening pick to cut it if necessary.

    • During reassembly start by snapping the midframe into place first before adhering the wireless charging coil.

  15. MDPfHEnbaBBwN5DS
    MDPfHEnbaBBwN5DS
    3SnhFaqu3LXtjZNv
    • Use the tip of a spudger to disconnect the orange ribbon cable connecting the battery to the motherboard.

  16. NRQVydRBmXXK2CGZ
    NRQVydRBmXXK2CGZ
    aWCOKNqEetTQPOd3
    nbDRbZkV1SqtFBPT
    • Apply a few drops of 90% isopropyl alcohol in the battery well along the bottom and in the upper-left corner of the battery.

    • Wait a couple of minutes for the alcohol to soften the adhesive under the battery.

    • Tilt the phone at various angles to help the alcohol flow under the battery.

  17. 3qZJcvJBbbTU62t1
    3qZJcvJBbbTU62t1
    S6PlgCPQyPat62T4
    HKMsvGCnY6fgV3Ra
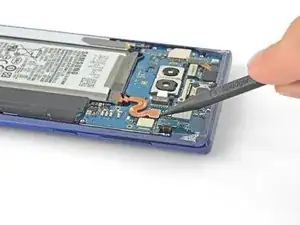
    • Apply a suction cup to the battery.

    • It may take multiple attempts to get the suction cup to adhere. Apply is as close to the center of the battery as possible and avoid the white sticker at the bottom of the battery.

    • Lift the battery straight up until there is a gap large enough to insert the opening pick.

    • Insert an opening pick underneath the bottom edge of the battery and twist to loosen the battery adhesive.

    • If the battery won’t pry out easily, apply a little more alcohol and repeat the last step to further weaken the adhesive.

    • Remove the battery.

    • Do not bend the battery. Do not reuse the battery.

Conclusion

To reassemble your device, follow the above steps in reverse order.

Take your e-waste to an R2 or e-Stewards certified recycler.

Repair didn’t go as planned? Check out our Answers community for troubleshooting help.

Compare your new replacement part to the original part—you may need to transfer remaining components or remove adhesive backings from the new part before installing.

Sam Omiotek

Member since: 25/02/19

53290 Reputation

5 comments

Great guide, much thanks!

Pierre Albi -

شكرا لك اليوم. لقد استبدلت البطارية بسهولة باتباع الخطوات الأولى في المرحلة الأولى. شكرا

اياد العطواني -

Thanks very much for posting this - it helped a lot. My Note 9 lives on!

Robert Oswald 4/29/21

Robert Oswald -

Great to hear Robert, and good job!

Sam Omiotek -

After replacing the battery should i do some calibration or cycles of charging and discharging?

N Z -