Introduction

  1. NL6mFMekMgZyS5GW
    • Switch off your phone.

    • Prepare an iOpener for softening the adhesive on the back of the Note8.

    • Apply the iOpener on the back of the Note8 along the side with the power button.

    I used a heat gun to soften the glue - worked it around the edges, moving the heat gun quickly. As this is my first attempt, I’m still calibrating on this - but other guides mention getting the back cover hot enough so as it’s just too hot to touch. I also have a temp probe on my multi-meter, and I measured appx. 75 deg. C.

    One of the other guides showed using a electronics hot plate set to 105 deg C for 60 sec.

    Phil Brooks -

  2. SGkLVwYb6ppAAHgN
    SGkLVwYb6ppAAHgN
    4mhJcBy1fZ4akNqD
    MESslCDbHbGpJa4J
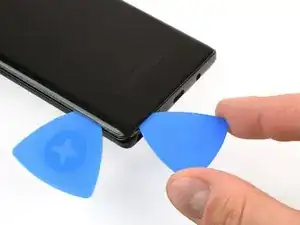
    • Use a suction handle to lift the back cover and create an opening pick to get in the gap.

    • Since the back cover is also slightly curved at the edges you want to insert the opening pick at a lower angle from underneath.

    • Start at the middle of the side and cut the adhesive while pulling up with the suction handle.

    • Be careful not to lever the opening pick too much to avoid breaking the back cover. Rather pull with the suction handle and use the pick for cutting the adhesive.

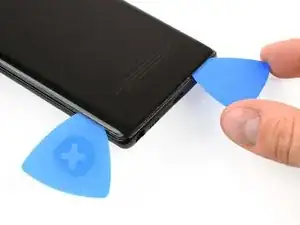
    • Move the pick towards the bottom corner and leave it there to keep the adhesive from resealing to the case.

    • Use another pick and move it to the top corner.

    • If it's getting harder to move the pick you might need to reheat the iOpener and apply it to the back cover again.

    I used an X-acto knife with the flat blade to get it started. I tried using the suction cup - but it’s difficult to get good leverage. Once I got the cover started - I used the metal pry tool (sharpened with a dremel file) and a business card to work it open.

    This is definitely the hardest part.

    Phil Brooks -

    Once off I see all the glue on the curved part of the chassis NOTON THE BACK. Apply heat to curved edges.

    Lyle Walsh -

  3. sSqDWoFHObK56xJp
    sSqDWoFHObK56xJp
    nxncMfYm2KUVYrl1
    diuWRRAFYKVkyLBY
    • Again take another opening pick and carefully move it around the corner and along the top edge.

    • Reheat with an iOpener if necessary.

    • Leave the pick at the top right corner to keep the adhesive from resealing.

  4. edGFZZXkGbZcYJvY
    edGFZZXkGbZcYJvY
    BQgRHIcKCAqUZM3w
    onhvVuYXi4gs2DqJ
    • Rotate the device and start to separate the adhesive at the bottom with another opening pick.

    • Leave the pick at the bottom right corner to keep the adhesive from resealing.

  5. ecHSbxpCmtaISrbQ
    ecHSbxpCmtaISrbQ
    XjG3DFTqN2VORed2
    lUAISUsw5llMA1N2
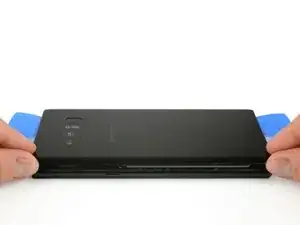
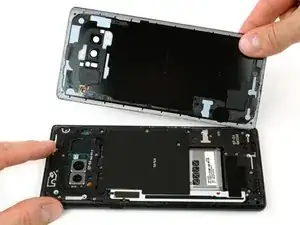
    • When the adhesive has been separated on all three sides properly you will be able to slowly lift the back cover.

    • Don't force it open. Use an iOpener to again soften the adhesive if the back cover won't come off or starts to bend.

    • Pay attention to the fingerprint sensor connector when flipping the back cover open. You might need to disconnect it as described in the next step.

    I broke the back camera cover for the NUT 8 and then I bought a commercial cover and installed it but the quality of the picture became very bad and my question is, do you know where to get the original cover at a reasonable price?

    Loord Mohammad -

  6. DDdOIeW2OV56XhYh
    • Use a pair of tweezers to disconnect the fingerprint sensor.

    • The connector might already have come off when flipping the back cover open.

  7. cvElNvbILNsVRWGV
    • Remove the back cover.

    • To prepare for the reassembly remove any remaining adhesive from the phone, and clean the glued areas with isopropyl alcohol and a lint-free cloth.

    How do you swap the fingerprint sensor

    Lukus Carr -

    You can use a tweezer to swap the fingerprint sensor, you might be careful when doing the step 6, additionally, a tweezer will be helpful when reassemble the fingerprint sensor. please note that your new back cover needs to have the fingerprint adhesive on. most of the product did not have. i have get a LUVSS brand from amazon which came with all OEM adhesive and full set tools, even a B6000 glue, best option to go for replacing the note 8 back glass

    ggmall -

  8. oYxXTk3numBwPCKL
    • Remove the ten Phillips #00 screws.

  9. m4tPAKEExvAdTYeh
    m4tPAKEExvAdTYeh
    NAkZSOfuSsQSI5tB
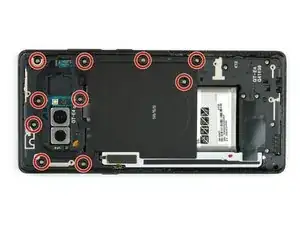
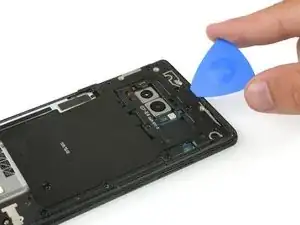
    • Use an opening pick at the top edge to get between the NFC antenna and charging coil assembly and the case.

    • Lever the top of the assembly out of the case.

    Solve the problem of moisture during charging

    moaed aljnapy -

    Solve the problem of moisture during chargin

    moaed aljnapy -

  10. NKVr2Lr1A2oxkNV3
    • Carefully pull up the complete charging coil and NFC antenna assembly.

    • The bottom left part of the assembly is slightly glued down to the frame.

  11. PVIpNYP1kJOKKYFX
    • Use the flat end of a spudger to disconnect the battery connector.

Conclusion

To reassemble your device, follow these instructions in reverse order.

Dominik Schnabelrauch

Member since: 23/11/16

156052 Reputation

0 comments