Introduction

Replacing the front case of your camera.

  1. WNHhIFlmaHfWZZvv
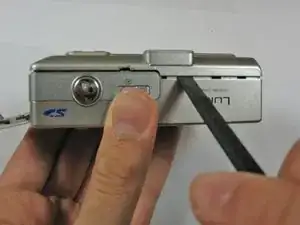
    • Slide the lock into the unlocked position to the right.

    • Use your finger to slide battery hatch towards the arrow sign.

    • Both battery and memory card should now be visible.

  2. IQNIPF5XEPjtPFVq
    • Open battery hatch and the black cover to expose the battery compartment.

    • The camera used to create these repair guides did not have a battery and memory card.

    • Pull the battery out and replace with a new one.

    • When putting the battery back in, make sure it is in the same orientation as before.

    • Close the battery compartment and make sure the lock is in the locked position.

  3. XU6okq46f4XJZyHm
    • Remove the two 2.8 mm Phillips screws.

  4. YAQmPSmBHXZaXVDp
    • Use a Phillips screwdriver to remove the three 2.8 mm screws on the bottom of the camera.

  5. HtubX3mlchUpVyDs
    • Remove the two 2.8 mm Phillips screws on the side of the camera as shown in picture.

  6. eK44c46mJXruCNOC
    eK44c46mJXruCNOC
    XsSLY2GIhFixfyY6
    • Use a spudger to pry open the case from all sides.

  7. CJfu6sQswJ6cw5eC
    CJfu6sQswJ6cw5eC
    QetLZjIdShSfFaVT
    • Beware of the ribbon cable that is still attached when opening.

    • Use your fingers to carefully pry off the back casing from the camera assembly.

  8. EMPVxiXnkHQZkcU1
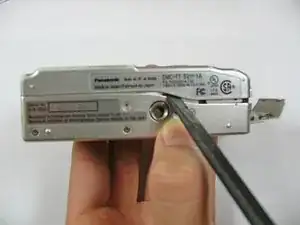
    • Lay the camera on its front side. Use the spudger to open the film strip locking mechanism and remove strip.

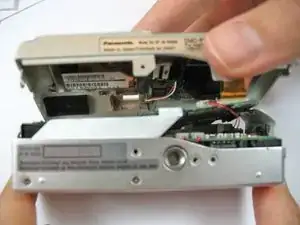
    • Hold down on the camera's metal casing with one hand. Use your other hand to completely lift the back case off the rest of the camera, making sure the film strip separates.

  9. kgvE3I3CKjuvbrtb
    • Remove the two remaining 2.8 mm Phillips screws on the bottom of the camera.

    • The other three screws shown in picture were removed to take off the back case.

  10. oOIgiNcHPNUKKZqV
    oOIgiNcHPNUKKZqV
    UwERkUZwEYKM1EGE
    uADHIr53RKsflZy4
    • Using Spudger tool, pry the front case from the camera's components.

    • Use your fingers to carefully pull the back case from the front case.

    • Cut the black and red wires connecting front case to the body of the camera.

    • Be careful to ensure that nothing gets caught, and separate the front case from the camera.

    • To put the new front case back on, solder the wires of the new front case to the components of the camera.

Conclusion

To reassemble your device, follow these instructions in reverse order.

Alex Penman

Member since: 28/01/11

463 Reputation

0 comments