Introduction

A guide to replace your broken or non working front camera on the Kindle Fire 8.9".

  1. bkbEhyiXZ1HjKZ4C
    bkbEhyiXZ1HjKZ4C
    gPtwNbXUYPDcx3LA
    BTCfm1oDvMG3DyM3
    • Remove the SIM card tray (if present in your model).

    • Insert a large plastic opening tool next to the Kindle's headphone jack.

    • Make sure the notch on the plastic opening tool is facing the back of the Kindle.

    • Move the plastic opening tool evenly around the Kindle, separating the two halves.

    • Be careful not to completely separate the rear cover. There are two delicate flex cables that connect the display assembly to the motherboard.

    Getting the SIM card dummy plug out a real challenge. Broke off one end. Seems this part was never intended to be removed.

    Bob Steger -

  2. En1T3mMhf3MtTQOA
    • Set the Kindle down on the rear case.

    • Holding the display assembly near the camera, carefully open the display assembly up to about 90 degrees from the rear case.

    • These images show the Kindle laying flat. In order to prevent damage to the flex cables, keep the Kindle open at 90 degrees while disconnecting the display assembly.

  3. IyOjwXpAigmDHn1s
    IyOjwXpAigmDHn1s
    Ai1asMaRQKIdSJLM
    EfBUsZv31oTnkMwG
    • Lift the retaining flap on the ZIF connector of the upper flex cable.

    • Gently pull the cable out of its socket.

    • This flex cable is delicate. Be careful not to crease or bend it while working.

    This is very delicate. The flap is very easy to break off. Remove the yellow tape on both these connectors and replace with ordinary plastic tape upon reassembly. If you don't tape them you'll pull them apart working on the other. A helper to hold the assy is a good idea.

    Bob Steger -

  4. 6CRrZb23FxHL4tM4
    6CRrZb23FxHL4tM4
    YSkJeZgZB2VAALll
    • Lift the retaining flap on the ZIF connector of the lower flex cable.

    • Gently pull the flex cable from its socket.

    • This flex cable is delicate. Be careful not to crease or bend it while working.

  5. RTnuHjAGGrSRL6cX
    • Separate the display assembly from the rest of the device.

    • When reassembling the device, align the two halves of the case before connecting the flex cables.

  6. YfRr52rmAwthY1GK
    YfRr52rmAwthY1GK
    gjKYWwHecqaS1Xqi
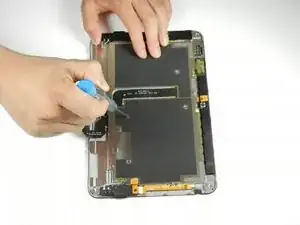
    • Remove the following sixteen screws from the metal midframe on the rear of the device:

    • One 3 mm Phillips screw from each corner

    • Four 3 mm Phillips screws surrounding the ports

    • Eight 3 mm Phillips screws from the body of the midframe

    The screws are next to the ports, not the camera.

    Joshua Feist -

  7. DjUX1nEXyevr4sBD
    DjUX1nEXyevr4sBD
    As3HuBvOKwd4yyxA
    • Carefully remove the metal midframe.

  8. YSNqVFKKZOGBh5P3
    YSNqVFKKZOGBh5P3
    tSlYFC4LLVBuLd44
    Hi1w3kjAxuXPkToV
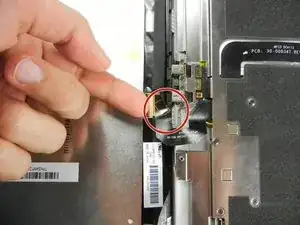
    • After taking off the metal casing, locate the camera.

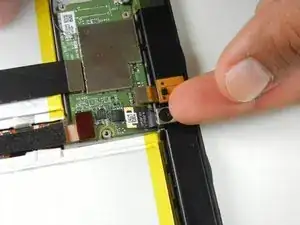
    • Use your index finger to carefully lift up the silver clip located just under the camera until you notice the obvious click when it comes loose.

    • After you snap up the silver clip, move your finger to the opposite side so that you are now pointing into the Kindle. Finally push the camera outwards towards the edge of the device.

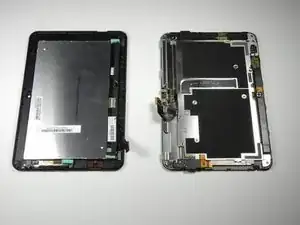
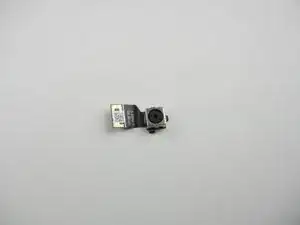
    • Once the camera piece is taken out, this is what you should end up with.

    • Make sure to keep in a safe area to avoid any damage to the lens and camera itself.

Conclusion

To reassemble your device, follow these instructions in reverse order.

Ted Park

Member since: 11/01/13

34 Reputation

0 comments