Introduction

This repair guide was authored by the iFixit staff and hasn’t been endorsed by Google. Learn more about our repair guides here.

Use this guide to replace the screen for your Google Pixel 6a.

For your safety, discharge the battery below 25% before disassembling your phone. This reduces the risk of fire if the battery is accidentally damaged during the repair. If your battery is swollen, take appropriate precautions.

Your new replacement screen will come with the fingerprint reader already attached. If not, you will need to reinstall the original fingerprint reader to your new replacement screen and recalibrate the reader to maintain its functionality.

You'll need replacement adhesive in order to complete this repair.

  1. XBVUE1Uv6VUMgXwN
    • Completely power off your phone before you begin.

    • Heat an iOpener and apply it to the right edge of the screen for two minutes.

    • A hair dryer, heat gun, or hot plate may also be used, but be careful not to overheat the phone—the display and internal battery are both susceptible to heat damage.

    What's a good temperature to set to hotplate to for a repair like this?

    David -

  2. Ddj6QlmyySZgoW6a
    Ddj6QlmyySZgoW6a
    hUPVuKPNoCOJIqv2
    UhmIq1ec1LqlbRRu
    • While you're waiting for the adhesive to loosen, take note of the following:

    • Screen seam: This seam separates the screen from the rest of the phone. Do not pry at this seam.

    • Bezel seam: This is where the plastic bezel designed to protect the screen meets the frame. It's held in place by plastic clips. This is where you should pry.

  3. XDaaq12ecnEIq4yD
    XDaaq12ecnEIq4yD
    alGoFZ4wLLdAvZAw
    BRy5TKDEcKNO3UDD
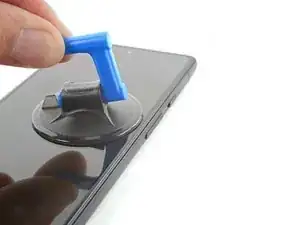
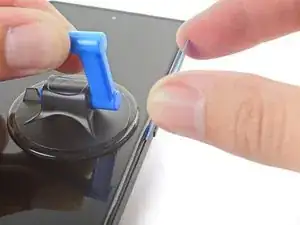
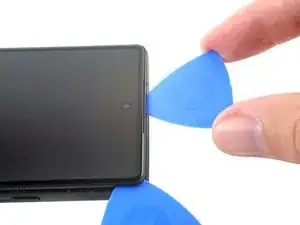
    • Apply a suction cup to the screen, as close to the center of the right edge as possible.

    • Pull up on the suction cup with strong, steady force to create a gap between the bezel and the frame.

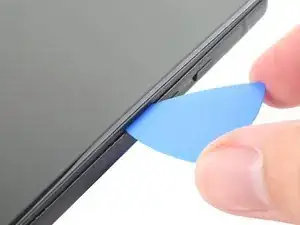
    • Insert an opening pick into the gap.

    • Depending on the age of your phone, this may be difficult. If you're having trouble, apply more heat to the edge and try again.

    • If your display is badly cracked, covering it with a layer of clear packing tape may allow the suction cup to adhere. Alternatively, very strong tape may be used instead of the suction cup. If all else fails, you can superglue the suction cup to the broken screen.

    Would be helpful to have alternative solutions offered here for those with shattered screens, since suction cups don't work.

    Paul York -

    Hi Paul.

    Thank you for your comment! I have updated the step to provide an alternative solution for shattered screens.

    Alex Diaz-Kokaisl -

    Would just like to note that in my particular case even tape or super glue did not work, due to the screen being shattered right along the spot where you need to place the suction cup. I ended up resorting to inserting a razor blade into the seam to open it just enough to insert the pick.

    mkirwin -

  4. aKADaMwDF1Su2ytM
    aKADaMwDF1Su2ytM
    ojCAATkuclM4RkHa
    CNQEOHFpaOTP5Nlf
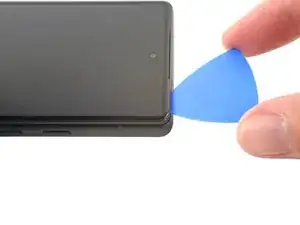
    • While still applying suction, pivot the pick upwards to a steep angle.

    • Carefully push the pick in while prying to reposition the opening pick into the bezel seam.

    • Only insert the pick up to 3.5 mm to avoid damaging the internals.

  5. fm3oG32vJ2EEBhuc
    fm3oG32vJ2EEBhuc
    gBarY33TTTBZCBZS
    T1RrWIEZYKqCKLue
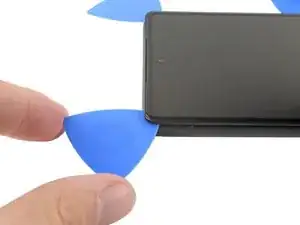
    • Slide the pick along the right edge to release the plastic clips securing the bezel to the frame.

    • Position the pick at the top-right edge before moving to the next step.

  6. dfU45x4Vk5SuSwn1
    dfU45x4Vk5SuSwn1
    GEBiXPOdSYHlB2oP
    QbSiwkPDRt5wPR2F
    • Rotate the opening pick around the top-right corner of the phone to release the clips.

    • Leave the opening pick in the top-right corner to prevent the clips from re-locking.

    • Only insert the pick up to 4 mm to avoid damaging the internals.

  7. MsjU6gcvUNhlBLuU
    MsjU6gcvUNhlBLuU
    LUT1jGbhZPrJ4FFO
    FL2DT6sQmAqd2TjO
    • Insert a new opening pick into the gap you just created.

    • Slide the pick along the top edge to release the clips.

    • When slicing around the front camera, only insert the pick up to 3 mm to avoid damaging the lens.

  8. NkLX4XJsx4UEFs6e
    NkLX4XJsx4UEFs6e
    yHuNMCvi4SaACvqa
    odm622mGQ4Njy6KU
    • Rotate the opening pick around the top-left corner of the phone to release the clips.

    • Leave the opening pick in the top-left corner to prevent the clips from re-locking.

  9. NLdAYs426UBCVRRt
    NLdAYs426UBCVRRt
    LKjkWexcYPlXuaoI
    rOTvEBRGLhXVPsqb
    • Insert a new opening pick into the gap you just created.

    • Slide the pick along the left edge to release the clips.

    • Only insert the pick up to 3 mm to avoid damaging the internals.

    • Repeat the rotating and sliding procedure for the remaining edge.

    • At this point, the screen should be separated from the frame. If there's still resistance around the edges of the screen, use an opening pick to release any remaining clips.

  10. BwXKiaQCfotybFTs
    BwXKiaQCfotybFTs
    1R1JaSBgkHIBHQ21
    sxfrVYeyPct14MLK
    • Don't try to remove the screen all the way yet. It's still connected to the frame by a flex cable.

    • Lift the right edge of the screen up and towards the left side of the device, like opening a book.

    • Rest the screen upside down and parallel to the frame before continuing.

    • Don't twist the screen or move it too far away from the frame to avoid damaging the flex cable.

  11. 4aDiGqShEoknkpOW
    4aDiGqShEoknkpOW
    OAULhXU5sTSSnHiC
    nUiacYiY3BDiH12K
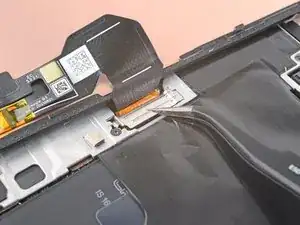
    • The display cable bracket is secured with metal clips.

    • Use tweezers to bend the left side of the bracket upwards, releasing the metal clip.

    • Remove the display cable bracket.

  12. 3L5D4qAJI4iQK3yD
    3L5D4qAJI4iQK3yD
    ylWfImyWZSXKtZTw
    • Use a spudger to pry up and disconnect the display cable's press connector.

    • To re-attach press connectors like this one, carefully align and press down on one side until it clicks into place, then repeat on the other side. Do not press down on the middle. If the connector is misaligned, the pins can bend, causing permanent damage.

    be incredibly careful when removing and installing the cable, the many tiny components along the edge and under the tab are incredibly fragile. This is one of, if not, the most important step.

    Jeffrey Leon -

  13. V1xthfC5ChONrdSh
    • You're now left with the screen.

    • During reassembly:

    • Follow this guide to reapply adhesive to the screen.

    • Be sure to remove all adhesive liners from your replacement screen, including the front-facing camera recess.

    • Perform a fingerprint sensor calibration.

    • If you're having trouble performing the calibration, you might need to download the Google USB Driver.

Conclusion

Compare your new replacement part to the original part—you may need to transfer remaining components or remove adhesive backings from the new part before you install it.

To reassemble your device, follow these instructions in reverse order.

Repair didn’t go as planned? Try some basic troubleshooting, or ask our Google Pixel 6a Answers community for help.

Alex Diaz-Kokaisl

Member since: 16/01/22

54801 Reputation

14 comments

How do I glue the new screen to make it waterproof.

Brenda Holt -

My screen replacement of my 6a was a success. Thank you IFixit :) Very good kit with good tutorial :)

fpoulin1 -

Just replaced the screen and it is a GREAT REPLACEMENT. Only issue is the fingerprint reader isn't working. Issue is with google NOT this replacement screen. I haven't been able to find a solution. Even when trying to install google's "Install fingerprint calibration software". I have an appointment with "Ufixit" to see if they can resolve it. Google's tech said it isn't a common issue but just wanted to share my experience.

Also...Install steps only show how to take the screen off. Steps to install would be helpful because there are some tips to aligning/applying the adhesive that would be helpful to consumers.

Jon Holland -

In the end I was able to get everything working. BUT, there needs to be a reassembly process. I was finally able to make it work, but it isn't terribly intuitive. Just simple instructions for the adhesive like this side down and peel this first, etc. would be really useful. I ended up with incomplete adhesion (and thus incomplete water resistance) because the adhesive failed to easily remove from the backing. I'm sure it's because I did something wrong, but I was on my own for this part.

Likewise, the fingerprint reader recalibration is very poorly documented on Google's site, requiring that you hop around until you click the right places to download the right USB drivers, unzip them, navigate through Windows device manager, install new drivers, and then finally complete the process of resetting the fingerprint reader. Took me almost an hour of cursing to get this working (heck, took 15 minutes just to get it to the fastboot screen...very finicky).

Anyway, good first 15 steps. Just wish there were 30 or so.

Paul York -

Replaced my screen successfully but as Jon and Paul pointed out there is a number of things I wish I knew / understood during the repair :

## Backup your phone (mandatory)

- Fingerprint calibration will require that you reset your phone so back it up now.

## Screen adhesive

- Buy some screen replacement glue (B7000 glue or B7010 adhesive)

## Fingerprint reset

- On first boot everything will be fine EXCEPT the fingerprint reader that need "unrollment"/calibration.

- A QRcode link is printed on the new screen but use the link provided by ifixit in the introduction of this repair (https://pixelrepair.withgoogle.com/udfps)

- Before you install the software on the pixel you will need a computer and the right USB driver : search "Google USB Driver" or go to https://developer.android.com/studio/run...

- Once you have completed the procedure on pixelrepair.withgoogle.com the fingerprint reader still won't work

- You need to reset your phone to factory settings (be sure to back it up before)

- Voilà

Laurent A. -

i cannot get my volume up rocker to work. I have cleaned out the phone with compressed air and inspected the button. I am not sure what to do.

nick peloquin -

For anyone wondering - you can replace the screen, "install" the fingerprint calibration software at https://pixelrepair.withgoogle.com/udfps and restore full functionality of the fingerprint reader in the replacement screen WITHOUT needing to wipe/reset your phone. The google tool even says as much, but I wanted to confirm that, for me, it indeed did not require a device data wipe.

Jason Harper -

I just received my repair kit this morning. Took me less than 30 minutes following the instructions you guys gave was spot on. I haven’t seen my wife smile so big in a long time. Thanks I fix it. Will be coming to you from now on 10 out of 10.❤️🙏👍

Kenneth Higgins -

I got the screen for PIxel 6A and I have no skills in replacing a phone screen. The instructions on this page were helpful. The suction cup was not helpful.

What I learned:

If you can't get under the screen, then a pocket knife works good to wedge under it and pry it up.

If your phone is on, but the screen it not lighting up/working, then you need to really push the connector into the phone. If it's loose, then it's not going to send a signal. You shouldn't be depending on the bracket to hold the connector in place.

The items I found useful in the tool kit were the tweezers, the picks, and the alcohol prep pad. I probably should have cleaned the old glue away better, but honestly my phone is in a case, I think it will be alright.

Amelia Richards -

The instructions should have contained reassembly instructions. And some more options for removing the screen, especially when it's shattered. The suction cup did not work, the packing tape I had wasn't strong enough. Eventually got it with duct tape. Also some instructions or video on how exactly to hold the phone while pulling with the suction cup would be helpful. That was rather tricky. I needed three or more hands which I was unable to sprout on short notice.

Saif Ahmed -

Make sure you remove the small protective film over the selfie-camera hole (if there is one) or your selfie camera will be waaay out of focurs.

Sam Robertson -

Comment to above: It's a small white piece of fabric tape about 1/2 inch long over the camera and onto the back of the display. Note that there is something that looks like a bigger neater piece of tape on the bottom and you shouldn't pull THAT off - its also on the back of the old display so you can just compare that two and pull the single piece of tape off over the camera on the new display as explained above to make them look similar.

Sam Robertson -

I can't complete this repair...I have two problems:

1. I can't get the bezel to come away from the screen enough to fit an opener in. I heated the screen for up to 10 minutes with the iOpener and it does not seem to get hot enough or I am not able to get enough leverage to pull the screen away from the bezel. The phone is only weeks old, not sure if newer or older is supposed to make this more difficult.

2. There should be specific instructions on applying the adhesive and replacing the screen, the "just do everything in reverse" doesn't seem very helpful here. This doesn't seem as straight forward as that.

Andrew Kulp -

Great tutorial, I have experience replacing other screens and doing such repairs so the tutorial was easy and t the point. I had the toolkit from a few years ago and it worked flawlessly, had to heat the adhesive a bit first to get the device to open, all went smooth after that. Thank you!

beriisrude -