Introduction

This repair guide was authored by the iFixit staff and hasn’t been endorsed by Google. Learn more about our repair guides here.

Use this guide to remove or replace the screen on your Google Pixel 5a.

For your safety, discharge the battery below 25% before disassembling your phone. This reduces the risk of a fire if the battery is accidentally damaged during the repair. If your battery is swollen, take appropriate precautions.

  1. fX42PHSMxaPL3GMb
    fX42PHSMxaPL3GMb
    6jVUHksrsjD6AYrP
    • Be sure to turn off your device before you begin the repair.

    • You'll need to pry the screen up to remove it from the phone. Read the following notes carefully before proceeding.

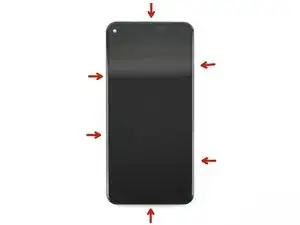
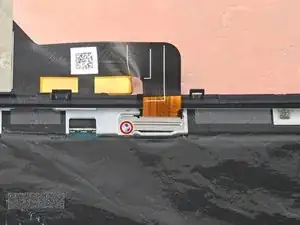
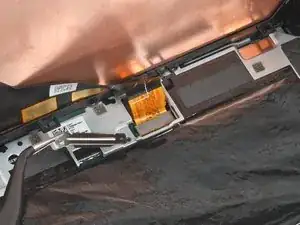
    • Take note of the two seams on the edge of the phone:

    • Screen seam: This seam separates the screen from the rest of the phone. Do not pry at this seam.

    • Bezel seam: This is where the plastic bezel designed to protect the screen meets the frame. It's held in place by plastic clips. This is where you should pry.

    This will be clear if you examine your replacement part first.

    bcling -

    True, but one may be disassembling the device prior to receiving their replacement 😉

    Niels Klassen -

  2. GZIYSPIQxNHkQ6Yr
    • Apply a heated iOpener to the right edge of the display for one minute to soften the adhesive.

    • Depending on the strength of your device's adhesive, you may need to reapply the iOpener multiple times in order to weaken it enough.

    • A hair dryer, heat gun, or hot plate may also be used, but be careful not to overheat the phone—the display and internal battery are both susceptible to heat damage.

    Use the full length of the iOpener to soften the adhesive on the right edge and top or bottom. My repair required three applications of the iOpener.

    bcling -

    I needed about 4 applications of the iOpener before the adhesive was weakened enough to stick the opening pick in.

    Ibukunoluwa Amusan -

    Do you have to wait 10 minutes between each application?

    Joey -

    I heated the iopener twice for 30sec (weak microwave) then applied for a couple minutes without success. Then reheated iopener for 30 more sec. Then used the blue tool supplied in kit to help push down on bezzle and that did the trick to separate enough to get the picks in.

    Ilya Pittel -

  3. 5DUi2kWQhyIOgxBE
    5DUi2kWQhyIOgxBE
    1xEVsm3hjC1fXsQZ
    • To remove the screen, you'll need to insert opening picks in between the black clips that secure the bezel to the midframe.

    • Note the optimal points of entry before proceeding.

    Use an old credit card or hotel key card to provide additional thickness and leverage to pop the bezel off.

    bcling -

  4. GZ1fbKOGAqkxKTIf
    GZ1fbKOGAqkxKTIf
    SSCqlsTeddwiTGRV
    • If your display is badly cracked, covering it with a layer of clear packing tape may allow the suction cup to adhere. Alternatively, very strong tape may be used instead of the suction cup. If all else fails, you can superglue the suction cup to the broken screen.

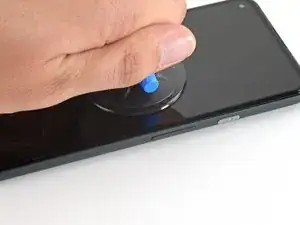
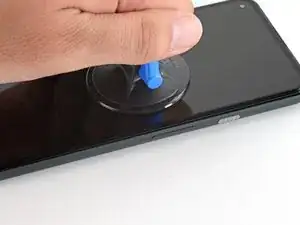
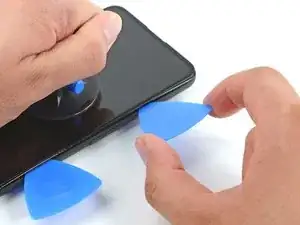
    • Place a suction cup as close to the right edge of the screen as possible.

    • Lift the suction cup with a strong steady force until a small gap forms between the bezel and midframe.

    Do we use the suction cup before inserting the picks? After applying the I opener 3 plus times, I am having difficulty removing the broken screen. Any tips?

    William Maniss -

    This was the most difficult part. What really helped was putting a piece of packing tape on the screen. It has to be wider than the suction cup. If there is any hint of a crack where the suction cup is located, it will not stick. I had to warm the right side and the top a couple of times to get the screen to give a little bit. It will only give just a little bit and you have to to slide the pick in with more force than I was comfortable with.. It really would help to have a third hand to hold the phone, pull the suction cup and the other to slide the pick in. I had to use my ring finger to apply force to the suction cup and with the same hand slide the pick between the phone and the screen. After this step it was easy peasy!

    Dustin Ashberry -

    Agree this was the hardest part. I heated the right edge of the phone multiple times with the iOpener before the glue was soft enough to flex. My screen only had a crack, was not shattered. I had to wet the suction cup to get it to hold strong enough to pull up to open a gap to insert the pick. Once the first pick was in, heating the other edges and moving around the phone was fairly easy.

    Lisa McManis -

    The screen itself has a large lip that makes it harder to insert the picks. what worked for me was pulling up the screen just enough to insert the pick slightly. next I rotated the pick towards the phone and pushed it down (the phones chassis has a bezel that will catch the tip so you can use a bit more force). Once the pick is inserted like that you can rotate away from the phone, pulling up the screen easily.

    Mason Tate -

    Ended up using Gorilla tape on the screen, a more powerful suction cup from a windshield phone mount, moving it back 1/2 inch from the edge so the tape wouldn't peel from the edge when I pulled.

    Scott Chaney -

    You definitely need a third hand to get the pick in, have someone nearby to help if possible.

    This is the step that requires the most energy.

    Ibukunoluwa Amusan -

    This was by far the most difficult part of the repair hands down. I heated the phone several times before the adhesive softened enough to stick a pick in

    Niels Klassen -

  5. asHyCDKsG4yji5Fe
    asHyCDKsG4yji5Fe
    jUNOIOHOXGBaNKZl
    • The bezel is connected to the midframe by a series of plastic clips which can be detached by inserting an opening pick at points all along the seam.

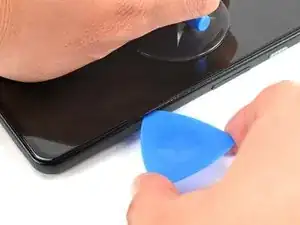
    • Insert the tip of an opening pick into the bezel seam about 4-5 cm from the bottom of the phone.

    Angling the opening pick downward helped with the initial opening

    barely_diy -

  6. mS2wgYAtWH4DdKMW
    mS2wgYAtWH4DdKMW
    fZhjnvKUSrtCg4rZ
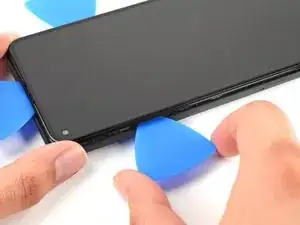
    • Insert the tip of an opening pick into the bezel seam about 3-4 cm from the top of the phone.

  7. 3JuiDEjApfsvZMyY
    3JuiDEjApfsvZMyY
    5o3k6kB1WhiBnrUG
    • Insert the tip of an opening pick into the bezel seam at the top of the phone.

    • If this step proves difficult, slide the pick along the top right corner of the phone until there is enough of a gap at the top for the opening pick.

  8. DwlHOpRXErlgGARH
    DwlHOpRXErlgGARH
    jxBHgsEXpF5lFNht
    • Insert the tip of an opening pick into the bezel seam at the bottom of the phone.

    • If this step proves difficult, slide the pick along bottom right corner of the phone until there is enough of a gap at the bottom for the opening pick.

  9. 16NYBGQThq6OQYWF
    16NYBGQThq6OQYWF
    uXfBAHoMTjEiJwr1
    • Insert the tip of an opening pick into the bezel seam on the left side of the phone, about 2 cm from the bottom of the phone.

  10. XKFXWfI3ITIMXgNq
    XKFXWfI3ITIMXgNq
    qhZkNuNgUFReXQqH
    • Insert the tip of an opening pick into the bezel seam about 3-4 cm below the front-facing camera.

  11. IwDnYZSfsesPABtr
    IwDnYZSfsesPABtr
    pABb1qrEZjBGAVUO
    IuGC2HDdXdKxPQgC
    • Be sure to detach all the clips. Slice through any remaining adhesive with an opening pick.

    • Open the device from the right side like a book.

  12. bn2XsPBnxwGGDFwk
    • Use a T3 Torx driver to remove the 4.6 mm-long screw securing the screen connector bracket.

    • Throughout this repair, keep track of each screw and make sure it goes back exactly where it came from.

    There is just this one screw.

    bcling -

  13. EEhHcXvoBwWPeKwE
    EEhHcXvoBwWPeKwE
    rOTkyQT1VnH4eMYM
    • Use a pair of tweezers to remove the screen connector bracket.

  14. XQFGXqnTUPrFtPYl
    XQFGXqnTUPrFtPYl
    VjciX1nAWKBhhJxS
    • Use the tip of a spudger to pry up and disconnect the screen flex cable.

    • To re-attach press connectors like this one, carefully align and press down on one side until it clicks into place, then repeat on the other side. Do not press down on the middle. If the connector is misaligned, the pins can bend, causing permanent damage.

    This was the most tedious part for me when reassembling. I used the gold colored corners on the board to line up the connector. Also, I recommend using your finger and not the spudger for pressing down when you reattach (even if you don't have small hands); this helps you feel the slight click when it's in place.

    Additionally, you can use the suction cup as a sort of kickstand so you have enough ribbon cable to work with (because there's not a lot.)

    Lol No -

  15. QD4rdj6JKP6NgSL6
    • Remove the screen from the phone.

    • If you are using a custom-cut adhesive, follow this guide to correctly apply new screen adhesive.

    • If you are using Tesa tape to reattach the screen, follow this guide.

    • During the boot-up process after reassembly, the screen will go through a calibration sequence. Do not touch the screen during this process, as it could result in improper touch calibration and create touch issues.

    The ribbon connector is a little tricky to attach to the pcb. Just be patient with the spudger and it will connect. The precut adhesive strip is such a nice touch for finishing the project.

    Dustin Ashberry -

    I also struggled with the ribbon connector. Be patient. It is hard to see the alignment so is done by feel and some outline guides on the pcb. I plugged in the new screen, tested by powering up the phone, then unplugged the screen to install the pre-cut adhesive. There were no instructions with the pre-cut adhesive sheet. First remove EVERY trace of old adhesive. I used the spudger plus isopropyl alcohol on a lint free wipe. Once the old glue was gone, I aligned the pre-cut adhesive with the clear plastic side down, folded down about 1", confirmed my alignment, then pulled on the clear plastic and secured as I removed the clear liner. Then I removed the large blue plastic liner, then there was a very small blue pull tab that exposed the top sticky side of the adhesive. Carefully pull on that to removed. Be sure to re-install the metal latch and screw over the ribbon connector before snapping the screen back onto the phone. I forgot it and had to re-open the phone. Face-palm!

    Lisa McManis -

    Custom cut adhesive is great. No instructions.

    Do not reattach the ribbon cable before applying the adhesive.

    Check the alignment of the adhesive with the clear plastic down.

    Carefully remove the clear plastic. This can be done all at once or gradually starting at the bottom of the phone.

    Apply the adhesive starting at the bottom of the phone pressing the adhesive in place and rechecking alignment as you go.

    Once the adhesive is in place, press the adhesive down again.

    Remove the blue plastic using the tabs at the top and down each side.

    Reattach the display cable by pressing the connector down from one side and then the other. The alignment of the connector is difficult since it is not visible, but starting at one side makes alignment easier.

    Reinstall the connector retaining plate and screw.

    Remove lens and connector tape from the top of the new screen

    Reinstall the screen and press down firmly on all of the edges making sure there are no gaps around the bezel.

    Power on without touching the screen to calibrate.

    craig potts -

    Precut adhesive is installed in 3 steps:

    1. Place adhesive before attaching cable. Remove clear plastic from adhesive and align with phone. Place adhesive onto phone using camera hole as starting point. Make sure blue plastic is properly aligned with edge of phone around entire perimeter

    2. Once adhesive is aligned and fully on, remove blue plastic starting from top right corner. A rectangular tab there can be lifted and used to remove blue plastic. Thin blue plastic strip will remain on adhesive after removing blue sheet. Leave it on to prevent damaging adhesive while screen is being installed

    3. Attach screen cable and retaining clip. Remove thin blue plastic strip starting from bottom. Two tabs there can be used to get started. Align and attach screen

    When attaching cable, hold screen perpendicular to phone with screen facing bottom charging port. This will give the cable more slack to work with. Two corner outlines are printed next to the plug on the phone that can be used to help with cable alignment

    barely_diy -

    The display connector's snaps are quite weak and will come undone easily. The connector's bracket seems to be the only thing keeps it in place. Try to get the connector to snap in as best you can (as others have said it's about feel) then install the bracket to lock it down. Lastly, the ribbon cable is fragile but it can be gently bent to help with installation. I bent mine outwards around 120 degrees and had no issues.

    Mason Tate -

Conclusion

To reassemble your device, follow these instructions in reverse order.

Take your e-waste to an R2 or e-Stewards certified recycler.

Repair didn’t go as planned? Try some basic troubleshooting, or ask our Google Pixel 5a Answers community for help.

Compare your new replacement part to the original part—you may need to transfer remaining components or remove adhesive backings from the new part before you install it.

Clay Kim

Member since: 16/02/21

5772 Reputation

14 comments

Thank you, this was useful for removing the screen from my device without damaging it further! With the invisible fasteners, a guide like this is invaluable for knowing where the latches are and how to get to them.

As a guide for replacing a screen, there are a few other things worth mentioning:

• Is it necessary to remove the old gasket ("adhesive film")?

• How do you apply the new display adhesive, the one that comes on a blue card? Do you need to do that before re-attaching the new screen cable? Why are there cut-outs in the blue card that mostly match the positions of contacts on my device, but not entirely? Do I remove it before closing the device?

• In addition to a couple pieces of tape, the replacement screen also comes with a small piece of film protecting the camera area. Do pull it out by the small red tab before re-assembly.

• Any other tips for reattaching that press-fit board-to-board connector? Should I really expect it to click into place? It took me many tries to get that aligned and secured!

keturn -

1. Depends on what you mean by "Necessary," but it is recommended

2. In Step 15, there is a guide linked for custom-cut adhesive; follow that one.

Yes, before you reconnect cable.

I don't know what the cutouts are for, but you will remove the blue card anyway after applying the adhesive to the frame. The important part to line up is the adhesive to the frame; the blue card doesn't matter beyond that.

And yes, you will remove it before closing the device.

3. Didn't see that. I hope my device's camera works. I'll check that now.

4. Reconnecting this was the most tedious part for me. I used the gold colored corners on the board to line up the connector(you can see these in the picture for step 15. Also, I used my finger and not the spudger for pressing down when reattaching (and I don't have small hands); this helps you feel the slight click when it's in place.

Also, you can use the suction cup as a sort of kickstand so you have enough ribbon cable to work with (because there's not a lot of it.)

Lol No -

Literally went step by step by this guide and repaired my own Google pixel 5A phone. If you purchase the entire repair kit for the Google Pixel 5A you have essential every tool you'll need. I will recommend ordering screens for this phone here from this website.

Tomas Serrano -

Muy buen tutorial, hay que mejorar la parte donde se coloca el adhesivo ya que no lo explica pero el resto esta muy bien. demore 30 minutos en remplazar la pantalla.

Lucho -

Good guide but agree with keturn that it would be great to have more tips and reminders for replacing the screen.

I mostly figured it out, heres how I did it:

- I removed the old adhesive, and tried to scrape and clear it all.

- next I attached the new adhesive before connecting the screen cable since I figured it would be hard when its attached. I did try to make sure to press all along the adhesive with tweezers to set it. I left the next set of backing on to minimize the time the adhesive is exposed (avoid dust or me touching it)

- then I attached the connector. This was a little difficult, but also not very experienced with this.

- then I removed the adhesive backing and closed it up right after. I used rubber bands (3 across and 1 down the middle) to clamp the screen and put some books on it as much as I could over the next day.

Sid Kundu -

I added instructions in the comments about installing the custom-cut adhesive. Please feel free to edit them and add them to the step-by-step instructions.

This is my first phone repair since the days of removable batteries, but your parts, tools, and guide were fantastic.

craig potts -

It was half the price to replace the screen myself than taking it to Assurion. It is so empowering fixing your own devices, and I got to know my device a bit better too. Thank you iFixit! Bless the Right to Repair movement!

Alex Jacobson -

First of all, a very well made tool kit and package by ifixit team; very impressed. I followed the instruction and managed to remove the cracked screen. But when tested the new screen, nothing came up. When pressed the power bottom there was only a short vibrate. I tried to connect the old screen (it was working with cracked glass) and it didn't turn on. Does anyone know the issue here?

JoHF -

This guide and the associated parts (screen, adhesive, and tools) work with the pixel 5a 5g as well.

Mason Tate -

Good guide, but it would be nice if the adhesive was included when buying just the part, so I don't have to get tools every time. I thought the adhesive would come with the screen but I only realized after I removed the old adhesive.

Yusef -

Kit had everything needed and instructions covered it well. Other than it being tiny parts to work with, it was actually quite easy and after shipping still saved $60 over having it fixed at a local store. If I'm in need again, I'll definitely buy again. Thanks!

tailwheelcfi -

Top-notch equipment and instructions! Only difficulty I had was getting the screen off. Ended up using Gorilla tape on the screen, a more powerful suction cup from a windshield phone mount, moving it back 1/2 inch from the edge so the tape wouldn't peel from the edge when I pulled. I didn't use the adhesive layer cutout as the clips seemed to be enough.

Scott Chaney -

This is a life saving site, I mean it! Can't believe that I could fix my own screen, first time ever trying that.

Thanks iFixit!

Ibukunoluwa Amusan -

Replaced my screen using this guide tonight. Took about 45 minutes, with the most time consuming part being removing the old adhesive. Great guide and great parts from iFixIt!

Bradford Strom -