Introduction

This guide will show you how to replace the trigger in a Dyson V11 Torque Drive vacuum cleaner. Since the trigger is made of plastic is it easily breakable. If the trigger on your Dyson V11 Torque Drive is broken then it will not start vacuuming. Even if the battery is fully charged, the Dyson V11 Torque Drive will not start vacuuming. Once you replace the trigger the Dyson V11 Torque Drive vacuum should be operational agin and it will start vacuuming.

Tools you will need to replace the trigger on the Dyson V11 Torque Drive vacuum are a Phillips #1 screw driver, Phillips #0 screw driver, and a spudger.

  1. GjFY5tOxoEhJfYwb
    • Remove the four screws beside the battery indicator with a Phillips #1 screwdriver.

  2. qOT6w4tUI2WGhuKy
    • Remove two screws next to the handle using a Phillips #1 screwdriver.

  3. WHZi2pCJvJm5nDuo
    • Separate the handle and the front end of the vacuum cleaner.

  4. DafmKoDds5lXIsvC
    • Remove two screws from the protective case covering the circuit board using a Phillips #0 screwdriver.

    These screws were Torx #7 instead on my Dyson V11

    Lenno -

    Same for me.

    Beth Romanelli -

  5. UctQyjDigS4DwF5V
    • Take the plastic protective case off.

  6. dsrtsI4ehtFSQvGM
    • Remove the single screw from the motherboard using a Phillips #1 screwdriver.

    These screws were Torx #7 instead on my Dyson V11 and bth need to be removed and the pins plied back.

    Lenno -

  7. yDa552GTij2diQRU
    • Remove the center part from the outer shell.

  8. qGlZBjLMHsNtECQQ
    • Remove the single screw inside the charging compartment with a Phillips #0 screwdriver.

    This screw was Torx #7 instead on my Dyson V11

    Lenno -

  9. 3pSvuZNberXpZuvj
    • Remove two screws with a Phillips #0 screwdriver.

    These screws were Torx #7 instead on my Dyson V11 and you need a very short screwdriver/ratchet or a flexible bit attachment.

    Lenno -

  10. DCVOUUxZ4JPvFIUS
    DCVOUUxZ4JPvFIUS
    no1SLBFrge4cJEMD
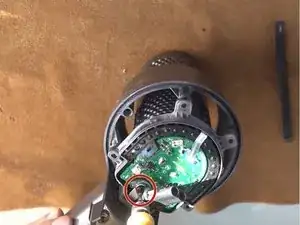
    • Use a spudger to push the part marked in the image to remove the trigger from the charging compartment.

Conclusion

To reassemble your device, follow these instructions in reverse order.

Beicheng Zhu

Member since: 15/01/22

205 Reputation

0 comments