Introduction
Very basic tutorial on how to open up the Nook Glowlight plus(2015, not the identically named 7.8" 2019 model). Capturing a bit more detail than what you would find on the current youtube clip showing battery replacement. I opened mine due to the power button being stuck. Will go over how to remove the screen safely and how to remove PCB and battery.
-
-
To open device use spudger/Credit card. Begin opening by freeing the right side, starting either the upper right or lower right side.
-
The screen is held on by 2.5mm of adhesive throughout, Check out third picture with the screen removed to see adhesive strips.
-
Watch out for backlight and data cable located in upper left behind screen.
-
Run spudger/card through Right Side, Top Side and Bottom side. After you have cleared these, pry screen open with the left side acting like a hinge..
-
With the device partially open, 3 Connections need to be removed. Remove the ribbon cables by pulling up on the black bar from the opposite side, this frees the ribbon cable.
-
From top to bottom the cables are backlight, screen, & touch. Pretty cool to see the display locked on last image after you remove the screen cable. Consider converting to art hanged e-ink display before junking in the future :)
-
After removing 3 ribbon cables, partially close screen and finish freeing the last left side of the screen from the adhesive strip. After free screen will pull off.
-
-
-
Battery connecter is clipped in, pull straight out to remove Battery from PCB.
-
Battery itself is connected to metal housing via adhesive pad. The housing is milled aluminum, safe to scrape aluminum, be mindful of LIPO pillow battery. 2 Methods to remove adhesive, attempt with PCB in, or remove PCB first.
-
Removing PCB first is easiest method as it gives more leverage/room to cut LIPO adhesive.
-
Remove nook button (2nd Picture) Remove 2 phillips screws, The remove ribbon cable by pulling up on black bar then can remove full botton.
-
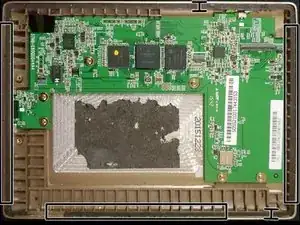
Unscrew 6 phillips 0 screws on PCB
-
Be mindful of battery (interfering some removal) as well as 2 plastic nubs holding board in place Then left up on Top of PCB gently, to Remove PCB slowly free from plastic clips, wiggle slowly and pull up, may need to move battery cable, or push on LIPO pillow to free obstruction of PCB removal. The whole board will lift up and out.
-
If Removing Battery with PCB in place (Battery replacement) Attack from Right side of device and bottom Right. Thin Metal spudger with force downard against aluminum is safe. The back adhesive is a soft pad about 1mm thick. This large pad covers nearly all of battery (3rd picture). It cuts rather easy, thinner spudger best to limit battery flex.
-


To reassemble your device, follow these instructions in reverse order. Water proof no more. Could replace adhesive strips to re-enable if you so desire.
My issue with the power button stuck I resolved by completing removal of PCB, Then Cleaning the button. I ended up adding card stock (2/3 fold accordiong style) between PCB and housing to give more push back from button after engagement with PCB toggle. I did not place card stock in path of button to pcb toggle, rather I placed it on base of pcb above and below to help retraction. This fixed my issue. Best of Luck!