Introduction

This guide shows how to remove or replace the battery of your Vivo FlipBook 14

  1. wyTZTQaSXBUwIKsP
    wyTZTQaSXBUwIKsP
    YlYyWP2V53NJDlK3
    • Unplug the laptop, power it off, and turn it over.

    • Remove the four long screws, marked in red, and place them aside.

    • Remove the six shorter screws, marked in orange, and place them aside as well.

    • If you have trouble keeping your screws in order, use a flat refrigerator magnet, and place them in the locations you pulled them from.

  2. UaLhB1RnZStTrxfD
    UaLhB1RnZStTrxfD
    ijvhCbVk2EjI1Y4R
    4YWrKJdZdTNasAKX
    • Starting from the power button area, insert a flat pry tool between the side and back of the laptop, and lever the back away from the rest of the case.

    • These photographs show a metal pry tool, but a plastic tool or spudger is preferred to avoid shorting the electronics inside.

    • Continue around the rear (hinge side) of the laptop, ensuring that you insert the tool at the proper seam.

    • Once the sides and rear clips are pried free, the back can be gently swung away to unclip the front of the back.

    • Ensure that you do not insert your pry tool too far into the case, particularly under the front area, to avoid damaging the lithium battery. Puncturing, deforming, or scratching the battery could cause it to leak or explode.

  3. qQyY5Yqyii25okBX
    qQyY5Yqyii25okBX
    h3LdFh6QsQADSaJk
    etCVEOKsFcYCfHFN
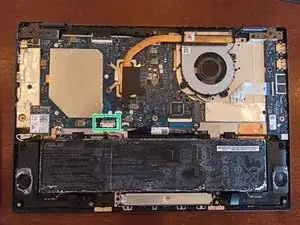
    • Our focus is on the battery connector, highlighted in green. The connector plugs in perpendicular to the motherboard - straight up and down, rather than sliding to one side.

    • Using a plastic spudger, slide the metal retaining clip away from battery, about 2 or 3mm.

    • Then, using a spudger under either side, lift the white plastic battery connector up and away from the motherboard.

    • Ensure that the white battery clip cannot make contact with any other electronics by bending the wires up and out of the way.

  4. tiFhKGhPUZoPqPDi
    • Remove the four screws holding down the battery, and lift it from the laptop case.

    • The battery has no adhesive or tape holding it in place, only the four screws.

    • Do not bend, twist, or otherwise deform the battery. Damaging the battery could cause it to leak or explode.

    • Reassemble by following steps in reverse order.

    • Excess force is not required to hold laptop screws in place, as they usually have blue-colored thread-locker on them; a gentle snug fit is all that is needed.

    • To avoid case damage, ensure that the proper length screws for the laptop back are inserted in the proper places. Refer to Step 1 for a diagram.

Andrej Walilko

Member since: 01/04/21

302 Reputation

0 comments