
Introduction
The following steps will help you replace the fan on Asus GTX 750 graphics card. This repair applies to broken fan blades or a non-functioning fan unit on the graphics card.
Tools
-
-
Before starting the procedure, make sure the workspace is neat and clean so that parts of the case do not go missing.
-
Put the case in a position such that the power button is on your right corner. Next, push the top panel’s ridgeline away to slide the case off. Similarly, continue this process to lift off the side panel’s case that was facing you.
-
-
-
For this step, we will disconnect the GPU cable. We will do that with our thumb and index finger which will unhook the hooking device. Later, we can pull the cable away from the case.(However Asus GTX750 is powered only by the motherboard, so we will skip this step on this model)
-
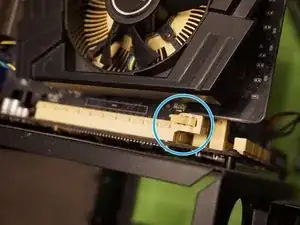
On the PCIe slot of the graphic card, you will see a release mechanism that you should push gently and carefully. After pushing it down, you will hear a clicking sound which signifies the correct release from the motherboard. Be careful and don’t touch the motherboard with your hands as it may cause a short.
-
-
-
Finally we are working on the GPU unit.
-
Disconnecting 4 pins fan power/speed control cable from the circuit board.
-
-
-
Remove the 4 small screws holding the fan shroud in place by using a (Phillips #00) screwdriver between the fan blades and supporting bracket
-
-
-
locate the 2 clips of the fan shroud on both sides and pull them slightly to the side to release it straight up from the heatsink
-
-
-
Congratulations!! you have finished the hardest part and now we will be reversing the disassembly process to fit our new fan shroud replacement back on the unit
-


To reassemble your device, follow these instructions in reverse order.
