Introduction

  1. VLqahZFftOnu1pka
    • Remove the 10 5mm silver screws on the back panel.

    • Remove the back panel.

  2. DWihvYtgqKFHkAE5
    • Remove the black wire to the audio card.

    • Remove the white wire connected to the audio card.

  3. UkJnHWGrjKJbXbrl
    • Remove the 4 - 2.54mm black screws on the battery and speakers.

    • Lift the battery out of the laptop

  4. DX4Sip6uX1a2qcZa
    • Remove the black strips connecting to the display at the top

  5. 4YPpQl4CLrNjBk5B
    • Pry open the white gate and then remove the connection with the blue strip.

  6. PLPNwKdhNS1BNcYl
    • Pry open the black gate and then remove the connection with the blue strip.

  7. xglXBNeH6PVGk5Ov
    • Pry open the black gate and then remove the connection with the brown strip.

  8. yearmRwD2AEawJZp
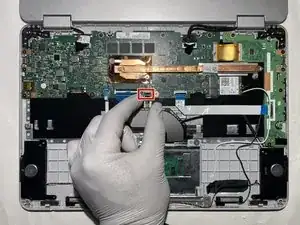
    • Remove two silver screws located in the middle of the motherboard that’s holding down the heat sink copper tab.

    • Remove the heatsink from the motherboard.

  9. GnSn5qAYPJkjFq16
    • Remove eleven 2.5 mm screws from motherboard/daughterboard.

    • Remove four 1.3 mm silver screws from the bottom of mother/daughterboard.

    • Remove the motherboard and daughterboard.

  10. FNWKm2op6btyJtBW
    • Remove six 2.5 mm black display screws on both left and right side of the picture

  11. 1pCrcOludDYGAMDl
    • Remove the two 2.5 mm screws that secure the speakers.

    • Remove speakers.

Conclusion

To reassemble your device, follow these instructions in reverse order.

NICKO SANTOS SALEM

Member since: 03/10/22

529 Reputation

0 comments